Window boxes are a great space saver and an easy way to add color and beauty to the outside of your home. They come in hundreds of colors and architectural styles, and for budget-minded, do-it-yourselfers, typing "free window box plans" into any search engine will result in hundreds of free plans. Here are some things to consider before you buy, build or install window boxes.
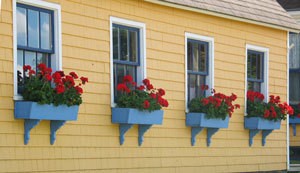
There are several things to keep in mind when buying or building window boxes. To keep with your home's architectural integrity, select a style of window box that will compliment your home's exterior. A Victorian era planter made from wrought iron, for example, will look garish on a contemporary home with sleek, modern lines. Dark colored boxes and boxes constructed from metal can heat up quickly and damage plants if your window gets a lot of sun. As a general rule, choose simple designs and solid colors to compliment your home's exterior and the plants inside the box, not distract from their beauty.
Window boxes tend to look best if they are slightly wider than the window they are placed under. A standard box is about 3 feet long, and should be not less than 4 inches wide. Proportionally, try to select a box that is approximately 20-25% of the height of your window. If you have shutters, window boxes should be long enough to reach the mid point of each shutter or extend at least 2 to 3 inches past them on either side.
Window boxes should be anchored securely to the windowsill with heavy-gauge wire or hooks. Install "L-shaped" or other mounting brackets on the bottom front of extra long boxes and screw them directly into the wall. Window boxes under very narrow window sills should be mounted to the wall with brackets fastened to the bottom or back of each box. Make sure to mount the box in such as way that it remains easy to access for removal and maintenance.
If you live in an apartment where your window boxes will be mounted on a railing above a downstairs neighbor, fasten a piece of rain gutter to the bottom of the window box to divert water away from dripping onto your neighbors terrace. An alternative is to place the window box into a deep drip tray to catch draining water.
Fill your planter box to within an inch of the top with a mix that contains 50% compost and the rest a mixture of peat and vermiculite or perlite. This will provide your plants plenty of nutrients while minimizing the weight of the soil in the planters. A singe layer of packing peanuts at the bottom will help increase drainage. Make sure you moisten the soil well before planting. If you're using a terra cotta box, soak it in water for an hour before planting so that the clay doesn't absorb the water meant for the new plants.
Window boxes look wonderful filled with a solid wave of one color or several plants are combined. For a lush look, stagger your plants in the box. Follow the basic rules of container gardening using taller plants in back, trailing plants along the front and sides and bushier plants to fill in the spaces in the middle.
Although we normally associate window boxes with flowers vegetables and herbs grow well in them, too. Try these vegetables: cherry tomatoes, Swiss chard, radishes, lettuce and peppers. Herbs that grow well and look good in window boxes include oregano, parsley, rosemary, thyme, lavender and chamomile.
Window boxes need to be watered frequently, especially if they sit in direct sun for most of the day. Plan on watering at least twice a day (morning and evening) during how or windy days. Mulching around the plants will help hold in moisture, but the soil should never be allowed to completely dry out.
Add a half-strength liquid fertilizer every two weeks throughout the season to compensate for the confines of space and that fact that nutrients are washed out of the soil with frequent waterings.
Deadhead spent flowers for continuous blooms and removed any plant debris to discourage fungal growth. If plants start to get long and leggy, pinch them back to encourage bushier growth.
About The Author: Ellen Brown is our Green Living and Gardening Expert. Click here to ask Ellen a question! Ellen Brown is an environmental writer and photographer and the owner of Sustainable Media, an environmental media company that specializes in helping businesses and organizations promote eco-friendly products and services. Contact her on the web at http://www.sustainable-media.com
Add your voice! Click below to comment. ThriftyFun is powered by your wisdom!