 I have made a "recipe notebook" out of a 3-ring binder and clear insert pages to hold all my recipes that were loose in my kitchen drawer. I have also written down my recipes "from memory", that I know how to make, but never bothered to write down. This way my girls will have all of Mom's recipes when I'm gone.
By vickie guy from Earle, AR
Share on ThriftyFunThis page contains the following solutions. Have something to add? Please share your solution!
I start gathering all my favorite holiday recipes a month before Thanksgiving or Christmas. The recipes I plan to use are then placed into plastic page protectors, then those pages are placed into a plastic binder that can be wiped clean.
I've started to organize my recipes together as meals. I know that I always serve my Mexican rice recipe with my Black bean casserole so now I keep them printed out on one sheet and then stored in my 3 ring binder.
I try to plan dinners in advance by choosing recipes and listing needed ingredients on a shopping list. The shopping list is always written on a sticky note and attached to the first insert (card stock) of my mini binder (7" x 4.5") which is always with me in my purse.

I have a bookcase in my dining room filled with cookbooks that I have bought over the years. It is difficult, however, to remember which cookbook my favorite recipes are in.
My three daughters were always asking me to share some of my favorite recipes, so I surprised them one Christmas by printing some of my favorites on acid-free paper, and putting them in small 3-ring binders that contained plastic sheet protectors.
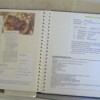
To keep my recipes clean, I place them in a plastic sheet and organize them in a large three ring binder. When I use one, I take it out of the binder.
I like to print out recipes I find online and I figured out a good way to organize and store them. I print them out so they take up a full page and then three hole punch them. I have two thick 3-ring binders, divided with tabs to make sections.