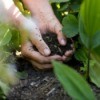
 I eat a banana everyday, and always throw the peel away, I also drink tea everyday and throw out the tea bags. I have now tried throwing the tea bags and banana peels in water, making a tea out of it, and it helps your plants stand up and cheer! The potassium in the peels, and the antioxidant in the tea are a great combination for plants. I put them in a bucket of water, let sit overnight, and use the "tea" as a pick me up for plants, both indoors and out.
They seem to love it.
Source: A gardner friend had read about this, but hadn't tried it yet.
Add your voice! Click below to comment. ThriftyFun is powered by your wisdom!
I usually compost mine and I'm going to try this.
I compost mine but this sounds good too. Also you can put a banana skin in the hole before planting a rose.
Marg from England
P.S. If you compost teabags, tear them apart first. They rot quicker.
Love this idea...
Just a comment on banana peels - if/when you get into fire ants, rub the bites with the inside of the peel. You will not blister or continue to itch.
One year I put the banana Peels in the blender with other compost items and put it in the garden just like it was. The plants went crazy and grew right before my eyes. Kinda! It might help to add a little water to this blend. See for yourself
I have been doing something like this for the past few years. I apologize in advance for my long-winded-ness, but I'm recovering from a stroke and have trouble making people understand me easily, but bear with me and I hope I can help your garden this year!
You line a cookie sheet with aluminum foil, then, as you're finished with your cup of tea and your banana for breakfast, you simply collect your "garbage" on the cookie sheet, then hiding the sheet inside your oven; BUT remembering to pull it out _before_ you turn your oven on to make dinner!!!
Once dinner is out of the oven at night, you immediately slide your special "brew" ingredients right back into that nice FREE 350° heat, using your oven as a dehydrator. Now forget about it and spend time with your family, until tomorrow night when you remember to take the cookie sheet out of the oven BEFORE you turn the oven on for dinner! Really important thing to remember before you stink the whole house up with essence of banana flambe! LOL!
Then, once a week (don't worry about fruit flies, even if you happen to skip the oven a night or two. It hasn't happened to me in more than ten years of doing this!) you are going to get to work on trimming down your "brew" ingredients with your kitchen shears.
First, go and find a spare ice cream bucket, coffee can or similar item. You're going to be leaving this uncovered, so be careful to put this soon-to-be liquid gold ingredients in a safe place where it will not be knocked over, ok? Now, let's get to work!
Your teabags should be completely dry to the touch, that's a very important thing! Cut open the teabag and coax the tea sweepings out of the paper wrapper and into your bucket. What I like to do is to line two or three up and snip off the bit where the staple holds the string/tag at the neck of the bag. Dump the used tea sweepings into your bucket, can, or other appropriate container. If you've been lucky to have been gifted some of the fancier teabags out there, you're on your own, I'm afraid. Just follow along as best you can.
Now, you've gotten all the tea out, but don't throw the empty bags out! You can use them at the bottom of your pots before you've filled them up with a freshly revived potting soil. They're biodegradable, they've already filtered water, so they can definitely be put to that use again! I arrange liberal fist fulls on the bottoms of pots that have too-big holes, or are recycled items that have multiple holes (I punch lots of holes into tin coffee cans, #10 Bush's beans cans that I get for free from my church at the annual picnic, etc. just because I feel like the metal cans stay too wet after a hard rain.).
Just be careful that you have removed that staple from the top of the teabag in the beginning of these steps, otherwise you could receive a reminder of why you don't want them in your soil if they lodge in your skin or nails (ask me how I learned that lesson). :-/
Now you've emptied out your used tea sweepings (what passes for tea these days wouldn't even be recognized as drinkable for the servants of the 17th and 18th century forebearers!) into the bucket, let's get to work on the banana peels you've accumulated over the week.
Most of the banana skins will be unrecognizable, blackened, and stiff. That's perfect!! Take your kitchen shears again and carefully snip away at them. Again, I want to warn you again that if your banana peel is still "fleshy" and rubbery and not as I described them above, you want to wait until they are blackened and stiff as a board before you proceed, otherwise this will absolutely turn into a science project! When in doubt, turn the heat on and heat anything growing, no big deal.
Make the cuts of banana peel as small as you like; remember, this "brew" is going to be sprinkled near the stem of your plant; you want to think of this as, like "adding the essential salt and pepper" to your plants. You absolutely can place some banana peels under your rose bush or climbing roses: this is for once they've spent a season in the ground. The goal is to dry things out and by doing so, concentrating the beneficial elements locked inside the " free" perfect answer to the most expensive form of miracle gro, hiding in plain sight inside your garbage can.
Other things you can add are dried coffee grounds, finely ground nut shells, eggshells and any of your unused greens (those leaves you pull off of a head of cabbage when you first go to use it, or any greens from vegetables). Again, no science project here! Even if you need to leave the oven on until after you've cleaned away dinner, you Do. Not. Want. A. Science. Project! Dry grounds are better in the long run.
Eggshells are a particular favorite of my dwarf rose (I got for free because Home Depot has no clue that they couldn't take the draft by being right at the front door). Poor little thing just needed a good few weeks under a 2-liter bottle "homemade cloche" and she was perky and bloomed that winter beautifully!
I used the same method as above, drying out the shells thoroughly. Then I take a bread bag or a used cereal box liner (remember when they were actually waxed paper and they had those tiny kid sized boxes you could eat out of as an all-in-one box/bowl? God, how we'd fight over who got the good cereal out of the pack!!!) and crush the eggshells as small as you can. Put them right into the bucket/can/receptacle along with everything else and give the contents a good stir.
Each different ingredient adds an element, whether it's potassium, calcium, nitrogen, each one is hitting the garbage can or compost pile when, with minimal effort, you can have your plants bursting out of the ground with vigor, added blooms and healthier roots, all for ten stress-free minutes of attention per week. Sounds like a TV gimmick, I know, but once you start giving this a try, I promise you that you will be impressed with your growth this year.
If you journal your gardens progress from year to year, take the time to see what your plant needs and then find the frugal way to deliver them to your garden. It's so easy each year you do a garden, and this couldn't be any easier, once you get the hang of it!
Remember, as long as you've already paid for the gas or electric to heat your dinner, why not avail yourself of that free heat? Just keep in mind that the cookie sheet is a finite space and you can only keep so much on it at one time without overcrowding it; then, I can assure you that you can get mold happening, so if it's looking kinda full, take care of your precious freebie that will get your whole garden cheering for you! Make sure when adding to that bucket that you lightly mix everything so you're airrating <sp?> the contents of the bucket. Don't put this where you have any moisture, otherwise you could grow mold, but remember that you need to leave the cover off the whole time, again so that it has some airflow, otherwise mold is going to grow.
When you're ready to give your plants a good head start; remember to do feedings, preventative care (grubs, pests, etc.) on the holidays of summer. Memorial day, Fathers day, Fourth of July, Labor day, the 21st of September (if you got that joke, we could get along!) :-)) and finally, Halloween, or, you could just put every three weeks on the calendar. It's up to you.
I take a good handful and on larger plants and shrubs, I give it two or three handfulls. I put it in a circle, about a foot away from the neck of the stem of the plant, and for shrubs, I'll go as far away from the neck of the trunk as the circumference of the top growth of the shrub, bush or tree, and that's everything from perennials, shrubs and trees. That imaginary circle of the circumstance of the plant in question is really the mark of how widespread the plants roots have grown. Those are the roots that you want to encourage and feed the most.
For annuals, I simply make a brew of 2:1 water:"brew" in the airrator <sp?> I bought for a nickel at a garage sale, it's an old MiracleGro bottle that you attach to your water/hose pipe to deliver a powerful dose of delicious nutrients to your garden. Your neighbors will be jealous of how huge your colrabelles <sorry, again I'm unsure of the correct spelling, but I'm told that it's Spanish for little Bella - a cute miniature petunia that becomes lush and bushy>!!!
You might be saying to yourself that there's no way you're going to create a year's worth of free plant food, but add up a cup of tea or pod or pot of coffee each day, the fruit and vegetable waste and all the preciouly over priced eggs we're paying through several orifices these days. It adds up, even with two eaters, you will make enough liquid gold to pay for your time it takes to do this. Obviously, since we do everything to NOT heat up the kitchen during the summer, so I abstain from collecting during the summer, let's say for sake of argument that I take off three months. The minute Pumpkin Spice coffee hits Speedway (a popular chain of gas stations in the Midwest), I start my little tray in the oven. Your mileage may vary.
Hope this helps you grow your best garden yet!
Add your voice! Click below to comment. ThriftyFun is powered by your wisdom!