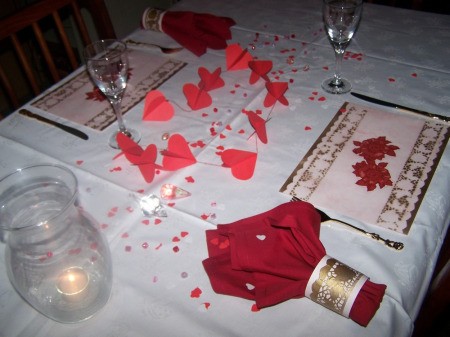
Make some budget-friendly decorations (placemats, napkin rings, a paper garland, and heart-shaped confetti) for a special Valentine's dinner with your loved one, using red, white, and pink, with a dash of gold, as the colors of choice. Add a few beads and candles, and voila! the perfect setting for a romantic dinner-for-two.
Advertisement
Approximate Time: 60 minutes
Supplies:
three A4-sized pink marbled cardboard sheets
three A4-sized sheets of red paper
one sheet of white ordinary printer paper
pictures of roses
I used four roses cut from an old piece of wallpaper.
three paper lace tray liners
See http://www.partyatlewis.com/ for a possible supplier.
clear Contact paper
quick-drying rich gold spray paint
pair of standard scissors
eraser
pencil
quick-drying glue
a few sheets of old newspaper to protect the working area
heart-shaped cookie cutter
heart-shaped paper punch
optional: candles and beads to complete the setting
Instructions:
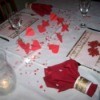
Placemats:
Advertisement
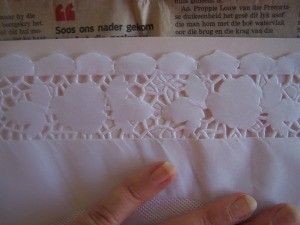
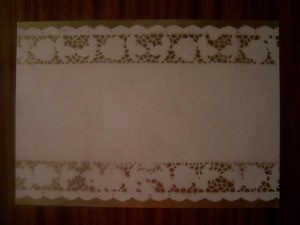
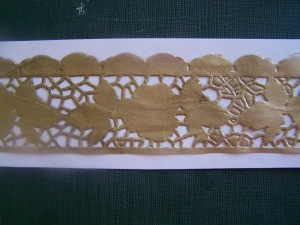
Position one of the paper lace tray liners over the long side of a cardboard sheet, so that the lace of the liner will be close to the edge of the cardboard.
Spray a layer of the rich gold paint over the tray liner. This means that the tray liner serves as a stencil.
Carefully lift the tray liner (stencil), so as not to disturb the pattern that has been sprayed onto the cardboard.
Repeat the process on the other long side of the cardboard.
Do the same with a second cardboard, so that you will have made two placemats.
Advertisement
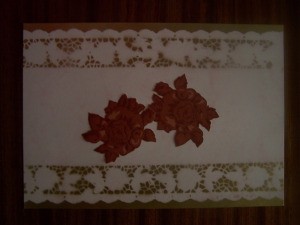
Cut out the roses and decide how they will be placed on the placemats, and glue them in place.
Allow to dry thoroughly.
Cover the placemats front and back with the clear Contact paper: ~ see: Craft Project: Christmas Coasters for advice on how to do this.
Napkin rings:
To make the napkin rings:
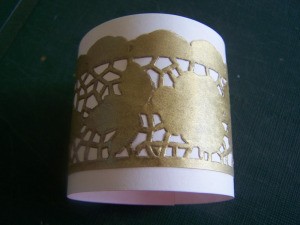
Cut two pieces size 2.3 inches x 8.2 inches from the third marbled cardboard.
Place a tray liner on a sheet of newspaper.
Spray the tray liner with a layer of the rich gold paint and let it dry thoroughly.
Cut two strips from the tray liner and glue each of these onto one of the 2.3 inches x 8.2 inches cardboard.
Advertisement
Fold each cardboard into a tube to make a napkin ring and glue together where it overlaps.
Paper garland:
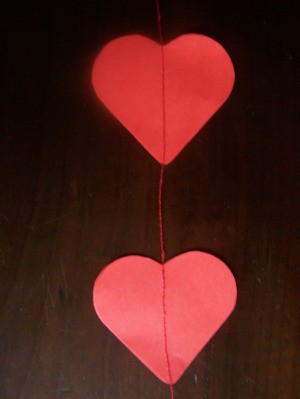
Place the cookie cutter on a sheet of red paper and trace around the edges.
Move the cookie cutter to a different position on the paper and trace around the edges again.
Continue until you have traced as many hearts as possible onto the paper. You should get approximately 12 hearts on a sheet of paper.
Fill the second sheet of red paper with traced hearts too.
Cut out all the hearts and erase any pencil marks.
Use a long tacking stitch on your sewing machine to sew the hearts two-two together to make a garland.
Advertisement
Once you have sewn over the first set of hearts, continue stitching for 10 stitches, so that you will make a string from the thread, and then sew over the second set of hearts. Stitch 10 stitches again, before adding the third set of hearts, then the fourth set, etc.
Continue until all the sets of hearts have been added.
Fold the hearts slightly open to create a three-dimensional effect.
Heart Confetti:
Use the heart-shaped punch to punch red and white hearts from white and red paper.