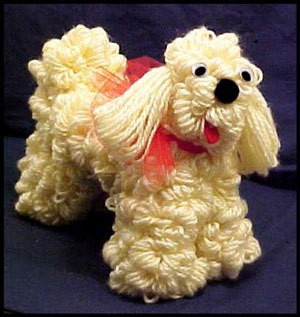
How do you make a yarn dog out of hangers?
By debbie from Connersville, IN
Moderately Easy Instructions
Things You'll Need:
To make a yarn dog, the following items are needed: two or more balls of yarn (of any color), a metal hanger, a large two or three inch sewing needle, and a pair of scissors.
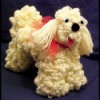
Step 1- Making yarn dogs involve tedious work and sound concentration. The amount of time you have will determine how long it takes for you to finish your yarn dog. The first thing you do is form the yarn dog skeleton. You do this by stretching the metal hanger so that it resembles a short snake with a hooked head.
Step 2 - Next, at the section of the metal hanger where the split begins, start folding the metal hanger so that it creates a figure. The first two legs should resemble spiked folds with the neck and head of the yarn dog longer than the hind portion of the yarn dog. The two hind legs should resemble smaller spiked folds with a hump to represent the back of the yarn dog and a loop for the yarn dog's tail. If the yarn dog skeleton is created correctly, then it should stand level and evenly on any surface. If your yarn dog skeleton is not standing evenly, then re-adjust the folding of the metal hanger until it reflects an even, standing structure.
Step 3 - Now that the yarn dog skeleton is ready, it's time to start adding flesh to the yarn dog. Start by taking a piece of yarn and place it between your thumb and your index finger. Next, turn your right hand or left hand, if you are left handed to the side. Slowly, begin wrapping the yarn around your hand at the top near your thumb. Do this procedure twenty times. Using the scissors, cut the yarn.
Step 4 - In creating the tail and the ears, create the same yarn bundle, tie a piece of yarn to the bundle on the inside of the bundle so that one side of the bundle is bound, while the other side is not unbound. Tie the yarn bundle with the bounded side to the yarn skeleton. Afterward, take the pair of scissors and cut the unbounded portion of the yarn bundle, which should be hanging downward from the yarn skeleton.
Step 5 - If you have followed the procedures illustrated properly, your yarn dog should turn out well. It will become a source of great conversation and many people will either want to take it home or have one made for them. Either way, cherish your creation because now you have made a yarn dog, not man's best friend, but a best friend for anyone.
good luck. (12/04/2009)
In 2006, I submitted step by step instructions with pictures and measurements for forming the hanger shape. You can print this out if you go to this link in the Thrifty Fun archives.
Just copy this into your browser: thriftyfun.com (12/13/2009)
By Harlean
Add your voice! Click below to comment. ThriftyFun is powered by your wisdom!
Precisamos de tradução p/ portugues.Obrigada
Google Translate: translate.google.com/
Add your voice! Click below to comment. ThriftyFun is powered by your wisdom!