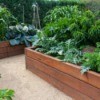
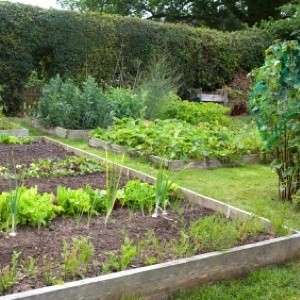
There are several advantages to using raised beds when gardening. They provide excellent drainage, warm soil earlier in the spring, prevent soil compaction, maximize yields in a minimum amount of space, and for gardeners with limited mobility, they can be built to any height. Perhaps best of all, raised beds also keep your garden looking neat and tidy.
Materials you will need:
Length & Width: A convenient size is 4 x 4-foot box, because lumber is readily available in 4-foot lengths. This also allows you easy access to the center of your beds from either side. Set the beds end to end to create larger gardens (4 x 8-foot or 4 x 12-foot, etc.) or arrange them in interesting patterns.
Depth: Most plants need at least a 6-12 inch root zone, so your boxes should be at least 12 inches deep to allow plenty of room for roots. Using 12-inch wide lumber to construct the boxes makes this easy.
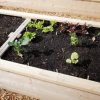
Construct your beds on a firm, flat surface (e.g. driveway, patio, or garage floor). Set the boards up on their sides and nail the ends together to create a box. Use 4 to 5 nails on each board in an off-set pattern to help prevent the wood from splitting. If you're doing this project alone, it's helpful to brace one board against a wall to hold it steady while you pound in the nails.
Optional: If you line the bottom of a raised bed with chicken wire, you can easily control gophers and other marauding rodents. Cut a piece of chicken wire/hardware cloth so it's a few inches larger than the inside dimensions of your box. Lay the wire inside of the box. Bend the excess wire up the inside walls and use a staple gun to attach it securely it to the box.
Use a sharp spade to loosen up the top few inches of soil at the bottom of the box. This will help ensure good drainage. Fill the beds with equal parts of compost, topsoil, and well-rotted manure. Water well. Allow a few days to a week for settling to occur and add extra soil if necessary.
About The Author: Ellen Brown is an environmental writer and photographer and the owner of Sustainable Media, an environmental media company that specializes in helping businesses and organizations promote eco-friendly products and services.
Add your voice! Click below to comment. ThriftyFun is powered by your wisdom!
I like the raised bed concept. Thanks for sharing these tips.
What a great article, and just in time too, cause I want to make raised beds this year. Would it be better to use screws? Also, I often see raised beds with steaks next to them, is this cause they are not nailed/screwed together?
In a 2 months I am moving out of city to home with a big garden. I am looking forward to planting and starting my vegetable garden. I love the idea of adding a chicken wire to the bottom of the box that I am planning to make myself. Great idea, thanks for sharing that.
I just registered with this site hoping to find some good tips and I got it right away. I'm so pleased I find it. :-) Thanks again.
To keep raccoons, squirrels, & other climbing wildlife out of the garden, don't stop with chicken wire up the sides - stretch it on over the top. One year our ears of corn never made it past 4 or 5 inches before the "critters" got to them. The chicken wire would have stopped that!
Add your voice! Click below to comment. ThriftyFun is powered by your wisdom!