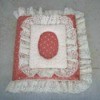
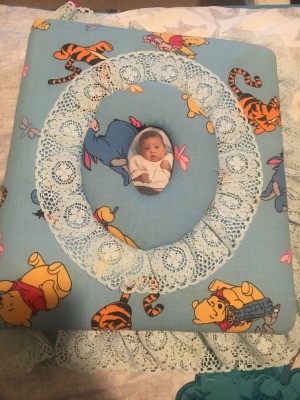
 For my first born I was gifted a cute Pooh Bear themed covered photo album by my ex's great grandmother. I love it! It's so cute. I now have my second child and she had asked me where is her book. I would love for her to have a covered photo album so I want to learn how to make it. Can you please direct me to a tutorial? I haven't found one similar to it.
Add your voice! Click below to answer. ThriftyFun is powered by your wisdom!
Thrifty Fun has a section here www.thriftyfun.com/
I own one of these given to us as a wedding album. I noticed on mine that quilt batting filler was used to pad the 3 ring notebook binder.
Binder with screw on ring frame and remove but save.
Spray can of glue (holds fabric in place)
fabric
Poster Board for the inner sides of front/back sides of binder
OR a little thicker back board if desired
Cut quilt batting to measurement of binder's full size.
Spray the glue lightly over the exterior of binder and lay batting over the exterior as one full piece. You will not overlap edges.
Cut fabric as one piece to cover the full exterior allowing for generous fold over edges and over where the metal ring frame is place.
Spray glue lightly on the back of fabric to prevent sliding and position over batting.
Glue gun edges down around the binder keeping fabric smooth and wrinkle free.
Working from the inside of binder, Place the front side of lace face down evenly over raw edges of inner binder. Glue gun or generously use quilter's glue to dot in place around three sides of both boards unless you wish to put it where the metal ring frame will go also which is all the way around. Your choice.
Two measured pieces of poster board or slightly thicker, cut for the interior of both sides of the binder that will be large enough to cover raw edges of lace. These do not use batting. AND, they must be cut from where metal ring frame edge is on both sides to about 1/2" or less from edges of album sides. You need the album cover to fold and give. Boards too far in will disallow that movement.
Inside of album: Cut fabric larger as one whole piece enough to cover both boards tucking in raw edges and gluing them down around three sides of each board. Tuck under rest of raw edges where metal ring frame will go and glue them down.
Replace the metal ring frame.
Decorative Middle Piece: If a photo is used cut a circle or oval poster board (mine is 5x6 inch oval)
Cut out a center hole in poster board the size of photo to be seen.
Place a thin perfectly fit layer of batting over the top of board cutting out center hole; no folding over needed for the batting. Use spray glue to hold in place.
Cut fabric and generously allowing enough fabric for folding over in the center hole and around the board continue gluing edges into place along both circumferences.
Lay this board face down, so raw edges are exposed.
Put lace face down evenly and glue around the circumference of the raw edges of the outer edge of middle board. Leave enough lace to overlap lace edge about 1 - 1 1/2" before gluing down. Ends should be straight cut.
Lay photo in center of the binder and place middle board's hole centering over picture. Tac with quilter's glue (in a tube) around edge of inner circle to hold photo in place.
Glue gun or use dots of quilter's glue around circumference of raw edge pressing firmly down.
Generous amounts of quilter's glue means lots of small glue dots close together; not in continuous flow like you would do with a glue gun.
If you get stumped, you have yours as a visual aid.
Now you are ready to insert photo holders in the binder and begin using.
I would say this is a form of scrapbooking on the cover of the album. They are not that hard to make and I am sure you could easily make one for your daughter.
You will need a photo album, material, hot glue gun, some fabric or lace for the center, maybe some foam for under the material and a baby picutre.
Start off by gluing the foam to the cover, then cover it with your material and glue the material to the inside cover. Use a bowl to makr a center line where you want your ring to be. Suff the ring with a little foram and glue this in place and then add your picture. Use the one you have as an example and have fun making one for your daughter.
Add your voice! Click below to answer. ThriftyFun is powered by your wisdom!