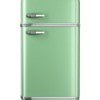
I have an old refrigerator which still works fine, but would like to change its color. (it's an old fashioned green color). Has anyone ever tried painting a fridge and if so, could you share your experience. What type of paint should I use and does anyone have any tips for applying it?
chiclets76
Since it is made of metal, you paint it just like you would paint a car. Lightly sand it with a fine grit sandpaper and use spray paint. Check with the people at Lowes or Home Depot and they can help you select the proper type of sandpaper and spray paint. (04/14/2005)
By Glenn Goss
I saw an article on TV that shows a material that peels and sticks and looks like stainless steel. If you like that look. Try Home Depot or Lowe's they might have some ideas. (04/14/2005)
By KPC
They make paint especially for appliances. Masking tape off the handle or any trim you don't want painted. Sand to rough up current paint to help new paint stick. Good luck! (04/14/2005)
By Cheryl from Missouri
Another option is to use sticky contact paper. (04/14/2005)
By Lynne
I know for a fact that at home depot they have a spray paint made for painting appliances. You don't even have to sand the appliance before you use the paint or apply a primer. (04/15/2005)
By melissa
I painted an old fridge many years ago with plain enamel and it looked fine. I think they have special appliance enamel now, which you can find at Home Depot or Lowes. It might be good to prime it with something like Kilz first, but just follow the directions on the can. Good look (don't use red like I did!) (04/15/2005)
By Claudia
You can purchase epoxy appliance paint at any home imporvement store and Walmart. Just choose the color you want. Unplug the fridge, pull it well away from the wall. Place newspaper or plastic sheeting on the floor around the fridge taking care to tuck it under the edge of the fridge.(make sure the kitchen is well ventilated or take the fridge outside if possible) Cover the handle with painters tape or masking tape( remove the handle if possible). Start on the side and spray with long, overlapping, even strokes side to side, taking care not to over spray or the paint will run.
By Klr2080
I have been trying to paint a refrigerator with appliance enamel and it is actually harder than it sounds. Maybe someone could offer some suggestions.
The first problem is that the enamel has a very glossy finish, and as a result, I have had a lot of problems with "overspray".
For example, if I paint the top half of the left side, and then pause for a minute (like maybe if I run out of paint and need to shake up a new can) you can tell where I stopped -- the finish is shiny and glossy up to the place I stopped. But when I continue, you can see a cloudy line of paint where the "overspray" landed on the paint that dried for a minute or two.
The only way I've found to avoid this problem is to start at the top and CAREFULLY work my way down, without pausing, and get the whole surface looking "wet" with paint. By the time I get halfway down the surface, the top is now "dry" enough (actually "tacky" enough) that I can't let any paint get up there, or it will make a cloudy misty finish, interrupting the nice glossy enamel finish. I just have to keep working my way down and get the whole side done perfectly, the first time, with no mistakes. If I run out of paint, or get a drip or something, I have to wait a couple hours for the paint to dry, and then start all over again at the top.
The second problem is similar -- after I paint the left side, then the right side, I'm screwed when I try to paint the front or top -- "overspray" from those surfaces lands on the shiny enamel finish on the other surfaces and makes them look cloudy/misty.
There MUST be an easier way to do this. I have repainted this whole darn thing 5 times, and I still keep getting this "overspray" mist problem (i.e. do the left side, do the right, do the front and accidentally overspray the right side; redo the right side but get overspray on the front, redo the front, etc. etc, etc.)
Can anyone offer any advice? (08/07/2005)
By Jim
I'd like also to paint my fridge and appreciate the advice. However, I'd like to see someone suggest buying supplies at a good, old-fashioned, downtown hardware store instead of Home Depot or Lowes. That sort of thinking is what has put the "little guy" out of business in favor of the "big boxes." (08/07/2005)
By lynn
A friend of mine had her frig painted by an auto body shop. It looked great. (04/14/2006)
By Cindy
You will need 3 cans epoxy enamel paint, 1 can plastic paint, 2 rolls masking tape, screwdriver, wrench and newspaper.
I have painted several appliances (fridge and freezer, I just finished number 8 or 9). It took me about two before I fully understood how to make it perfect. The last ones I did nobody can even tell they were not factory black. My preferred paint is Rust-Oleum Specialty Appliance Epoxy (Lowes, Home Depot, and Wal-Mart). I took the doors off, pulled out the seal (Yes, they are made to come out and if its not in good shape you can get one for ANY model at Sears parts for under $15.00), taped off the front and covered the door with newspaper and taped off to the edge. That way you are only painting what's supposed to be colored. Also, most door handles will come off if you can figure out how they are removed. Most fridges have a plastic vent at the bottom, and it can be removed and pulls off pretty easy. Use "plastic" paint for it. I tried to use the epoxy once and it just chipped or scraped off. This last one I did we used plastic paint and I couldn't scrape it off if I had to. I used the plastic paint on the hinge covers too.
The key is to get fine or medium sandpaper and rough up the entire surface. We are not talking about removing paint, just rough up the existing paint some, just going over the surface once. The paint is hard to deal with, but if you go in steady lines, left to right, top to bottom it turns out fine. Also, it takes about three coats. If you read the directions you will see they are very specific about when to apply the second or third coat, it's within 1/2 hour OR after 1 week, so keep moving so you can get it all done in one day. This helps cut down on the streaking and lets you see where you missed. White is harder to paint with then black. They also sell a couple of other colors but if your going to paint a stove or something, you can not paint the top with this stuff as it will burn.
Another tip is to start by spraying on the back so you can see how well it flows out and how quickly you have to move before you ever start in the visible areas.
The one I did a few days ago had the icemaker in the front and I was afraid to paint the plastic but luck had it, Sears had a change out kit for about twenty bucks. I have almost $40.00 total in a fridge that was less then a year old and would have cost me $1,800.00 to replace.
Wear old cloths. I refuse to paint inside after ruining my cabinets. The smell is better if you do it in the garage our outside.
This is not a 30 minute project. It takes a while to remove the stuff and then tape it off. Also, if you have an icemaker it may not be possible to completely remove the door, I just took it off and set next to the fridge because the water line was keeping me from completely removing it. I'm sure there is a way to do it, but for this it didn't matter. Once it's taped off you could just place it back on and paint from there.
My last piece of advice is about the tape. They advertise that blue stuff for painting, but I have not had any luck with it on the appliances. I use just regular masking tape. When I used the blue stuff, it left all kinds of glue behind and it was hard to remove. Regular tape also does the same, but it wipes right off. (08/09/2006)
By Mark
Add your voice! Click below to comment. ThriftyFun is powered by your wisdom!