social

Repairing a Leaky Shower

October 18, 2010

This is my version of how to repair a dripping or leaky Delta "Monitor 17" or these other similar tub or tub/shower valves. These instructions are for when the valve constantly drips out the spout or shower head night and day.
Advertisement

Approximate Time: 30 minutes

Supplies:

Instructions:

  1. Turn off the water to the shower and relieve the water pressure by opening some valve's cold and hot side. Then close or cover the tub drain so no small parts get lost down there.

  2. With the pointer on the temperature setting knob up - remove the temperature control cover by rocking to one side and pulling away from the wall.

  3. Before removing the Phillips head screw! There are two plastic parts held down by this screw. A number of teeth hold them fixed to one another. With a Sharpie, mark the location of the black plastic part relative to the grey plastic part. These two parts control the maximum temperature possible out of the valve. Generally this has been set to a safe temperature by the installer. If you put a mark on each of the two places where the black ring contacts the grey ring it will ease re-assembly and assure the "scald guard" lettings are the same and no one's kids get burned in the shower.
    Advertisement

  4. Remove the Philips head screw holding the plastic parts and handle on the shower valve cartridge. Remove the grey and black plastic parts pulling straight out from the wall. Put a hook in the end of a paper clip if needed to help pull them gently out.

  5. Pull the valve handle off the same way very little force should be needed.

  6. There is a thin chrome escutcheon covering the valve mechanism. Simply grab the decorative chrome tube and pull straight out. This will reveal the plastic valve body, and a smooth retaining ring that is holding the plastic valve cartridge into the brass valve body. To remove the smooth chrome ring - just turn counter clockwise using two hands. This is a fine threaded part that only needs to be hand tight. Some installers will really twist it on. You may need an adjustable or slip joint type wrench to get it loose. A strap wrench is best and will prevent damage and future corrosion. If a tool is used the threaded ring should easily unscrew after an initial turn loosens it.
    Advertisement

  7. The inner valve cartridge should be easily removed by wiggling the plastic part side to side while pulling straight out from the wall.

  8. There are four similar plastic valve cartridge types pictured in the Delta drawings above. There are minor variations to disassembly: for the newer ones grasp the cartridge in two hands and twist it a quarter turn. This will separate the cartridge into two pieces and expose the easy to replace gaskets. For the older - a small adapter plate inside is held on with a screw, this holds the gasket set inside the brass valve body. I demonstrate this older version (Type 17" below).

  9. You will note a "V" shaped notch in the side of the brass valve body. As you pull the plastic cartridge from the brass valve body be sure to note which side of the plastic cartridge is by this notch. You will want to return this side of the cartridge to this side of the brass valve body. It's a very good idea to mark this side with a Sharpie.
    Advertisement

    But be sure to mark it low on the plastic cartridge. As in - near the stainless steel plate on the bottom of the cartridge. The outside grey part of the plastic cartridge is just a cover and a seal, it spins freely and can go in two ways.

  10. Deep inside the valve body you will see the plastic adapter that holds the seats and replaceable gaskets with their springs. A Phillips head screw and two rather tight "O" rings hold this plastic adapter plate in place. This is a very good time to close and/or cover the tub drain if you haven't already! Unscrew the pictured screw and set it aside. Take a stiff large paper clip and bend the end into a tight 90 degree loop or use a similar tool and gently pull the plastic adapter plate out from the valve body. Slowly work it from side to side and top to bottom until it slides out. If one side comes most of the way out - it will jam - it will have to be pushed part way back in to be able to work the other side loose.
    Advertisement

  11. The plastic adapter plate holds: two springs each with a base larger than their top; two cup shaped seals; two round washers similar to "O" rings - but not quite - they are grooved; and two "O" rings. You can Call 1-800-345-3358 or go to www.deltafaucet.com and delta will send the parts free (a week or so) or you can take the adapter and it's parts in a bag to your local big box home improvement store. They will have all six parts. Keep asking till you find the employee who knows where they are. Also, get some silicone "water pump" grease for the "O" rings and seals. It helps them last longer and holds them in place while you reassemble the adapter and screw it back in. Don't use auto grease or petroleum jelly.

  12. Clean and inspect these: the plastic adapter plate for wear missing parts and splits; the brass valve body and specifically the two holes in the back for wear and for cracks anywhere in the casting; the base of the plastic valve body for abrasions or scratches (metal plate with two small holes in it); and all "O" rings and seals for scuffs, dents, and cuts.
    Advertisement

  13. Put the plastic adapter plate back together again with just a tiny surface coating of the very sticky silicone lubricant. Be sure that the grooved and squared off "O" ring like seals are flat and completely inside their groves in the plastic adapter - if one ripples out of it's groove - it may never seal. Be sure the small end of the springs go into the cupped side of the cupped gaskets, and that the flat side of the cupped gaskets will rest against the stainless steal plate on the plastic valve cartridge. Also, be sure that all large "O" rings on the outside of the plastic valve cartridge go in smoothly, and don't get pinched. An example would be the escutcheon "O" ring.

  14. Reassemble the adapter plate into the valve body with the screw; and then the valve cartridge over the adapter plate; threaded ring holds the cartridge in; and the rest back together in the reverse order of dis-assembly.

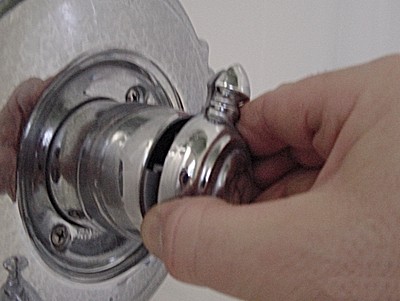
While it's all apart is a great time to buff up the chrome parts with a bit of your favorite cleaner or non abrasive cleanser.

By TWB from Tigard, OR


Questions

Here are the questions asked by community members. Read on to see the answers provided by the ThriftyFun community.

February 22, 2020

I've been trying to fix my shower faucet, but have been having problems. I had to replace the stems/seat because they are very old and leaky. I ordered a new set online as I am disabled and don't have a car to drive to a hardware store. Once I tried to install it it did not fit. The new seat and stems are too wide and don't fit. I ordered a new one and had the same problem. I unfortunately didn't know there were different sizes.

I attached pictures of my old and a new one to see size difference.Repairing a Shower Faucet - old and new
 

If anyone could help me figure out which faucet kit I would need to order I would love you. All the steam kits I see online look so different than mine does. I am low income and disable so I can't afford to continue to buy them blindly, but it was leaking too bad and I can't afford a plumber.

Repairing a Shower Faucet
 
Repairing a Shower Faucet
 

Answers


Bronze Post Medal for All Time! 105 Posts
February 24, 20200 found this helpful

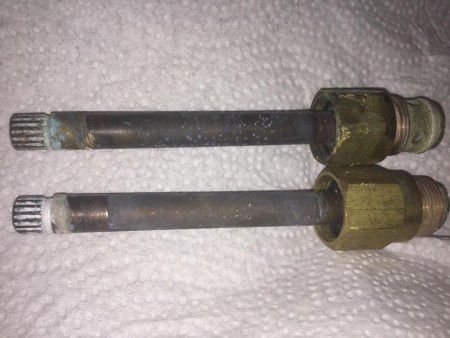
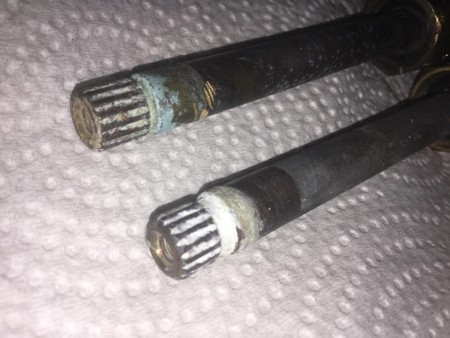
You will need to measure the stems on the old ones and order this size. You can return the ones you have ordered. If there are some issues ask the company you are ordering them from what are the different sizes they sell and how you can measure these so you can order the correct size for your shower. They are always willing to help and maybe they have an online scale that you can use to place yours on to see the size of the stem you are ordering.

 
Answer this Question
Categories
Home and Garden Home Improvement BathroomFebruary 7, 2012
Pages
More
🎂
Birthday Ideas!
💘
Valentine's Ideas!
🍀
St. Patrick's Ideas!
Facebook
Pinterest
YouTube
Instagram
Categories
Better LivingBudget & FinanceBusiness and LegalComputersConsumer AdviceCoronavirusCraftsEducationEntertainmentFood and RecipesHealth & BeautyHolidays and PartiesHome and GardenMake Your OwnOrganizingParentingPetsPhotosTravel and RecreationWeddings
Published by ThriftyFun.
Desktop Page | View Mobile
Disclaimer | Privacy Policy | Contact Us
Generated 2024-01-31 10:14:46 in 17 secs. ⛅️️
© 1997-2024 by Cumuli, Inc. All Rights Reserved.
https://www.thriftyfun.com/tf/Home_Improvement/Bathroom/Repairing-a-Leaky-Shower-Valve.html