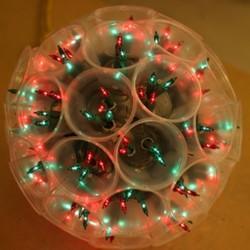
I would like to know how to make the big Christmas balls, made from plastic cups and lights. I have seen them a few times and I think they are so cheery for the holiday. Any info on how to make them would be so much appreciated.
Add your voice! Click below to answer. ThriftyFun is powered by your wisdom!
Susie, I hope this is what you're looking for...don't let "Winnie the Pooh" throw you....lol www.newcelebritystudios.com/
i made these many years ago. its a great family project. you need the small plastic medicine cups/ catsup cups from drive in. you punch small whole in center with nail. whole must be large enough to put twinkle christmas lights into inside of cup pointing out ward.you need a styrofoam ball after you have made holes and pushed xmas light into it, use styrofoam spray glue and set cup onto ball. pull wires together to place under next cup and repeat in circles around the ball.
Keep lights plugged in while making this in case a light goes out you can replace right away. Also, use plastic shower curtain or old plastic table cloth to protect table. I suggest you spray adheisive [for styrofoam/ from hobby lobby or walmart] insert some type of wire, string, for hanging. have fun and thanks for the memories !!
I have made the big christmas light balls before it has been a while , but I can tell some what of how I made them . It will take 50 clear or colored 8 or 9 oz. party cups. 25 cups for each half , the ball has to be made in halves, if you melt a hole on the center of the cup make sure it doesn't get too big for the lite, but you also cut a small X and it will work also. Them you take and make a ring with your cups you might want to hook them 2gether with clothes pins to make sure you get the right amount of cups on each side.
I alread made a comment but looked it up and found another way kinda like the way I did mine .Supplies Needed:
50 9 oz Solo Clear plastic cups (short squat ones)
1 string 50 light set
100 paper fasteners (or hot glue if you are in a climate where it won't melt while storing)
24" coated wire or heavy duty fishing line
garland (optional)
something to punch holes in sides of cup (a small pointed soldering iron works fine)
drill and bit (size depends on size of mini-light base.
Instructions:
Drill holes in the bottom of all 50 cups. Take 38 of these cups and put 2 small holes near the rim at the top (not needed if hot gluing), opposite each other. Put the other 12 cups to one side for now, do not punch holes in these cups yet. Working one half of the ball at a time, begin by taking 12 of the cups and the paper fasteners (or hot glue) and fasten cups side by side. By the time you get to the 12th one, it should form a circle. Complete by attaching together. Put aside. Take 2 of the unpunched cups and punch only one hole near the rim. With 7 punched cups, fasten together side by side. Take each of the 1 hole punched cups and attach to each end of the 7 attached cups. Take the 2 cups on the end and bring them together, forming another circle, that will arc out, punch hole in both cups and fasten together. These 9 cups should fit on top of the 12 previously fastened cups. With the hole punch, fasten the 9 and 12 grouping cups together. Take 4 unpunched cups and punch 1 hole in each near rim. Take 2 of these cups and fasten together. Fasten other 2 together. Set these on top of the hole left in the 9 cup grouping so they fit. (They will not be exactly opposite each other. Make holes in each of the cups where they join the 9 group. Fasten or hot glue together. This should form half of the ball. Repeat to form other half. Putting lights in: (Holes should have already been drilled before putting cups together.) With open end of ball facing you put light (at opposite end of plug-in) in one of the holes in the 4 center cups.
I also make 1/2 balls the same way as the full, only I use 35 light sets and the 4 cup cluster has 2 holes each and 6 of 12 cups have 2 holes (every other one). To finish off back, I put a plastic 12 inch plate and fasten it to the back with the bottom of the plate to the inside near the wires.
Hope it helps Merry Christmas , Barbara Ann
I would really like to see a picture of the christmas ball
Does anyone have a pic of the xmas ball ?
Thanx.
Here's what you're looking for!! I have a ball that my sister gave my Mom years ago and I wanted to make a couple more and just found this page:
www.born2haunt.com/
EXCELLENT step-by-step instructions with great pictures to show you how to assemble!
Has anybody ever made a orange light ball for Halloween using the solo cups? You know the same way you make the Christmas ball. Let me know. Thanks
Another place with great instructions (and making these balls with a soldering iron) is http://www.sparkleball.com. (just click on the link) There are also lots of photos.
Add your voice! Click below to answer. ThriftyFun is powered by your wisdom!