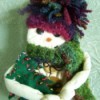
Need something to brighten up someone's room, but they don't have shelf space? How about a plant stake? He can also be made to hang on a wall.
Approximate Time: 2 hours
Supplies:
- muslin scraps
- 3 large buttons
- 3 medium buttons
- 2 small black buttons for eyes
- beads for mouth
- scrap of fabric for scarf or yarn to crochet one
- 1 inch of 1/4" dowel
- orange acrylic paint
- corrugated cardboard
- scissors
- heavy scissors
- needle and thread
- black and red floss
- colored beads
- wire hanger
- wire cutters
- hot glue
- green felt scrap
- quilt batting scraps
Instructions:
- Cut three circles from your muslin, one each 10.5 inches, 8 inches, and 5 inches.
- Cut three circles from your cardboard one each 5.25 inches, 4 inches, and 2.5 inches. Cut them out with the heavy scissors.
- Cut out a circle of quilt batting to match each of the cardboard circles and glue it around the edges to the matching cardboard. Stitch a running stitch close to the edge around each muslin circle and gather it up around its matching cardboard, covered with quilt batting, with the batting toward your gathers.
- Before you tighten your fabric around the cardboard circle make a mark on your fabric where the tunnels in the cardboard run from one side to the other; (see illustration) you will need to know this to slip your hanger into when you assemble your snowman. If you forget you can use a pin to find it later.

- For the arms: cut two strips of muslin 2 inches by 9 inches, sew each of them into a tube and turn them right side out. Cut a piece of your batting 2 inches by 9 inches and stuff your arms. Refer to photo for my tip on how to turn and stuff the arms.
- With the floss sew on three of the largest buttons to the largest circle, the next largest to the middle size circle; use plenty of length so you can make a loopy bow.
- Sharpen your dowel in a pencil sharpener if it is long enough or cut it to a point with a knife otherwise, paint it orange and lay it aside to dry while you prepare the face. Sew your eye buttons on or hot glue them on, attach the mouth beads by sewing or glue. Just below your gathered center on the face circle make a slit in the muslin, then make a hole clear through the circle with a large needle or crochet hook; you will later push the dowel nose through this hole from the back.
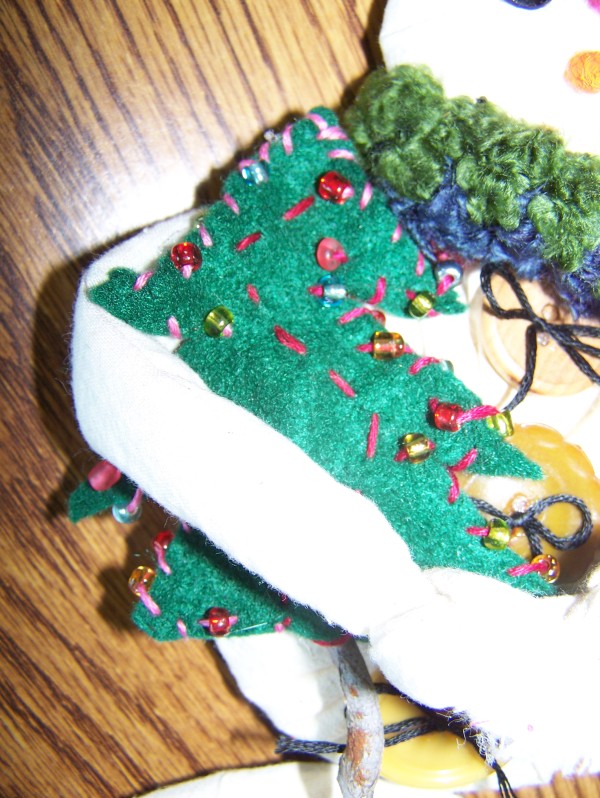
- For the tree, cut two felt shapes just alike, place a line of glue down the middle and lay a stick in the glue, apply glue on the stick and add the other tree shape. With floss stitch the edges together adding a bead now and then.
- Now you are ready to assemble your snowman. Cut the hook off of your hanger, straighten out the first bend then cut off the hanger a couple of inches past the next bend. This will keep your snowman from turning when pushed into a plant.
- Locate your marks on each of the circles where the tunnels go straight; make a small slit on both edges. Slip your hanger through the large circle, then the medium, and then the small circle. Don't come out the top of the head. Put a drop of glue on each of the holes between the circles to hold them in place.
- Glue or stitch the arms at the top of the middle circle where you would expect the shoulders to be with the seam on the underside; point them slightly downward and tie the other end in a knot for hands. Bring them around to the front and glue them together. Slip the tree under one arm; glue the tree to the body in a couple of spots.
- For the hat and scarf on my snowman I crocheted a strip approximately 15 inches long by 1.5 inches wide by first making a chain then double crocheting two rows. I then made a pom pom by wrapping my yarn around my cell phone 40 times, tying a piece of the yarn around it, and cutting the loops. I didn't trim the loops but left them shaggy. I then wrapped the scarf around the front of the head starting at the side I wanted the scarf to appear knotted at and went around the back. I pinned this in place. Then with needle and thread I stitched the top edges together, hot glued the bottom edges to the head, then glued the pom pom to the top back edge completing the hat. With the rest of the scarf I wrapped it around the neck and tied a knot bringing the tail down one side where I glued it in place under the arm. You could certainly use knitted material such as an old sweater and fashion a cap and scarf the same shape as my crocheted scarf or just go with a scrap of fabric tied around the neck.

- What self-respecting snowman would go around without a nose? Push the snowman's nose through the hole from the back, add a spot of glue around his nose (on the back) just before you have it all the way through. You now have a snowman on a stake to enjoy or give a way.
By Ann W. craftingtales.com from Loup City, NE
Add your voice! Click below to comment. ThriftyFun is powered by your wisdom!
August 31, 20110 found this helpful
Adorable as ever! Now I am all stoked about the Holidays. Thanks for the great tip.
Add your voice! Click below to comment. ThriftyFun is powered by your wisdom!