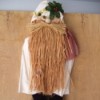
Brighten a wall or welcome your guests with this jolly Old Saint Nick. He requires a small number of items to make him, most of which you may already have around the house. White material from a tablecloth works great for his clothing and I purchased one in a thrift store. I also found a blouse the right color that I cut and made his face from. Non-stretchy material works best. Raffia can often be purchased in dollar stores. This Santa is very inexpensive to make but very rich in looks. You can adjust your cuttings to make him any size you want.
Approximate Time: time will vary
Supplies:
- white material for clothing
- muslin or flesh color material for head
- material strip for scarf
- plastic or wire hanger
- pair of gloves-size depends on Santa size chosen
- rolled stuffing or batting
- piece of wire for glasses
- raffia for beard, hair, and mustache
- small wreath-optional
- black permanent marker
- sturdy cardboard for face
Instructions:
- You will first need to decide on the size of Santa you would like to make. Not including the wreath, mine is approx. 2 ft. tall. If you would like to make a smaller one, use a child's hanger instead and cut material to fit that size.
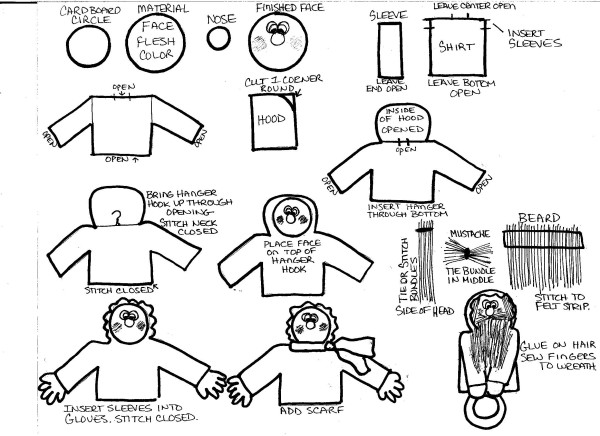
- I made his shirt and hood from a white table cloth. The shirt body is just two rectangular pieces and the sleeves are long tubes. I made the hood by cutting two squares and rounding one corner of them for the back. You will be inserting a hanger so just be sure to cut your material wide enough for the size hanger you are using. I chose a plate the size I wanted his face to be and used this as a template for his head.
- Cut a circle from sturdy cardboard the size you want the face to be. Then cut a circle from flesh colored material larger than the cardboard one. You will need it big enough to gather the outer seam so it covers the back of the cardboard.
- Lay circle flat and draw on eyes with marker.
- Cut a smaller circle from same material for nose. Make a running stitch along outer edge. Put a ball of stuffing inside and gather closed. Make some stitches to secure the ball closed in back. Sew to face.
- Make glasses by wrapping a piece of wire around something circular. I used a paint bottle. Bend into two circles and stitch in center onto face, on top of nose.
- Rub blush onto the cheeks.
- Take 2 long rectangular strips for each sleeve and sew together, leaving one end open. Cut two rectangular or square pieces for shirt. Be sure they are wide enough for the hanger to fit inside once sewn together. I turned the edges in on my two shirt pieces and sewed them flat. Put both shirt pieces together and insert arm tubes. Sew closed, leaving bottom open and the center of top, where the neck would be.
- Turn edges in on the two hood pieces and sew. Place both pieces together, matching the rounded corner. Sew top seam and along back, leaving the other two sides open. Lay hood right side down on a table. Lay top of shirt on the hood's bottom edge. Pin together and hand stitch hood to shirt, being sure to leave neck open on shirt.
- Insert the hanger into the shirt and pull hook part through opening at neck. Stitch neck opening in shirt closed, securing the neck of the hanger. This should now look just like a shirt hanging from a hanger.
- Cut circles of flat stuffing for face, using cardboard circle as guide. Cut several, laying each on top of the cardboard circle until the face is fat enough for your satisfaction.
- Make a running stitch along outer edge of face. Lay cardboard circle down, then layers of stuffing with the face circle on top. Pull thread to gather face behind cardboard circle and sew in several places to keep closed.
- Lay shirt and hanger on table with hood opened. Place head into hood and secure to shirt at neck by stitching well. Secure hook of hanger to back of head by stitching in a few places. Do not stitch hood to head yet.
- I wanted a very full looking beard so I used 2 bundles of raffia. You will need the raffia to be straight and most come packaged, which makes it curved or twisted. To straighten, remove from package and soak in a sink of hot water. Squeeze excess water from raffia and lay pieces out straight on counter on top of a towel to dry. The facial hair for Santa is the most time consuming, but the end result is worth it. Once the raffia is dried, you can apply it to the face in a couple of ways. For the sides of the head, I made small bundles and stitched each at the top. Then I hot glued them on. For the beard, I cut a strip of felt, the length across his face. I then sewed the raffia onto the felt with a sewing machine. I kept adding more until I achieved the fullness that I wanted. I took a good size bundle for the mustache and tied it in the center with a few pieces of more raffia. I hot glued the felt onto the face and the mustache on top of that, under his nose.
- Make a few gathers at the front hood edge so the hood fits nicely around his face. Secure small gathers with stitches. When desired look is achieved, stitch hood to back of head in a few places.
- Sew loop on back of hood to hanger.
- Wrap a long strip of material around the neck and tie at side for scarf.
- Insert ends of each sleeve into a glove and sew closed. I used a pair of older child's gloves for mine. If your Santa will be holding something, such as a wreath, wrap fingers of glove around item and sew to secure.
- You can hot glue items on to the Santa such as holly or ribbon for trim on his hood.
By Mary from Palm Coast, FL