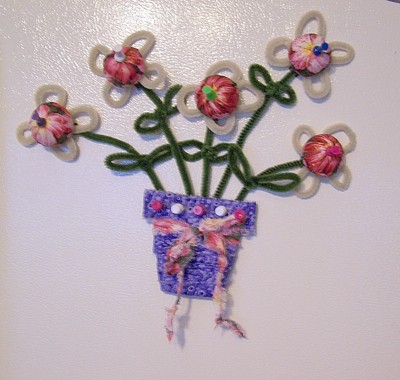
Any mother is sure to enjoy leaving notes with this cheerful note holder and you are giving a bouquet to her also.
Supplies:
- three Styrofoam 1 1/4 inch balls
- floral fabric scraps
- decoupage liquid
- flower pot fabric scraps
- double thick cardboard for flower pot
- pushpins
- 3 contrasting chenille stems
- tacky glue
- hot glue
- 5 green chenille stems
- wire cutters
- 7 strong small magnets
- scissors
Instructions:
- Cut the three Styrofoam balls in half with a sharp knife.
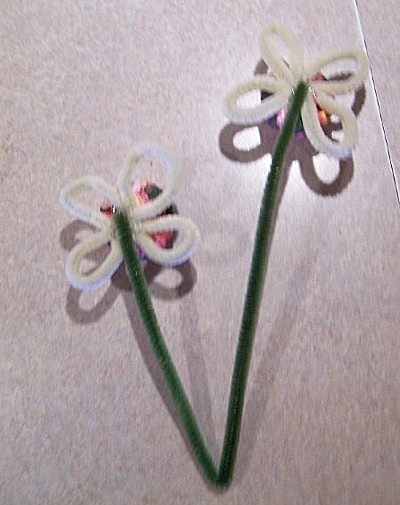
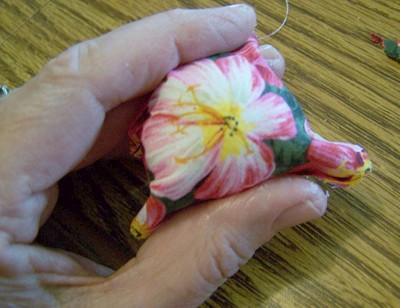
- From your floral fabric cut around a flower that you will center on each of your five half Styrofoam balls around 1/2 inch wider than the ball. They don't have to be exact because you will be gluing it around to the back. You don't want a lot of bulk so don't overlap too far. I centered my ball on a flower, wrapped the fabric around the ball then cut 1/4 inch from the ball around in a circle.
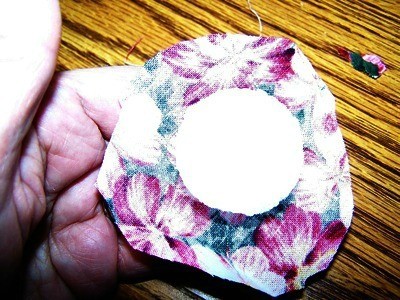
- Run a circle of tacky glue on the half ball and fold your fabric over the edges, try to avoid folds in your fabric as much as you can. Repeat with all 5 half balls.
- With your contrasting chenille stems bend them into 4 petal shapes around your thumb then using hot glue attach them to the back of each half ball.

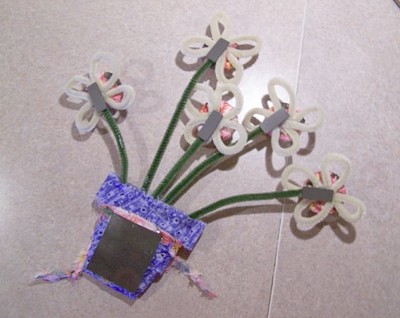
- Bend two of the green chenille stems in half unevenly, cut another one for the fifth stem shorter than half of one stem. Use hot glue to attach a flower to each end, also to add a good magnet to each flower.
- Cut a magnet for the back of the flower pot or use two of the small ones.
- Tear strips of your contrasting fabric 1 inch wide and wrap your flower pot starting at the back. Make a smooth wrap around the top rim then fold the strip in half and make twists in the fabric as you wrap around and around slightly overlapping; ending on the back and hot gluing to secure.
- Slip your flower stems between the fabric and the back of the cardboard pot. Put hot glue inside the fabric over and around the stems, press the fabric into the glue.
- Tie a strip of fabric around the pot for a bow. Put push pins in the rim of the pot and if your magnets are strong enough in the flowers.
- Write a note to put under one of the push pins telling Mom how special she is and wrap up your Flower Pot Note Holder.
By Ann Winberg from Loup City, NE
Add your voice! Click below to comment. ThriftyFun is powered by your wisdom!
Keeper
Gold Feedback Medal for All Time! 690 Feedbacks June 13, 20110 found this helpful
How cute. Thanks for sharing.
Julia
Bronze Post Medal for All Time! 146 Posts June 15, 20110 found this helpful
Turned out so pretty. A really great idea, and excellent instructions.
Thanks for sharing it with us.
Pookarina
Add your voice! Click below to comment. ThriftyFun is powered by your wisdom!