social

Hanging Ball Made With Old Cards

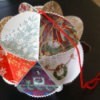
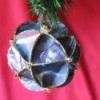
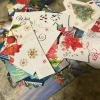
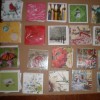
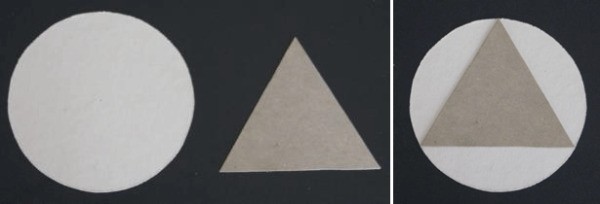
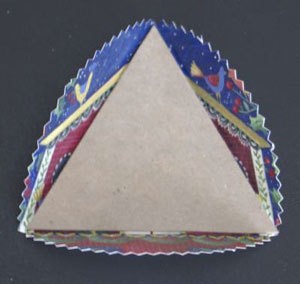
Take 20 used Christmas card (or any other card) fronts and cut out 4 inch circles. Using a triangle template, fold the edges of the circles up to form flaps. Glue the flaps together, add a hanging ribbon and you have an 8" decorative ball.

Advertisement

Approximate Time: 1-2 hours -- longer with young children
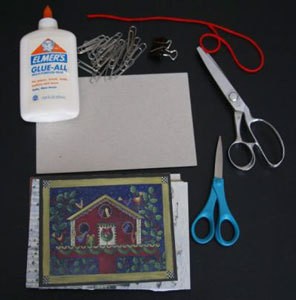
Supplies:

  • 20 used Christmas card fronts
  • cardboard
  • regular scissors
  • pinking shears
  • glue
  • paper clips (optional)
  • large binder clip (optional)
  • ribbon or yarn

Greeting Card Ball Supplies


Instructions:

Preparation:

  1. With regular scissors, cut a 4 inch circle and a 3-7/16 inch equilateral triangle on sturdy cardboard (not corrugated). Using these dimensions will make a ball about 8 inches in diameter. Any other size circle will work - just make the equilateral triangle so that it fits inside the circle with all three points touching the edge of the circle.
  2. Select 20 Christmas card fronts that are all about the same thickness of card stock and at least one-fourth inch wider than the diameter of the cardboard circle.
  3. Advertisement

  4. Place the cardboard circle on a Christmas card front and cut around it with pinking shears. So that the circles are uniform, try to get as close as possible to the cardboard circle's edge without cutting into the cardboard. I use a binder clip to hold the cardboard circle and Christmas card securely - it's easier on my hand. You could also use other craft scissors that cut other patterns such as small scallops.
  5. Greeting Card Ball Prep
     

  6. Divide the card circles into two groups of ten.
  7. Take each card from the first pile and center the cardboard triangle with one of the points up (pointing away from you); fold the exposed edges upward to form three flaps.
  8. Advertisement

  9. Do the same with the second group of ten, but place the triangle with one of the points down (pointing toward yourself).

Assembly:

  1. The ball is made in three parts - a top "cap", a middle band, and a bottom "cap". As you are assembling the ball, make sure all the pictures are in the same direction. Paper clips are handy to hold the flaps together while the glue sets.
  2. To make the top "cap" of the ball, take five cards from the first group that were folded with the triangle point up and glue the side flaps together. Set aside.
  3. To make the bottom "cap" of the ball, take five cards from the second group that were folded with the triangle point down and glue the side flaps together. Set aside.
  4. Greeting Card Ball Assembly
     

    Advertisement

  5. To make the middle band or ring, take the remaining ten cards and glue the side flaps together, alternating those that were folded with the triangle point up with those that were folded with the triangle point down. Set aside.
  6. Cut a length of ribbon or yarn to use for hanging the ball. Glue one end to a small piece of cardboard. Thread the other end through the hole in the center of the top "cap".
  7. Place the top "cap" on the middle band and glue the flaps together where they meet. Attach the ball's bottom under the middle band and glue those flaps together.
  8. If you used paper clips, remove them carefully to avoid tearing the points around the circles.
  9. In order to find the best part of the picture to cut out a circle, cut out a sample circle using scrap paper. Lay this over the card front before cutting and move it around to see how the circle will look.
  10. Advertisement

  11. Make interesting groupings by varying the length of ribbon or make various size balls. Use Christmas cards that have the same theme - all Santas, all wreaths, all one color, etc. Make a ball from other greeting cards - Easter, birthday, flowers.

By Linn VW from York, PA

Using Old Christmas Cards
 

Add your voice! Click below to comment. ThriftyFun is powered by your wisdom!

 
January 23, 20080 found this helpful

Beautiful!

Also makes me want to try this with fabric with fusible interfacing on the back...

And to try it with different sizes of circles.

Thanks for such detailed instructions!


Bronze Post Medal for All Time! 104 Posts
January 23, 20080 found this helpful

That's real cute. I've seen it on Creative Juices on HGTV already. Nice pictures and instructions.


Silver Feedback Medal for All Time! 418 Feedbacks
January 24, 20080 found this helpful

So that's how these beautiful decorations are made. I wondered how many hands it took to make them.

 
By (Guest Post)
January 24, 20080 found this helpful

Love this ball; I might try it with decoupage!

 
By Gena (Guest Post)
January 27, 20080 found this helpful

I have made these for years! I mean -- many years. I am 50 now, and when I was in elementary school I saw this craft in a Highlights for Children. I made a couple balls, then taught my younger sister how to do it.

Advertisement

One fond memory, bittersweet, is from the Christmas before my father died of lung cancer mets. He was in bed, my mother had gone out of state for a wedding, and my sis and I had come home for Christmas early so she could go. Mom didn't want to deal with 'festivity' that Christmas, but T and I thought it was important. Against her stated wishes, we bought a small tree and stayed up till the wee hours making these balls and some folded-paper 'bells' out of wrapping paper. We made much smaller balls, using circles smaller than an inch in diameter.

Later, we learned that Dad treasured the hours in which he lay awake listening to us in the next room (we'd thought he was sleeping -- he was paralyzed from shoulders down at the time). Because of this, our mother didn't get mad at her ADULT children for defying her wishes!

I teach 5th grade, and have my students trace 20 circles on heavy drawing paper. They then color or draw on their circles before cuttng them out to make a ball. Interesting task -- they learn about circles, and equilateral triangles, and chords. Many of them need help gluing them together, but some pick it up quickly and are willing to help me help the others.

Thanks for sharing!

 
By Amber (Guest Post)
July 6, 20080 found this helpful

I posted a comment on someone else's question on what to do with old cards! On how to make these but I'm bad at explaining. Glad some one could explain it better and post a picture and you gave me an idea this year when I make them. I'm useing pinking shears!

 
By Amber (Guest Post)
July 6, 20080 found this helpful

I use a compass to make my circles. Then, you can use it also to make the corners of your triangle and just bend the flaps back!

 
September 15, 20080 found this helpful

I have made these using family pictures printed on photo paper. They are a treasure.

 
September 30, 20080 found this helpful

I have never seen these before! I have been saving Christmas cards for years not knowing what to do with them. I couldn't just throw them away. I had finally decided that after 16 years of saving it was time to throw some away. Now I don't have to. Thank you so much!

 
By Wendy S (Guest Post)
November 13, 20080 found this helpful

Thank you so much! I love it. I can't wait to make them. I bet valentine cards would be cute too!

 
February 21, 20110 found this helpful

I remember making this in 5th grade back in 1964. It was fun then and really fun today when I tried it again. A great project for all ages.


Add your voice! Click below to comment. ThriftyFun is powered by your wisdom!

 
In This Page
Categories
Crafts OrnamentsJanuary 23, 2008
Pages
More
🎂
Birthday Ideas!
🍀
St. Patrick's Ideas!
💘
Valentine's Ideas!
Instagram
Sub-Categories
AdviceBaking TipsBooksBoxing DayBudgetCardsCharitiesChristmas RecipesCleaningCooking TipsCraftsDecoratingDietingGamesGift WrappingGiftsHelpful HintsHosting TipsLinksMiscellaneousMy Frugal HolidayOrganizationParentingPartiesPhotosPlanningSanta TipsShoppingStocking StuffersTraditionsTravel
Published by ThriftyFun.
Desktop Page | View Mobile
Disclaimer | Privacy Policy | Contact Us
Generated 2024-02-05 18:58:25 in 6 secs. ⛅️️
© 1997-2024 by Cumuli, Inc. All Rights Reserved.
https://www.myfrugalchristmas.com/tf88387830.tip.html