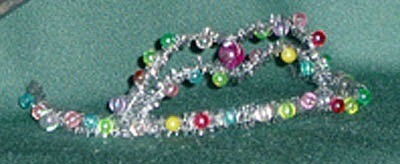
Home |  Index |  Submit Request |  Share Photos |  Share Tips |  Active Topics |  New Feedback  |  Contact Us  |  Search
 User Login:  Username:    Password:      Forgot It?  | Join ThriftyFun!

 Popular Topics
 - Beauty
 - Budget and Finance
 - Christmas *
 - Cleaning
 - Consumer Advice
 - Craft Projects
 - Craft Tips
 - Food Tips
 - Garage Sales
 - Gardening
 - Gifts
 - Green Living
 - Home Improvement
 - Organizing
 - Parenting
 - Parties
 - Pest Control
 - Pets
 - Product Reviews
 - Recipes
 - Repair
 - Thanksgiving
 - Weddings for Less

More Topics

Google Search:

Web thriftyfun.com

About:
RSS Feed
About Us
Media
Advertising
Contact Us
Privacy Statement
Disclaimer

Terrific Beaded Tiara

By Connie Decker Brown
1x1
Date: 08/31/2005 Topics: Craft Projects > Halloween > Costumes | Photos > Crafts  
1x1
1x1
Post Feedback! | Email Friend | Print | Get Responses | Bookmark | del.icio.us | Link | Rate: Thumbs Up Thumbs Down
Beaded Tiara

Supplies:

  • 1 package silver tinsel stems
  • 1 package beads
  • Grey or white upholstery thread
  • Beading needle

Directions:

1. Take one tinsel stem, tuck end over, and shape into an arc. Tuck the other end over.

2. Take another tinsel stem and fold it in half.

3. Twist the folded end, leaving a small hole. Shape into an arc.

4. Thread the first stem through the hole of stem #2.

5 Take the 2 loose ends of stem #2 and wrap them around stem #1 (see illustration).

6. Shape the two strands of stem #2 into the shape of a heart and stand them upright on stem #1.

7. Tuck the ends of tinsel stem #3, and shape into an arc like stem #1. Place it under stem #1. Stems 1 and 3 the base of your tiara.

8. Thread needle with upholstery thread.

9. Make a slipknot around one end of the base and tighten to join the stems.

10. String a bead onto the threaded needle, making sure it goes to the far end. Wrap the thread around the base, wrapping them together and keeping the bead on the outside.

11. Repeat step number 10 around the base until you reach the upright half-hearts.

12. Repeat step 10, going up and around one, then back and around the other, returning to where you left the base.

13. Repeat step number 10 around the rest of the base, making a slipknot at the end to finish.

14. Voila! One Terrific Tiara for your special princess.

Also see the Beaded Magic Wand.

Jump to Feedback | Post feedback
Related Links:
Previous: Craft Project: Juice Pouch Tri-Fold Wallet ThriftyFun Next: Swiffer Wet Jet Refill Recipes
1x1
 Feedback
1x1
1x1
1x1
1x1
 Sponsors
1x1
1x1

No Feedback Yet

Be the first to post feedback! Click here to post feedback.

1x1

Post Feedback:
Login using the form on the top of the page to post feedback if you have registered with ThriftyFun. If you have not yet registered, click here. It's FREE!. If you are not registered you can post feedback as a guest below. Please don't use your email address for your name because spam robots can dredge it from our site. Please do not post your feedback more than ONCE. We need to approve all guest feedback and it may take from minutes to hours for that to happen.
(1x1 graphic )
Your Name

Subject

Feedback

text tool text tool text tool text tool

Image Upload: Add an image to your post! Click the "Browse" button below and select an image from your hard drive. Please only select gifs or jpegs. If you have any problems, just email the image to images@thriftyfun.com


If you want to post your email address for responses from readers, obscure it in some way like put spaces between the name and @ sign and service address with (remove spaces) behind it or name (at) server (dot) com . This is for your protection from those creepy Robots.

(1x1 graphic )

© 1997-2008 ThriftyFun.com - Design by Cumuli Design
Disclaimer: ThriftyFun.com cannot accept any responsibility for any injury or damage that you may cause to yourself, others, or property when following any advice given on this site. Read the full disclaimer. If you find any information on ThriftyFun.com or in our newsletters that is either erroneous and/or potentially harmful to others, please Contact Us, immediately.