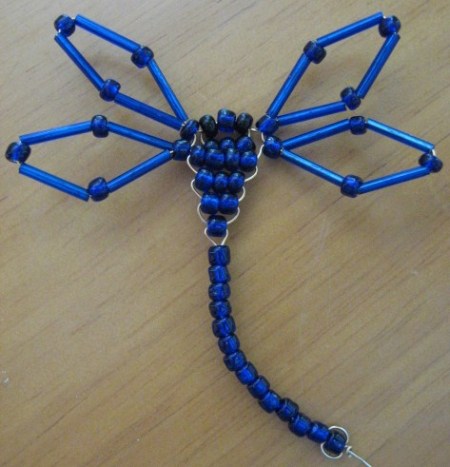
Follow ThriftyFun
 

Crafts Contest Results

This contest had 4 contenders. You can view the winning posts below.

Started: July 02, 2012

Ended: July 08, 2012

Voting Ended: July 15, 2012

Contest Entries: 4

Winners: Fast and Easy Beaded Dragonfly.

Enter a Contest!

Fast and Easy Beaded Dragonfly
contest winner icon

Supplies:

  • "E" beads (approximately 50 colored and 2 black for the eyes)
  • bugle beads (16)
  • fine craft wire 36 inches (26 gauge, or just use inexpensive fine floral wire)

Instructions:

  1. First you will cut a length of wire 36 inches long.
  2. Place 3 E beads on the wire, in the middle of the wire, then add a black bead, a colored bead, and another black bead, which will become the eyes of the dragonfly. Be sure to snug the beads so there is little wire showing.
  3. Next, place an E bead, then a bugel bead, then another E bead, bugel bead, E bead, bugle bead, until you have a wing made. (4-E beads/4-bugle beads.)
  4. Now you will go through the E bead at the beginning of the wing, come out and start your other wing the same way as the first wing was made.
  5. Place 4 E beads on the wire, then go back through the beads with the end of your wire, then place 3 beads on the wire, go back through those beads, then 2, and go back through those beads, then one bead, and now you are at the tail section of your dragonfly.
  6. Place 16 E beads on the wire, and at the very end, take the 2 loose ends and go back through the last bead to secure it, and you are finished.
  7. You can use the excess wire to place your dragonfly into a floral arrangement if you wish.

By CDC from FL

5 0SharePrintFollow
Clay Pot Frog
These are cute for your garden.

Approximate Time: 1 hour

Supplies:

  • 4 small clay pots
  • 1 medium clay pot
  • 2 big googly eyes
  • glue
  • green and pink acrylic paint
  • paint brush

Instructions:

  1. Paint all of the inside of the pots pink. Let dry.
  2. Then paint the outsides green.
  3. When dry add googly eyes inside of 2 of the small pots at the bottom glue in.
  4. Then glue the two pots to the top of the medium pot. Lay it on its side before gluing them on.
  5. Then glue the other two little pots onto each side of the medium pot for legs. Let dry.
  6. Sit it in your garden.

By coville123 from Brockville, Ontario

2 1SharePrintFollow
Pringles Can Straw Dispenser
I have been making straw holders/dispensers from empty Pringles containers (or the cheaper version of Pringles). I wanted to make them look like ice-cream sodas. My inspiration came for a 50s wedding that I was helping with. This is what I came up with.

Materials:

  • Pringles can, empty
  • paper, scrapbook paper works well
  • paint
  • glue
  • wooden skewer
  • half of a straw
  • foam/polystyrene ball
  • artificial cherry or red paper ball
    (If using paper ball, you will need a stick for the stem.)
  • hobby fill (polyfill)
  • 600 ml water bottle, about 20 ounces
  • hot glue gun and glue
  • glitter, optional
  • ribbon, optional

Instructions:

  1. I painted tin white (just in case paper was a bit see through. If using a heavy quality scrapbook paper you could probably skip this step.
  2. I then painted the rims a pink colour as well.
  3. Wrap tin with paper of choice. I used pink and black stripes and also polka dot paper.
  4. You need a wooden skewer and a foam/polystyrene ball. Stab the ball with the skewer and slide on.
  5. You will then need to stab/slide on a "cherry". I didn't have any fake cherries so I used a red paper ball and glued a stick/stem into it.
  6. Then stab the ball from the side top to add half a straw for decoration.
  7. Cover the polystyrene ball with glue and stick hobby fill all over it. This makes the fluffy milkshake.
  8. Cut the bottom off a 600ml water bottle (or equivalent/whatever fits).
  9. Make a hole in the centre bottom. Poke the bottom of your skewer through it and hot glue. This forms the "lift" and holder for the straws.
  10. Extra embellishment - wrap the skewer with ribbon, spray glue the hobby fill/fluff and sprinkle some hot pink glitter on the top. Wrap a bow or add a "straws" label and Da Da you are done! It looks great. So cute and practical.
  11. Source: original idea from igottacreate.com

    By Rebecca from Ipswich, Queensland, Australia

2 0SharePrintFollow
Uses for Vinyl Records
Simple use for vinyl records!

Approximate Time: 5 minutes

Supplies:

  • old vinyl records (any size)
  • vases
  • glasses
  • plants or flowers

Instructions:

Simply place records over a fancy drink glass or vase and place flowers in the middle. Pretty for a party.

You can also do this with houseplants (keeps them moist longer) or even in your garden to hold down weeds around your growing corn stalks/veggies.

By AHA! from Sterling, PA

0 0SharePrintFollow