Follow ThriftyFun
 

Crafts Contest Results

This contest had 7 contenders. You can view the winning posts below.

Started: June 25, 2012

Ended: July 01, 2012

Voting Ended: July 08, 2012

Contest Entries: 7

Winners: Reinvented Character Pillow Chair.

Enter a Contest!

Reinvented Character Pillow Chair
contest winner icon
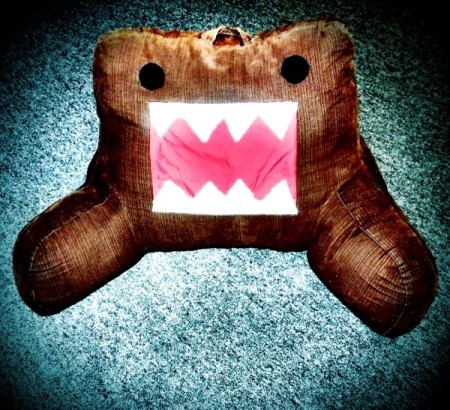
I wasn't so thrilled when my husband brought home this brown pillow chair from a discount retail store just because it was cheap. I didn't really care for how it looked. One day I gathered a few scrap items from my kitchen and my handy glue gun (I'm not so great with sewing) and spruced it up to look like my favorite popular Japanese cartoon icon. All my friends adore it. It's a great way to give kids a favorite seat!

Approximate Time: 20 minutes

Supplies:

  • pillow chair
  • large plastic bottle caps
  • old white towel
  • small scraps of black cloth
  • scrap of red cloth
  • hot glue gun

Instructions:

  1. Cut black scraps into circles a bit larger than your bottle caps (I used large sports drink caps that measured almost 2 inches across). Make sure the cloth covers the caps all the way. Take your glue gun and glue the cloth on to the bottle caps. Press down to seal. Let dry.
  2. Cut a square from your red cloth about 10 inches wide and 8 inches high. This will be the red mouth. Glue it on to your pillow chair. Press down to seal. Let dry.
  3. Cut out zig zags from your white towel (or white cloth) 10 inches wide and 2.5 inches high. I used the ends of the towel for the top and bottom of his mouth so it didn't fray and was perfectly straight.
  4. Glue teeth down on to the red cloth square. Press down to seal. Let dry.
  5. Put a generous amount of hot glue on the cloth covered bottle caps (under side) and press onto the pillow chair above the mouth. Press firmly for a good 30 seconds. Let dry.

Voila! Iconic monster chair! You can, of course, spruce up your chair to look like any character. This just happens to be my favorite little guy. :)

By attosa from Los Angeles, CA

Completed project.
8 0SharePrintFollow
Butterfly Birthday Card
Make this simple, yet elegant, card to convey birthday wishes to a special family member.

Approximate Time: 20 minutes

Supplies:

  • two pieces of light purple marbled card stock: 8.2 inches x 5.6 inches for the card and 5.2 inches x 3.5 inches for the frame
  • two pieces of dark purple paper: 5.4 inches x 3.7 inches for front of card and 8 inches x 5.4 inches for inside of card
  • light purple paper, sized 5.2 inches x 3.5 inches
  • two similar butterflies, cut from scrapbook paper (or use printed butterflies from the given design)
  • four short bristles cut from a broom
  • pencil
  • a pair of standard scissors
  • ruler
  • purple satin ribbon, 0.3 inches wide
  • quick-drying glue

Instructions:

  1. Fold the 8.2 inches x 5.6 inches marbled card stock crosswise in half to create a card 5.6 inches x 4.1 inches ~ use the ruler to make the fold neat and smooth.
  2. With the fold at the top, center and glue the 5.4 inches x 3.7 inches piece of dark purple paper to the front of the card.
  3. Take the 5.2 inches x 3.5 inches of marbled card stock and cut out the inside, leaving a space of 0.5 inches from the outer edges of this piece to make a "frame".
  4. Glue the light purple paper to the back of the frame.
  5. Center and glue the frame to the front of the card.
  6. Glue purple ribbon all around the frame, where the card stock ends and the light purple paper starts.
  7. Glue the two butterflies to the front of the card, and add two bristles for each butterfly. The bristles will be the antennae.
  8. Fold the 8.0 inches x 5.4 inches dark purple paper crosswise in half and glue it to the inside of the card to write a message.

Photos included:
The butterfly design used for the card.
The completed card.

By BessieBessie from Pretoria, Gauteng

Completed card.
5 0SharePrintFollow
"Tiny" Doll - Pteranodons
This quick craft is inspired by the "Tiny" dolls seen on the children's program "Dinosaur Train." The dolls are meant to look like pteranodons made from sticks and leaves.

Approximate Time: 3 minutes

Supplies:

  • spring-less clothespin
  • silk floral leaf
  • silk floral flowers (optional)

Instructions:

  1. Remove the leaf and/or flowers you are using from the floral stem by pulling it off.
  2. Place nubby end of leaf/flower between the prongs of the wooden clothespin at the bottom.
  3. Push the leaf/flower up toward the middle of the clothespin. As it moves higher, the clothespin narrows, tightly holding the leaf or flower.
  4. Add additional flowers or leaves if you like. Secure with tape or glue if desired.

By Kirsten from Logan, UT

Completed doll.
2 0SharePrintFollow
Making Little Fabric Bags
Are you a sewer or quilter? Do you have lots of small pieces of material left over? Don't throw them out, but recycle them. You can make fabric bags in various sizes to use for gift bags, jewelery, cosmetics and even to put your keys inside your handbag so you can spot them quickly when needed. I have made many of these little bags over the years.

Approximate Time: 30 minutes

Supplies:

  • piece of cotton fabric
  • string, cord, or twine
  • sewing machine
  • scissors
  • iron

Instructions:

  1. Just cut a rectangle shape any size you want, fold in the sides and iron, then fold down the top edge and iron.

  2. Slip a cord or twine under the top folded down edge.
  3. Sew along the top to encase the cord or string.
  4. Then fold bag in half with wrong side out and sew down the sides and across the bottom.
  5. Turn right side out, tie two cord ends together and you are done. See picture.

By Linn from Nova Scotia, Canada

Small fabric bags made from fabric scraps.
2 0SharePrintFollow
Knitted Laptop Cozy
I made (knit) a simple rectangle shape to put under my laptop. This computer cozy helps to slide the computer and it distributes the battery heat.

By Louella from Billings, MT

Knitted rectangular cozy.
2 0SharePrintFollow
Upcycled Plastic Bag Saver
This is a great way to keep those plastic bags near by but contained. Use a large men's shirt sleeve!

Approximate Time: 1/2 hour

Supplies:

  • men's long sleeve shirt
  • sewing machine
  • whipped topping container 8 oz.
  • scissors

Instructions:

  1. Cut the sleeve off the shirt as high as possible and hem the end, about a 3/4 inch hem. Leave an opening in the hem for inserting the plastic strip.
  2. Cut the whipped topping bowl into about 1/2 inch wide strip. Round the short ends. Now you are ready to feed it through the hem, it should push through easily.
  3. Next you will cut a slit about 1 inch from the end halfway up and on the other end half way down, this way they can intersect with each other and it keeps the plastic in a full circle.
  4. All you need is to complete sewing the hem up and attach a small loop for hanging.
  5. The bags will fall down into the sleeve cuff and you add new ones in at the top. I turned the cuff up after I buttoned it. Mine hangs in my pantry, it's so handy when I need a bag.

    By NoRulesArt from sunny FL

    Plastic bag holder made from a shirt sleeve.
1 0SharePrintFollow
Rice and Bean Mosaic Decoration
Old beans, corn, and rice can make a great mosaic design hanging.

Approximate Time: 1-2 hours

Supplies:

  • thick cardboard
  • Elmer's glue
  • old beans, corn, and rice
  • woven flat basket or frame
  • pencil

Instructions:

  1. Cut a piece of cardboard the size you'd like for your decor. Draw a design on the cardboard with a pencil.
  2. Arrange many different kinds of beans and rice in piles to get your design.
  3. Apply glue in each area and lay beans/rice securely.
  4. When the design is complete, lay wax paper over the glued design and pile many books on the design over night to dry.
  5. Attach to a backdrop of either a woven flat basket, a plate, etc.

By Louella N from Billings, MT

Abstract design mounted to shallow round basket.
0 0SharePrintFollow