Follow ThriftyFun
 

Crafts Contest Results

This contest has 6 contenders. Vote for the posts that you like the best. You can vote for as many as you like.

Started: July 23, 2012

Ended: July 29, 2012

Voting Ended: August 05, 2012

Contest Entries: 6

Enter a Contest!

Cornstarch Beads
contest winner icon
This is a super easy and fun way to make beads for a necklace or bracelet. All it takes is three ingredients that you have in your kitchen to make the basic beads. I've added color and sealant to mine. You'd never know it was cornstarch!

Supplies:

  • 1 cup water
  • 1 1/2 cups table salt
  • 1 cup cornstarch
  • acrylic paint of your choice
  • gloss glaze
  • thick needle

Instructions:

  1. Bring water and salt to a boil in a pot. Turn off heat and quickly add cornstarch. Stir until it becomes a sticky paste.
  2. Let it cool a bit then pick it up and start to shape the dough in your hands. If needed, add more cornstarch to get the right consistency.
  3. Start rolling beads to whatever size and shape you like. I did slightly larger ones for my necklace.
  4. Once you have your beads rolled out, use a thick needle to poke a hole through each bead.
  5. Let them dry for 24 to 48 hours, depending on how large you make them it may take longer for to them dry.
  6. Once dried, you can leave them white, paint them (like I did) and coat them with a thick gloss glaze. I just used the needle and a piece of thread to turn mine into a necklace. Enjoy!

By attosa from Los Angeles, CA

Corn starch beaded necklace.
10 0SharePrintFollow
Decorated Cookie Christmas Tree
contest winner icon
Excellent and yummy gift, easy for kids to make!

Approximate Time: 30 minutes to assemble

Supplies:

  • 5 to 8 star cookies of different sizes
  • frosting
  • sprinkles
  • cardboard circle base
  • cellophane and ribbon

Instructions:

  1. Using a gingerbread cookie recipe (or any other sturdy cookie recipe) make your own cookie stars of varying sizes.
  2. You can then create as many giftable trees as you wish using 5 to 8 cookies each.
  3. Frost each of your cookies with green frosting, add sprinkles, and stack them- largest on the bottom to smallest at the top. You will use a dollop of frosting between each to "glue" them together with the base of tree "glued" to the cardboard circle.
  4. For the top star you can use another color frosting.
  5. Once assembled you can use frosting to add details such as snow if you wish.
  6. Small square pieces of cookie can be decorated to look like gifts under the tree!
  7. With the cellophane under the cardboard pull it up and gather it around and tie with ribbon and add a to/from tag.

By Kelly L. from Ann Arbor, MI

Decorated Cookie Christmas Tree
5 1SharePrintFollow
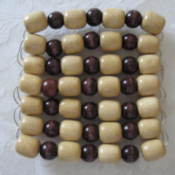
Wooden Bead and Wire Trivet

Approximate Time: 1 Hour

Supplies:

  • 20 gauge wire
  • 28 large wooden beads
  • 21 medium wooden beads

Instructions:

My trivet measured 4 inches X 4-1/2 inches. You can buy the large assorted packs of beads for approximately $10, and there will be enough to make a trivet.

  1. Lay out the beads into a pattern that you like and then measure the wire accordingly. You will be going back through the rows, so you will need a lot of wire. (I used approximately 80 inches of wire.)
  2. Find center, then thread the first and second rows of the trivet onto your wire, then you will go back through the second row and continue doing this with your rows until you have finished your trivet.
  3. At the end you will need to go back through your previous row (or two) to hide the ends of your wire.

By CDC from FL

Large bead trivet.
2 0SharePrintFollow
Recycling Round Tablecloths

Approximate Time: 1 hour

Supplies:

  • round tablecloths
  • scissors
  • iron on bias tape

Instructions:

I imagine almost everyone has a couple of round tablecloths stashed in a drawer someplace. If you don't have any, they can be found at thrift stores in abundance, and sometimes after a holiday, they can be bought for very little money.

You can make 2 cute valences by cutting a round tablecloth in half, then leaving at least 2 inches for the rod pocket on the cut edge, then using iron on tape to finish your valence, or if you sew, sew a rod pocket.

It's easy to make your own Christmas tree skirt by using a tablecloth also. Fold and find the center, mark, then cut a straight line to your center mark, then iron on bias tape on the raw edges and you can add Velcro or ties to close the skirt in back of your tree.

You can also make a fireplace mantle treatment, by cutting your cloth in half, then finishing the cut edges with iron on bias tape.

If you sew, you can make a cute circle skirt by cutting out the center per your waist size, then cutting down from the small circle cut out at center, which would be about 6-8 inches, or enough to allow you to get the skirt over your head, then add 2 cute ribbon ties, Velcro, snaps, buttons, or sew in a zipper.

Have fun! Use your imagination for recycling those round tablecloths!

By CDC from FL

1 0SharePrintFollow
Use a Cupboard Door as a Tray
I thought this was a cool idea.

Approximate Time: 2 hours

Supplies:

  • cupboard door
  • house paint
  • acrylic paint, your colour choice
  • 2 handle pulls
  • drill
  • stencil
  • screw driver
  • spray paint, your colour choice

Instructions:

Paint your cupboard door with house paint, colour of your choice. Let dry, you may need 2 coats. I did black and blue.

Use your stencil or free hand and put your design on with acyrilic paint. Let dry.

Drill holes for your handle pulls. Also spray paint your handles, colour of your choice. When dry, attach onto your tray. You will need ones your hands can fit into.

You can add a protective coat of shellac, if you want. Then you're done.

By coville123 from Brockville, Ontario

Use a Cupboard Door as a Tray
0 1SharePrintFollow
Gold Jump Ring Earrings

Approximate Time: 30-40 minutes per set

Supplies:

  • 2 gold colored French earring wires
  • 26 medium sized split jump rings
  • chain nose pliers or needle nosed pliers

Instructions:

  1. I like split jump rings as they are more secure and also add more interest to your earrings. Start by placing one split jump ring on each of your earring wires.
  2. Next take 3 jump rings, all at once, and place them all on the jump ring you placed on the earring. (This saves time.)
  3. Now add 3 more jump rings, in a row, on each one of the other jump rings that you have placed on the wire. That is it! You're done!

Note: The very last picture shows how your earrings can be changed by just adding 6 "dangles" to the last jump rings at the very bottom. Your earrings can be lengthened, or shortened also, as you like.

By CDC from FL

Set of earrings without the added dangles.
0 0SharePrintFollow