social

Snow Man Door Stop


Bronze Feedback Medal for All Time! 149 Feedbacks

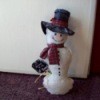
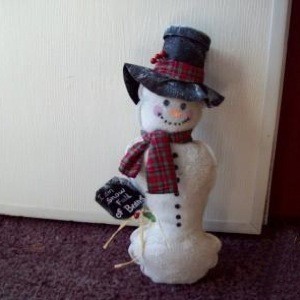
With just a few scraps of fabric from an old polyester blanket and a few household craft supply items you can create this adorable snowman door stop for your home or as gifts to give for the holidays. Just as his sign states "He is full of beans". His bottom inside is filled 1/4 of the way with beans to hold him in place to create your holiday doorstop.

Advertisement

Approximate Time: 1 hour or less

Supplies:

  • old polyester blanket fabric scraps (save old blankets that get holes in them or rips and put them to cute holiday craft use).
  • any type dried beans to fill his inside bottom 1/4 full so he will sit up straight and be a weight for the door to stop in place (I used pinto beans in mine)
  • polyfill fiber batting for the remaining inside of his body and head
  • scissors to cut your fabric pieces
  • sewing machine using a straight or zigzag stitch to sew up his body and head
  • fabric scraps for his scarf and matching trim around his top hat
  • old leather or black fabric scraps to cut out his top hat
  • cardboard tube cut the length for his top hat's middle section
  • mayonnaise lid for his top hat top to add weight and added charm
  • glue gun and glue sticks to glue his 2-section body pattern together after it is stuffed, also to glue your top hat pieces together and onto his head
  • Advertisement

  • acrylic paints (white, black, pink, and orange) to paint his facial expression and to add white paint dabbed onto his body and hat for "snow"
  • craft paint brushes; thin liner brush for face, old tooth brush or stencil brush for snow effect
  • small square of black poster board for his sign and a Popsicle stick for the sign post

Instructions:

  1. Cut your old fabric scraps for his body into the size you want him to be simply by cutting an hour glass shape pattern in into 2 pieces.

  2. Also cut 2 circle pieces of the same fabric for the head, this should be a bit smaller than the top half of his body.
  3. Fabric pieces for body.
     
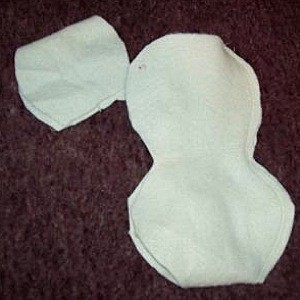
  4. Sew him up on your sewing machine on his body by starting at one end and coming all the way around, but leave the top part across his shoulders left open for now so you can fill his body with both the beans then the polyfill.

  5. Sewing parts together.
     
  6. Advertisement

    Lay him aside and do the same thing sewing up his head also leaving the bottom of the head un-sewn so you can fill it with polyfill.

  7. Now stuff the snowman by putting 1/4 of his body full of dried beans and then stuff the remaining body and head tightly with lots of polyfill making him fat full and round.

  8. Now hot glue his head to his body with his head on his upper body around the shoulder section, let that set up and dry good so it does not come off.

  9. Set him aside to make your top hat by cutting out 2 pieces from fabric scraps (his hat's edge should be floppy only the middle brim and top will be the firm part). For the hat's underbrim part, cut out a circle a bit bigger than his head's top size around. Cut a piece of the same fabric in a long narrow rectangle shape which you will glue around a paper roll (I used a paper towel roll cut to my desired height of 3 inches).

  10. Advertisement

  11. At this point cut the large circle for his hat's brim in the center just a bit by slicing it into pie sections of 8, about 1 inch inside so you can fold it back into the middle section of the top hat's tube and glue it with your glue gun.
  12. After you have painted your mayonnaise lid black with your paint and it is dry, glue it to the top of your paper roll so he has his top hat's top on his hat.

  13. Now glue it to his head with hot glue. Then you add the finishing touches by putting a fabric scrap around his neck and hat's brim to match his scarf by gluing those on and tying the scarf onto his neck.

  14. Use your paints and paint on his facial expressions and his sign to hold and dab the white paint over his body and hat and sign to simulate snow added.
  15. To add his sign, I cut a small slice into his body's side fabric and put some hot glue on his stick's bottom. Then just stick it half way in. After it dries it will remain there.
Advertisement

He is now ready to add charm to any door as your holiday doorstop.

Happy Holidays!

By Julie from TN

Doorstop by door.
 

Add your voice! Click below to comment. ThriftyFun is powered by your wisdom!


Bronze Post Medal for All Time! 163 Posts
November 26, 20170 found this helpful

Cute!


Add your voice! Click below to comment. ThriftyFun is powered by your wisdom!

 
In This Page
Categories
Crafts MiscellaneousDecember 20, 2009
Pages
More
🎂
Birthday Ideas!
💘
Valentine's Ideas!
🍀
St. Patrick's Ideas!
Instagram
Sub-Categories
AdviceBaking TipsBooksBoxing DayBudgetCardsCharitiesChristmas RecipesCleaningCooking TipsCraftsDecoratingDietingGamesGift WrappingGiftsHelpful HintsHosting TipsLinksMiscellaneousMy Frugal HolidayOrganizationParentingPartiesPhotosPlanningSanta TipsShoppingStocking StuffersTraditionsTravel
Published by ThriftyFun.
Desktop Page | View Mobile
Disclaimer | Privacy Policy | Contact Us
Generated 2024-01-27 13:11:22 in 2 secs. ⛅️️
© 1997-2024 by Cumuli, Inc. All Rights Reserved.
https://www.myfrugalchristmas.com/tf37375883.tip.html