Follow ThriftyFun
 

Crafts Contest Results

This contest had 5 contenders. You can view the winning posts below.

Started: May 21, 2012

Ended: June 03, 2012

Voting Ended: June 10, 2012

Contest Entries: 5

Winners: Button Flowers in Salt Shaker Vase.

Enter a Contest!

Button Flowers in Salt Shaker Vase
contest winner icon
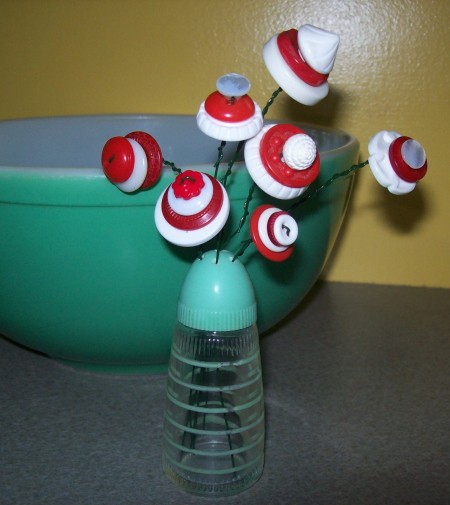
Use your button collection to make these funky flowers. Add a vintage salt shaker to hold your bouquet.

Approximate Time: Took me longer to choose the perfect buttons than it did to make the flowers.

Supplies:

  • old buttons
  • floral wire
  • salt shaker

Instructions:

  1. Use as many buttons per flower as you want, but I found that 3 or 4 was the easiest to work with.

  2. Simply thread the wire up through the buttons, one at a time, allowing enough extra wire to bring it back down through.
  3. Then twist the end around the longer "stem".
  4. If you want, you could wrap floral tape around the twisted wire, but I left it as is.
  5. Now poke your flowers into the holes of a salt shaker.
  6. Done.

*I saw this craft on several websites. This is my version*

By ~gloria from upstate NY

Red and white button flowers in salt shaker.
1 0SharePrintFollow
Driftwood and Rock Art
I love using natural objects for crafts. They look great on a table in a cottage or your home.

Approximate Time: 2 hours approximately

Supplies:

  • a small smooth rock
  • an interesting piece of driftwood
  • acrylic paint, brushes, and varnish
  • hot glue gun

Instructions:

  1. Enjoy a day at a lake, beachcombing for interesting driftwood pieces and nice smooth rocks that will fit nicely onto the driftwood.
  2. Find or take your own photo of an animal, bird, or flower that you like.
  3. Prepare your rock: wash, let dry, and then paint it with 2 coats of black acrylic paint (or whatever colour you like). You can buy acrylic paint at most dollar stores or in the craft area of department stores.
  4. Following your photo, paint the animal/bird you like on it. (I use white tracing paper I purchased at a craft store to apply my pattern onto the rock.)
  5. When you have finished painting, seal the rock with varnish (3 coats).
  6. Clean the sand and debris off the driftwood. You can wash it, but let it dry for a couple of days in the sun, or you can use an old paintbrush to brush the dirt off.
  7. Varnish the driftwood (3 coats, letting it dry well in between coats).
  8. Decide on a place on the driftwood where the rock will sit upright and then hot glue it to the driftwood.
  9. This is a beautiful cottage or home decor craft project using natural materials. It is also a great conversation piece to put on display. You can help kids with this craft providing them with photos of simple objects to paint (a basic flower, a smiley face, etc.)

By Ann from Goulais River, Ontario

A painted rock placed in a piece of driftwood.
5 1SharePrintFollow
Plant Labels for Vertical Shoe Holder Planter
This is a method for making plant labels that are weather resistant and pretty, for the project presented in Birds and Blooms Magazine by Kirsten Sweet. The designer did not give measurements for the labels she made. So I came up with my own. There is no intent here to take credit from her. Plus she mentioned using ultra-firm stabilizer and iron-on adhesive. When I went to buy some I found it to be very, very expensive. I had to find a more economical way. (Besides, I don't get along with irons.) So here are my instructions for the labels.

Approximate Time: 2-3 days for glue and sealant to dry.

Supplies:

  • glue: Aleene's "OK To Wash-It", permanent fabric bond.
  • plastic canvas, medium weight for bases - 3 sheets, (13 1/2 x 10 1/2 inches each = 300 square inches.)
  • pretty fabric, as coverings for the bases - 24, (6 x 6 inch squares.)
  • fabric canvas, medium weight for covering bases - 1 piece, 10 x 10 inches.
  • Sharpie brand permanent marker, fine tip
  • sealant: Thompson's Water Seal*
  • binder clips, 24 - 1 inch wide

*Do not use Mod Podge! It caused several problems after 6 days!

Instructions:

  1. Cut plastic canvas in to 24 pieces for bases. Each base should measure 2 1/2 x 3 1/2 inches.

    Note: You may use any base material that is weather resistant.

  2. Cut pretty fabric into 6x6 inch squares.

    Note: It's fun to have a different pattern for each base. I went to my neighborhood fabric shop and looked through their "scrap" box. Nicely, already cut squares of over 40 different patterns!

  3. Glue the pretty fabric around the bases of plastic canvas just like you would wrap a gift. Do this in steps, allowing the glue to dry a bit between steps so the tackiness will help each layer of fabric hold. Not much is needed so be judicious.

    Note: Aleene's "OK To Wash-It" is very sticky and takes a long time to dry. So be patient. This makes the labels water proof and washable, which is needed as the labels will get wet each time the plants are watered. When I thought I was finished, there were still tiny sticky spots, so I put some baking powder on those spots.

  4. While the glue dries work with your Heavy Duty Fabric Canvas.
  5. Cut the fabric canvas into strips that are 1/2 to 3/4 inch wide, then cut lengths that are long enough to write the name of the plant and still fit on the bases.

    Note: You may use wider strips of Fabric Canvas but it will cover more of your decorative background. The name of the plant doesn't need to be seen from far away. The label is for the person growing the plants.

  6. Using the Sharpie, write the names of the plants on the fabric canvas. One method for doing this is to write the name on the long strip first then cut the strip. However, remember that your base is only 3 1/2 inches long. Another method is to write the name on a small piece of paper first, measuring and adjusting till it's right, then doing it on the fabric canvas.
  7. Once the glue on your bases is dry enough to handle easily and your ink from the Sharpie is dry, glue the labels onto the bases in the center. Let everything dry completely before next step.
  8. It's best to seal it properly. Using the Thompsons Water Seal spray one side of each of the bases with a generous but not extremely thick layer of the sealant. Let these dry completely before continuing.
  9. Now turn your bases over and repeat step 8. Let everything dry completely.
  10. Use binder clips to attach labels to pockets of shoe holder.

    Note: There are binder clips that have pretty decorations on them also. So there is no need to use plain black.

  11. Hang the Shoe Holder from a strong door or fence or from nails placed through the grommet holes at the top of the holder into some wooden surface, fill each pocket with soil, plant the seeds, water your seeds, clip on a label!

    Note: The Hanging Shoe Organizer I found was from www.casa.com. It was the only one I found with a bamboo top edge, which I felt might support the weight of the soil better than one with a cloth top edge.

    By JazzyMe from Los Angeles, California

    Editor's Note: JazzyMe doesn't have a completed photo of the vertical planter as she is giving it as a gift.

    Plant Labels for Vertical Shoe Holder Planter
2 0SharePrintFollow
Plastic Canvas Spring Angel
This is one of 4 seasonal angels. I made this for my mom for a late Mother's Day gift.

Approximate Time: 1 week

Supplies:

  • assorted yarns
  • 3 sheets, 7 count plastic canvas
  • #16 embroidery needle
  • hot glue gun

Instructions:

  1. I had cut out all of the pieces and stitched them by the directions. It was fun watching her come to life.
  2. I had put together the flowers first on the skirt and then in the hair.
  3. I whipstiched the arms to the body parts, then stitched those together.
  4. I put together the skirt then assembled the body on top and whipstitched it together.
  5. For the wings on the back, I had hot glued them to the body and then glued the watering can in to her hands.

I have the pattern if you are interested.

By SueS from Ephrata

Closeup of angel.
0 0SharePrintFollow
Rose Bowl Holiday Decor
Don't throw those rose bowl glass containers away. I painted mine with acrylics and sprayed 3 coats of varnish. You can fill it with candies or use either a fake light or a real candle.

Approximate Time: 2-3 hours including drying time

Supplies:

  • many acrylic paint colors
  • paint brushes
  • sponges cut into shapes
  • black permanent skinny Sharpie
  • spray varnish
  • fake candles or real
  • candy

Instructions:

  1. Wash the rose bowl container with soap and water. Dry very well.
  2. Sponge on your main color. Let dry - 15 minutes.
  3. Cut sponge shapes for eyes, etc. Sponge on the eye color, etc. and let dry.
  4. Spray with clear varnish very lightly for the first layer. Let dry.
  5. Spray the next two varnish layers with drying time in between.
  6. Outline all features with the Sharpie marker.
  7. You are done. You can fill with candy or a tea light.

You can do one for every season. Enjoy!

By Louella from Billings, MT

Rose bowl painted as silly pumpkin face.
0 0SharePrintFollow