Follow ThriftyFun
 

Crafts Contest Results

This contest had 7 contenders. You can view the winning posts below.

Started: June 04, 2012

Ended: June 10, 2012

Voting Ended: June 17, 2012

Contest Entries: 7

Winners: Tilted Pot Planter for Strawberries.

Enter a Contest!

Tilted Pot Planter for Strawberries
contest winner icon
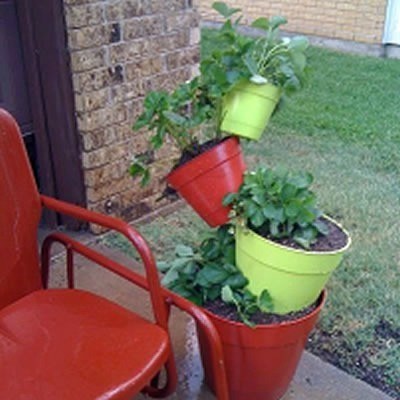
My strawberry plants needed more room to run and I found this planter project. Since the first one was made, I've made several more as birthday gifts for my gardening friends. You can use any assortment of pot sizes, just stair step them up a metal rod or piece of rebar. Spray paint or decorate the pots as your creativity moves you and have fun planning and building one. Enjoy...they're so easy to make!

Approximate Time: Two evenings (one for painting and one for assembling)

Supplies:

  • plastic or clay pots
  • spray paint
  • river rocks
  • metal rod/rebar
  • potting soil
  • plants

Instructions:

  1. Select 4-5 assorted size pots. Begin with the largest for your base and get progressively smaller going up.
  2. Drill a hole off-center on the base of your pot. This should be large enough in diameter for your metal rod to slide through.
  3. On your base pot, stand your rod in the center and surround it with pond rocks or slightly larger ones to help support the rod.
  4. Then place your potting soil in the pot and wet it down thoroughly to give your rod a good support base.
  5. Begin staggering your pots one by one on the metal rod. You'll want to tilt the pots as you go to provide a firm support for each level.
  6. Before adding potting soil and plants to your pots, add a small amount of river rocks. This will help give your plant proper drainage when you begin planting.

By Nelda from Dallas, TX

3 0SharePrintFollow
Framed Fabric Flag
Use odds and ends of fabric strips to add to your decor.

Approximate Time: 1 hour

Supplies:

  • purchased 3 1/2 by 5 picture frame, with cardboard backing
  • cream, red, and blue fabric strips
  • sewing machine
  • cream color thread
  • buttons
  • hot glue

Instructions:

  1. Repurpose an old picture frame or purchase a new one.
  2. Measure the cardboard backing so you know how long to sew your fabric strips.
  3. Stitch thin strips down to the cardboard in the middle only so the sides stick up.
  4. Adhere whole flag onto the cardboard backing of the frame.
  5. Hot glue buttons in the upper left corner.
  6. Place flag into frame and display.
  7. By Louella from Billings, MT

    Scrappy framed flag with button
0 0SharePrintFollow
Paper Bag Flag Heart
This is just either packing paper or paper brown bags made into a great 4th of July decor idea.

Approximate Time: 1 hour

Supplies:

  • craft brown paper or paper brown bag
  • pencil
  • shape to trace (heart)
  • acrylic paints: red, white, blue, and brown
  • raffia
  • star stencil
  • Kleenex
  • glue stick

Instructions:

  1. Use either brown craft paper or brown paper bag.
  2. Trace design to get one shape. Have a larger piece ready for the 2nd shape for later.
  3. Draw design with a pencil and paint.
  4. Make your own star stencil and paint in the corner section of your shape.
  5. Use brown paint really watered down to go over the top of the dried colors so it looks old or antiqued.
  6. Shred kleenex so it makes the shape puff up.
  7. Glue the shape down on the large piece of paper, with the shredded tissue inside.
  8. Let dry and cut to the same shape.
  9. Hang with raffia.

By Louella from Billings, MT

Finished project hanging from a hook.
0 0SharePrintFollow
Repurpose Pine Needles
Use fallen pine needles to create something for your home decor.

Approximate Time: 1 hour

Supplies:

  • pine needles (bunches)
  • rubber bands
  • fabric strips

Instructions:

Gather pine needles and rubber band bunches in the middles. Make sure to do half of the needles facing opposite directions. (See photo!) Add a strip of fabric color for your decor. I like to decorate my Christmas tree with these too.

By Louella from Billings, MT

Pine needle bundles in wooden bowl with other nature decorations, such as pine cones, etc.
0 0SharePrintFollow
Branch Star Decoration
Cut a branch that is dead from one of your trees and cut into 5 of the same length to make a star.

Approximate Time: 40 min.

Supplies:

  • sticks from branch
  • string
  • fabric strips
  • glue

Instructions:

Gather a dead branch. Cut 5 sticks for your star. Make a star shape by tying string at intersections. Glue each point and intersection. Cover the whole star by wrapping strips of fabric around each branch. Glue the beginning and end of strips of fabric.

By Louella from Billings, MT

Fabric wrapped star on wall.
0 0SharePrintFollow
Old Door Knob Art
I found an old window screen, attached dried herb bundles, and screwed old door knobs on the bottom for a unique decoration for my garden room.

Approximate Time: 2 hours

Supplies:

  • dried herb bundles
  • old window screen
  • old door knobs/screws
  • wire
  • raffia

Instructions:

Attach herb bundles onto the screen. Screw the door knobs on the bottom of the wooden part of the screen. Hang and enjoy.

By Louella from Billings, MT

Art piece hanging on the wall.
0 0SharePrintFollow
A Very Hungry Caterpillar Playset
Inspired by the Eric Carle book and similarly armed with a hole punch, you and your child can create an interactive extension of learning playset.

Approximate Time: 15 minutes

Supplies:

  • hole punch
  • cereal box
  • crayons
  • pipe cleaner or shoelace
  • scissors

Instructions:

  1. With crayons, draw foods onto the empty side of the cereal box cardboard.
  2. Cut out your food shapes.
  3. Use a hole punch to put holes into the cardboard food shapes.
    Tip: if you have a two-hole punch, young children may find that easier to use and can actually do some of the punching.
  4. Double the pipe cleaner over on itself or twist the ends backwards to hide the sharp end. This is your caterpillar.
  5. Now it's playtime. Re-enact the story, or take your caterpillar on a whole new culinary adventure.

By Kirsten from Logan, UT

Foods cut from cardboard.
0 0SharePrintFollow