Follow ThriftyFun
 

Crafts Contest Results

This contest had 6 contenders. You can view the winning posts below.

Started: June 18, 2012

Ended: June 24, 2012

Voting Ended: July 01, 2012

Contest Entries: 6

Winners: Crystal Garden Ornament (My Garden).

Enter a Contest!

Crystal Garden Ornament (My Garden)
contest winner icon
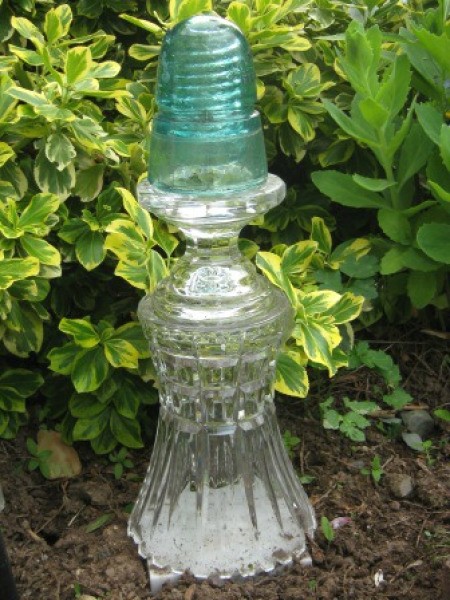
Instead of throwing away a lovely crystal vase that I chipped on the top edge, I turned it upside down placing it onto a marble base of an old lamp. Then I glued a mint green beehive telephone insulator (that use to be on top of a telephone pole years ago) to the top.

It now sits in my flower garden. When the sun hits the crystal and glass it adds not only a sparkle to the area, but makes for a good conversation piece as well.
Before throwing out anything try and think of ways to reuse it! You might surprise yourself.

By linn from Dartmouth, NS, Canada

Decorative glass garden ornament made from reused glass items.
6 0SharePrintFollow
Magazine Holder from Bottled Beer Box
Bottled beer comes in very sturdy boxes. I used this one as a magazine holder.

Approximate Time: 1 hour

Supplies:

  • cardboard beer box
  • spray adhesive
  • cloth of choice (1/2 yard)
  • scissors
  • colored duct tape

Instructions:

  1. Get yourself and empty beer box, one for glass bottles as these are more sturdy. Find the one perforated opening and break open. This is an already U - shaped opening needed to slip in your magazines.
  2. Trim off about 3 - 4 inches from the top or the shorter side of the box.
  3. Reinforce the handle hole on the other short side with duct tape.
  4. Take your box outside and generously spray with adhesive, only the four sides that will be covered.
  5. The top will be open and the bottom will not need glue. Eyeball or measure how wide you'll cut your fabric leaving about 1 inch overlap for the opening on the top.
  6. Lay your fabric in place and smooth with your fingers. This glue is easy to reposition so you can get it right. It's much like contact paper. Trim any long edges.
  7. Coordinate your duct tape so it will not be too noticeable. Tape down all the raw edges until it looks like the picture. I put a heavy book in the bottom on its side to give stability to the whole box and now it is ready for your magazines for the bathroom, garage, living room, or man cave.

Enjoy!

By Louella from Billings, MT

Completed box.
3 0SharePrintFollow
Shoe Box Wedding Card Holder
I found an old shoe box with a separate lid. Next I wrapped it in foil like a present. (I like using the dull side.) Paper dollies adorn the front lip. I found silver sticker lettering and other clear stickers for embellishment and words. By cutting out a suit and dress of your color choice, you can create a wonderful place for your guests to place their cards and you'll be recycling too.

Approximate Time: 1 -2 hours

Supplies:

  • shoe box
  • glue stick
  • stickers
  • colored construction paper
  • any lace, dollies, ribbon, etc. to enhance
  • aluminum foil
  • tape

Instructions:

  1. Get your shoe box and cover it like a present.
  2. Tape down the edges so there will be no tearing.
  3. Draw out your design for suit and dress.
  4. Assemble them with glue stick.
  5. Add any fun ribbons, lace, stickers, etc. Paper dollies adorn the front edge of the box. They are folded in half and glued down. Your sticker lettering can just be pressed on the paper dollies.
  6. It makes a great storage and keepsake gift as well as a functional card holder. The lid gets propped inside free standing so you can remove and cover.

By Louella from Billings, MT

Decorated shoe box for wedding cards.
1 0SharePrintFollow
Pictures in a Jar
This was pretty, easy, and a cute way to display pictures.

Approximate Time: 1/2 hour

Supplies:

  • glass jars different sizes
  • pictures, any you choose
  • white construction paper
  • glue
  • scissors

Instructions:

  1. Clean your jars and tear the paper off, dry well.

  2. Cut out pictures from magazines or use your own photos.
  3. Glue construction paper onto the backs of magazine pictures so they don't show through.
  4. Then place them in your jars whatever way you like. You can change them whenever you want.
  5. By coville123 from Brockville, Ontario

    Magazine photo attached to construction paper.
1 0SharePrintFollow
Popsicle Stick Puzzle
Kids can make their own puzzles. They are fun as gifts that they can make for others, as well.

Approximate Time: 5 minutes

Supplies:

  • Popsicle sticks (wide craft sticks recommended)
  • tape
  • markers or crayons

Instructions:

  1. Lay a number of craft sticks side by side so that they look like a picket fence.
  2. Place a strip of tape across the top and bottom of the sticks, to keep them together.
  3. Use crayons or markers to draw a picture across the sticks.
  4. Remove the tape, scramble the sticks, and see if you can put the picture back together!

By Kirsten from Logan, UT

Drawing on the picture.
0 0SharePrintFollow
Easy Fleece Hair Bow
This is a bow for girls, using scraps of fleece. You can vary the size by cutting it wider or shorter or longer.

Approximate Time:

Supplies:

  • fleece, use 1-1/4 inch piece by 26 inches for one bow
  • scissors
  • glue gun
  • clip for hair

Instructions:

  1. Cut a strip 1-1/4 inches by 26 inches.
  2. Make clips on width approximately every 1/4 inch, but not all the way to edge.
  3. Heat glue gun.
  4. Glue the edge that has not been clipped, rolling into a circle as you glue.
  5. Cut circle to fit back.
  6. Glue on clip.

By Elaine S. from near Cedar Rapids, IA

Finished bow, resembling a pom pom.
0 0SharePrintFollow