I am going to start out by saying that I am an amateur at sewing so if any experts have any sewing tips feel free to submit feedback, it would be greatly appreciated by many. This project was a bit difficult but was very well worth it, all my friends asking for one and I get many compliments while I am out and about.
I used an old gear driven Singer sewing machine to execute this project and it worked wonderfully. The great thing about these old machines is that since they are gear driven instead of belt driven (like most machines today) you have less trouble getting through the heavy material. This project would have been very difficult on my featherweight Singer that my dad bought me when I was 16.
I wish for all of you who attempt this craft good luck and feel free to ask questions and I will do my best to answer.
To start I cut my board in half down the middle where the crease is.
I cut my front and back pieces 8" by 6.25", I have one of those long wallets so I used that to judge how big to make it.
For the second 9" by 6.25" piece I used the left over board from the previous cut out as a template, I used the edge of the board and cut next to it.
Note: Instead of doing this you could also cut all the way across your board at 6.25" then cut that piece to 9" then the left over piece would be used for the side of the purse, depending on how wide you want your purse to be, in my case I cut my side smaller than what was left, for aesthetic purposes.
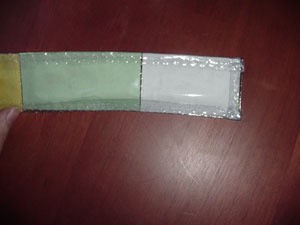
Now it is time to cut your vinyl, which will need to be larger than your board pieces. I cut mine 3/4 to an inch larger on each side (I tried cutting it to the size I wanted it to be when it was finished and had a really hard time sewing the pieces together). After sewing all the pieces together you will cut these edges down a bit.
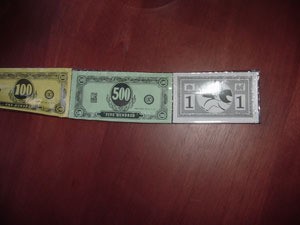
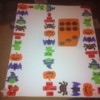
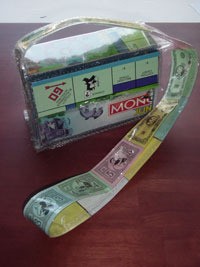
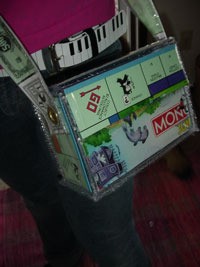
I took the junior Monopoly money and encased it in clear vinyl for the strap, you could do all sorts of stuff for this with all different board games:
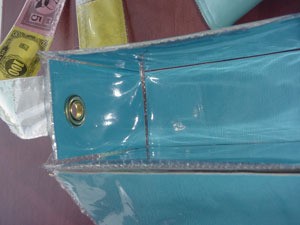
Encase each piece of board in vinyl by sewing as close as possible to the board on all sides, ending with the same width of vinyl on each side (so make sure that you place the board in the middle).
Before sewing together all your pieces place your holes for the grommets in the two side pieces and the strap. I did not do this and it was difficult to get the hammer in there to punch the holes through. You could even think about attaching the strap to the sides with the grommets before sewing it all together, but the strap may get in the way when you are sewing.
Sew together all the sides like shown in the pictures using either a zig zag stitch or two straight lines next to each other. Remember to sew the seams on the outside, so they will be showing when the purse is put all together. I line up the edges of each piece I want to sew together with the back sides of the board facing each other, then sew along the lined up edge. Try and sew as close as possible to the board game. When finished sewing all pieces together cut excess vinyl, but make sure not to cut it too close to the stitching.
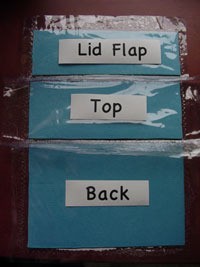
Sew together the lid flap, top, and back together. The back being on the bottom and lid flap on the top all the image of the board facing in the direction you want it, remember that the lid flap will fold over the top. Be sure to have the seams on the outside where the image of the board game is.
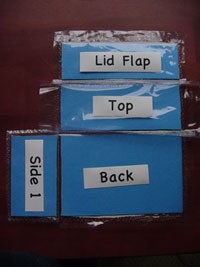
Attach one of the sides to the back piece. (When the image side of the board is facing down attach this piece to the left hand side of the back piece).

Attach the front piece to the side piece.

Attach the bottom to the bottom of the back piece ( You can also sew this piece on when you attach the lid, top, and back pieces, either way will work.)
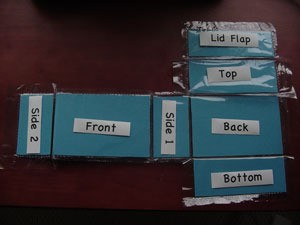
Attach the second side piece to the side of the front piece.
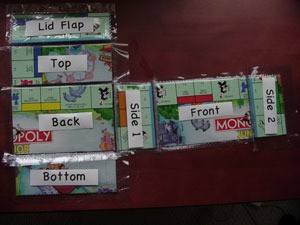
This is what it will look like on the image side of the board.
Now fold the second side piece around to the other side of the back piece with the image side out. Line up the two edges (be sure to line up the edges of the board rather than the vinyl, since the vinyl might be uneven) and sew together as close to the board as possible.
Now fold the bottom piece up and sew to each edge, this part is the most difficult part to sew, but it is possible.
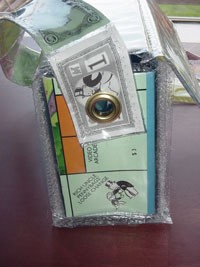
This is what the grommet will look like when it is attached.
This is the inside of the purse when it is all sewn together.
Now attach your strap with a grommet to the side pieces, it may be difficult to hammer it all down, but it is possible.
Add snaps or Velcro to close the lid and it is finished! I used Velcro that had the sticky tape on one side and just stuck it on the purse.
You can use the game pieces in the design of your purse by glueing the pieces on to the lid or tying string around them and having them hang off the purse.
Add your voice! Click below to comment. ThriftyFun is powered by your wisdom!
How creative! Great idea to use a game board from the thrift store. I bet you get a lot of compliments!! Thank you so much for sharing!
Thank you for the instructions for the purse. I truly would be lost without them. I sew too. You may be a beginner, but you are also a teacher. I sew potholders, pillow covers, animal shapes, repair clothes, and quilts, but I haven't learned to sew purses of any fabric or object. This article will be very helpful. Thank you and good luck in your sewing adventures.
Really great and creative idea. Thanks for your step by step photos. I don't know if I'll make one but I sure enjoyed watching yours develop. Kelly
Too cool! I love it, what a great gift idea for a teen!
WOW; what an incredible job. Your directions are just awesome!
These were really great directions and I loved how mine turned out. I would just like to add a few tips. Make it in a bright area. I made mine in my somewhat dim room and afterwards I realized that all sorts of hair and lint had stuck to the vinyl. So make sure you do it in a bright place and clean the vinyl first. Also my sewing machine would frequently get stuck on the vinyl but I solved that by just raising up my foot just a little bit so it wasn't so tight. It only took about 3-4 hours to make the first time and I am looking forward to trying it again! Thanks for the great directions!
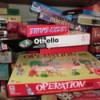
excellent job! I am working on mine now......but I made mine bigger....to be a diaper bag...I used Chutes and Ladders...my next project is going to be a diaper bag of Candy Land! :) Wish me luck!
Editor's Note: We'd love to see it, please take a picture and post it when you finish.
So cool! Now with all the different monopoly games, you can get creative. I hope I find a scooby doo monopoly game with missing pieces at a yard sale this year!
Awesome project! Your directions were perfect. I personalized my purse by cutting out pictures of friends and family, & gluing our heads in the middle of the paper money. So, I'm a $10, my mom's a $100, etc. I also glued money back to back, so that there is no "wrong side" on the strap. What fun!
That's GREAT!! I'm sure you could do it too with the Life Game maybe? Someone will have to try it and post it LOL (I personally don't have THAT much patience!)
I was wondering how much vinyl I should get if I were to use the same measurements as yours?
OK, so I'm definitely not an amateur seamstress, but I also don't claim to be an expert. I am however a bit of a perfectionist. These instructions are very well written, so I give you a lot of credit. Also, your finished piece is beautiful.
Here's my dilemma - there's absolutely no way to seam up the bottom with a machine. I cannot get the piece into my machine, or my serger for the matter, since it hits the top part. I've also tried a small hand held machine and still can't get close enough to the game board to my liking.
So my question is - what's your secret to getting the bottom of this pieced together? Thanks for your help!

Yes, this was the most difficult part for me. When I did this, I left extra vinyl to work with so I could sew it up, but it did not get as close as I would have liked. My only other suggestion would to leave the bottom board piece out and instead just sew in doubled vinyl. Then place the board piece in the bottom of the finished purse for support. It would be best if it was also incased in the vinyl. By doing this you would have a little more flexability and may be able to get it in close where you want it.
Thanks. I actually already tried that too, and the vinyl ripped apart when I was stretching it to piece the "box" together. What kind of sewing machine did you use? Thanks again!
Cookie, I use an old gear driven singer.
I feel like the top lid should be as wide as the sides or the flap does not fold down over the front... I'm having issues with this fitting..also I could only find large grommets, bummer. getting thru the cardboard is the hardest. But.. it has been fun making this!! love it! THANKS!
Add your voice! Click below to comment. ThriftyFun is powered by your wisdom!