social

Découpaged Easter Eggs

If you're looking for a quick and easy craft to do this Easter, then decoupage is definitely for you. Decoupage comes from the old French word decouper, meaning "to cut out", so if you can cut and paste, you already know most of the techniques involved.

Advertisement

Basically, all you have to do is cut out pictures, glue the pictures onto an object, and then cover the object with glue to seal it. Not only is the end result very effective, decoupage won't make a hole in your budget; and you'll be able to create a beautiful display for your home, as well. Happy Easter!

Approximate Time: 30 minutes (per egg) plus drying time

Supplies:

  • polystyrene eggs from a budget store or craft supplier
  • paper napkins/serviettes
  • gesso or white acrylic paint
  • a decoupage medium; diluted white glue or school glue (PVA) - 3 parts glue to 1 part water
  • sponge
  • cotton bud
  • damp paper towel or rag
  • paint brush
  • pair of scissors

Instructions:

  1. Paint lots of polystyrene eggs with gesso (acrylic primer) or white, acrylic paint.
    Advertisement

    Note: decoupage works best on matte surfaces, so apply at least one base coat of paint to remove the shiny finish on your eggs.

  2. Peel off all white layers from the back of a paper serviette/napkin. Only the top printed layer is used. Cut out a motif with a small pair of scissors. Alternatively, tear out an image.

  3. Apply a thin layer of diluted PVA to the surface of your egg. Position the motif on the surface and carefully smooth it out using a cotton bud or a sponge; start in the centre and work outwards to work out any air bubbles or wrinkles. Let the motif set for a few moments and then clean up the edges with a damp paper towel or rag. Repeat until all your images are glued on the eggs. Leave to dry completely.

  4. To finish, apply a minimum of two coats of diluted PVA using a brush to seal each egg.

    Note: leave to dry thoroughly between each coat. The edges of the serviette motifs should end up smooth.

    Advertisement

  5. Display your eggs in dishes or baskets around the home, alternatively, string together to make an Easter mobile.

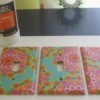
You can have a go at decoupaging other household objects too, such as a lampshade, plant pot, wooden box, or even a glass plate.

By Anne D. from United Kingdom

Decoupaged Easter eggs made from strips of paper.
 

Add your voice! Click below to comment. ThriftyFun is powered by your wisdom!


Bronze Post Medal for All Time! 146 Posts
April 16, 20111 found this helpful
Top Comment

Nice craft that is easy and just as intricate as you choose to make it. Decoupage is fun for all ages and can add a lot of beauty to your home decor.

Advertisement

I love decoupage and have used it to cover whole bookshelves or other small pieces of furniture including small tables and lamp bases etc.

A very old craft that I'd like to see come back in large order.

Thank you for sharing your work.

Pookarina


Add your voice! Click below to comment. ThriftyFun is powered by your wisdom!

 
In These Pages
Categories
Crafts Easter DecorationsApril 16, 2011
Pages
More
🐛
Pest Control
🌻
Gardening
👒
Mother's Day Ideas!
Facebook
Pinterest
YouTube
Instagram
Categories
Better LivingBudget & FinanceBusiness and LegalComputersConsumer AdviceCoronavirusCraftsEducationEntertainmentFood and RecipesHealth & BeautyHolidays and PartiesHome and GardenMake Your OwnOrganizingParentingPetsPhotosTravel and RecreationWeddings
Published by ThriftyFun.
Desktop Page | View Mobile
Disclaimer | Privacy Policy | Contact Us
Generated 2024-04-11 05:19:58 in 4 secs. ⛅️️
© 1997-2024 by Cumuli, Inc. All Rights Reserved.
https://www.thriftyfun.com/tf97905797.tip.html