ThriftyFun Logo
Home   Find   Ask   Share   Answer   Join   Index   Login  
 
 User Login:  Username:    Password:      Forgot It?  | Join ThriftyFun!

 - Beauty
 - Budget and Finance
 - Cleaning
 - Consumer Advice
 - Craft Projects
 - Craft Tips
 - Food Tips
 - Garage Sales
 - Gardening
 - Gifts
 - Green Living
 - Home Improvement
 - Organizing
 - Parenting
 - Parties
 - Pest Control
 - Pets
 - Product Reviews
 - Recipes
 - Repair
 - Weddings for Less

RSS Feed
About Us
Media
Advertising
Contact Us
Privacy Statement
Disclaimer

Vacuum Cleaner Cover

By Kim Davis
1x1
Date: 07/18/2005 Topics: Craft Projects > Sewing | Photos > Crafts  
1x1
Post Feedback | Get Responses | Bookmark | Link | Print | Print (With Feedback) | Rate: Thumbs Up Thumbs Down | Bookmark and Share
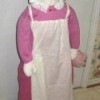
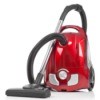
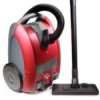
Are you someone that just doesn't have a good place to store your vacuum cleaner? You end up standing it in the corner but hate seeing it there. I have the solution for you. Make a cute cover and no one will realize it's your vacuum cleaner. Even if you do have a closet to stick it in, this cover will keep off the dust.

Materials

You can use a variety of materials. You can use things you have or purchase material to make them. I usually shop the thrift store for items such as these.

  • Child's long sleeved long dress or matching top and long skirt (or even a child's Halloween maid costume). The dress or top and skirt needs to measure about 40" from shoulder to hem. Check the measurements of your vacuum to be sure. You can add a complementary material to hem to increase the length if needed.
  • Polyester or other fiberfill stuffing
  • Flesh colored material enough for two 7 inch circles (or even an old large rag doll head would work)
  • Yarn for hair
  • A pair of white child's gloves or material to make to mitten shaped hands
  • Fabric paint
  • Thread
  • White apron or material to make apron
  • Old white shower cap
  • 2 inch Eyelet lace trim

Directions

First make the head. The easiest way to approach this would be to have the head from a large old rag doll and then your job is simplified. But if you can't find one to use then make one. Cut two seven inch circles of material for the face. Paint a face on one of them. Let the paint dry. Put the material right side together. Stitch 1/4 inch from the edge leaving a 1 1/2 inch opening on the top of the head. Turn the material right side out. Stuff the head. Stitch the opening shut. Attach yarn around the face for hair.

Then make the cap. If you are using an old shower cap just sew lace trim around the edges. If not, cut one circle 8 inches in diameter. Sew lace around the edges. Use a baste stitch around the inside edge. Use one basting thread to gather the cap. Attach the cap to the head.

Attach the neck of the dress or top to the bottom edge of the head. If you are using a top and skirt you will need to sew them together at the waist before proceeding. Stuff the gloves and sew them to the ends of the sleeves. If you are not using gloves, you need to make hands. Stuff the sleeves. Add stuffing to the shoulders and chest and back of the top. Attach it with basting stitches or hot glue. Leave enough room for the vacuum handle to fit into this area. The skirt area does not need to be stuffed.

Fit the doll over the vacuum cleaner and put on the apron. Hand-stitch the apron in place. You can attach a dust cloth or scrubby to one hand as was done for this photo. Just lift the cover by the head to remove it when you need to use your vacuum. Slip it back over the vacuum to store it. Now you can tell everyone you have a maid!

(1x1 graphic )
Previous: Eco-Friendly Critter Control ThriftyFun Next: Find New Places for Getaways
(1x1 graphic )
1x1
1x1
 Feedback
1x1
1x1
1x1

By Annette (Guest Post)
Have been thinking about doing that, but did not know where to start. Thanks for the directions! Have seen them for about $20.00 but not want to spend that if cam make it. will go to thrift stores and start to get things so can make this a winter projest Thanks again

Posted on 08/27/2005 | Report Spam or Abuse

1x1
1x1
 Post Feedback:
1x1
1x1
1x1

Login using the form on the top of the page to post feedback (if you are a registered user). If you have not yet registered, click here to do so. It's FREE!.

1x1
(1x1 graphic )

© 1997-2009 ThriftyFun.com - Design by Cumuli Design
Disclaimer: ThriftyFun.com cannot accept any responsibility for any injury or damage that you may cause to yourself, others, or property when following any advice given on this site. Read the full disclaimer. If you find any information on ThriftyFun.com or in our newsletters that is either erroneous and/or potentially harmful to others, please Contact Us, immediately.