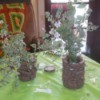
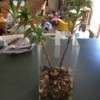
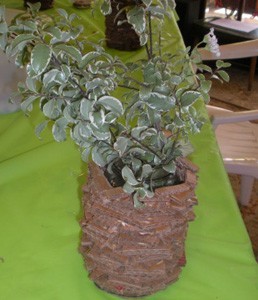
This is a really cool use of recycled cardboard and a very funky way to display flowers in your green home.
Approximate Time: 2 hours
Supplies:
- cardboard/shipping box
- scissors +/cutting blade
- glue
- clean glass jar
- cutting knife/x-acto
- cutting board
- measuring tools
- marker
Instructions:
- Start by using a marker to outline the circumference of your jar for
the base of your cardboard vase. I used an 8 inch round salsa jar.
- Cut out the base, leaving about a 1/2-inch border around the marked circle.
- Cut your cardboard into 1/2-inch long strips, making sure to cut
against the grain of the corrugation ( so the circle design on cardboard
piece shows on outside of vase.)
- Cut your strips the 1/2 long strips into 1-1/2-inch pieces. Your pieces might have to be slightly bigger or smaller depending on the size of your jar.
- Figure out how many cardboard pieces you need to go around the base of
your vase, making sure your jar will fit. I lined them up on bottom, touching the top right corner of one piece to the top left corner of next.
- Glue the pieces to the base. I lined up top corners of each piece around.
- Use only a small bead of glue on each cardboard brick so that the glue
won't squeeze out the sides. This will keep the vase neat.
- Glue the second layer down using a brick like pattern. Each piece fills
in open space from previous row, to add support and visual interest.
- Slide your jar into the cardboard tube throughout the process to make
sure that it still fits inside, and is easily removable. Continue adding cardboard pieces until your jar is fully hidden.
- Once your jar is hidden, slide it out of the cardboard tube and allow
the glue to dry overnight. This will ensure that the jar is removable for easy cleaning.
- Then experiment with different size jars. I also use one on my desk for pencils.
By Kat from Long Beach, CA
Add your voice! Click below to comment. ThriftyFun is powered by your wisdom!
(Guest)
Gold Post Medal for All Time! 846 Posts September 30, 20090 found this helpful
I love this idea! Looks really cool and is also conserving!

Athena
Bronze Feedback Medal for All Time! 215 Feedbacks October 1, 20090 found this helpful
Neat idea, zig
helen
Bronze Request Medal for All Time! 65 Requests October 5, 20090 found this helpful
Hi, what a funky idea. Do you have a photo of this? Many thanks, Helen
Add your voice! Click below to comment. ThriftyFun is powered by your wisdom!