Composting is an easy, economical way to keep nutrient-rich plant food at the ready. Not only is it good for your plants, if you pay by the can for waste removal, it can also be good for your garbage bill! Here is an inexpensive way to get started.
Organic materials need oxygen to decompose, so using a hammer and nail (or drill), punch air holes into the garbage can at 4-6 inch intervals until you have covered the surface of the can (don't forget your gloves and eyewear). Flip the can over and punch 4 equidistant holes near the center of the bottom for drainage. Elevate the can using blocks and place the pie tin underneath it to catch any liquid compost tea that drains out (this is great for feeding houseplants).
Layer 1: Start by spreading a layer of garden soil (or saw dust) 3 inches deep on the bottom of the can. For faster composting, you can add Red Wiggler worms on top of this layer. Unlike earthworms (don't use them, they won't work), Red Wigglers are champion composters. They are inexpensive and easily available online. They multiply rapidly, so 100 will be plenty to start with. If you don't want to use worms, don't worry. You don't need them.
Layer 2: Next add some chopped leaves, junk mail, shredded cardboard, or a few sheets of newspaper. These materials are rich in carbon and referred to as browns. Other examples of browns include straw, woodchips or saw dust.
Layer 3: Your next layer should contain nitrogen-rich materials, also called greens. Greens include grass clippings, pet hair, dust bunnies, vegetable and fruit peelings, coffee grounds, and other non-fatty kitchen scraps including eggshells. If you are composting with worms, avoid onions and keep citrus peelings to a minimum (worms don't care for them).
Along with oxygen, moisture must be present for the organic materials to break down. Ideally, try to maintain moisture levels in the can similar to that of a wrung out sponge.
At least once a week, roll the can on the ground to mix its contents. If the can becomes to heavy to handle, mix it using a pitchfork or shovel.
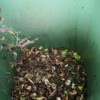
Depending on conditions, you can expect finished compost in as soon as 4 to 6 weeks. If composting with worms, leave the cover off for a few days before emptying the compost into the garden. The worms don't like light and will move to the bottom of the can where they'll be easy to separate out and use again once the can is empty.

About The Author: Ellen Brown is an environmental writer and photographer and the owner of Sustainable Media, an environmental media company that specializes in helping businesses and organizations promote eco-friendly products and services.
Add your voice! Click below to comment. ThriftyFun is powered by your wisdom!
This was a great article. I love gardening and already have a mulch pile, but wanted a compost pile as well. I always hated the mixing part, but I like your setup and think I can maintain this with a minimum of effort.
Great idea! I was just looking to start a small compost as my previous one has been taken over by kudzu. Thank you.
This is a wonderful way to have a small compost without having a section of the yard devoted to it. I'll be getting this started this weekend!
This was awesome! We just finished setting ours up today. We are new to farming/gardening and this sounded so "do-able"!
Add your voice! Click below to comment. ThriftyFun is powered by your wisdom!