Home |  Index |  Submit Request |  Share Photos |  Share Tips |  Active Topics |  New Feedback  |  Contact Us  |  Search
 User Login:  Username:    Password:      Forgot It?  | Join ThriftyFun!

 Popular Topics
 - Beauty
 - Budget and Finance
 - Christmas *
 - Cleaning
 - Consumer Advice
 - Craft Projects
 - Craft Tips
 - Food Tips
 - Garage Sales
 - Gardening
 - Gifts
 - Green Living
 - Home Improvement
 - Organizing
 - Parenting
 - Parties
 - Pest Control
 - Pets
 - Product Reviews
 - Recipes
 - Repair
 - Thanksgiving
 - Weddings for Less

More Topics

Google Search:

Web thriftyfun.com

About:
RSS Feed
About Us
Media
Advertising
Contact Us
Privacy Statement
Disclaimer

Teacup Planters

By Christine Weber
1x1
Date: 05/02/2006 Topic: Craft Projects > Garden & Yard > Planters  
1x1
1x1
Post Feedback! | Email Friend | Print | Get Responses | Bookmark | del.icio.us | Link | Rate: Thumbs Up Thumbs Down
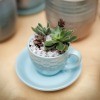
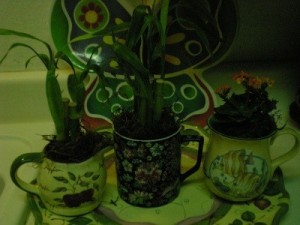
This simple project is a wonderful way to use the china teacups gathering dust on your shelves. Filled with soil and ivy they make dainty and long-lived planters.

Teacup Planters

Materials and Equipment:

  • a large plastic bag or several sheets of newspaper
  • one or more teacups, preferably with saucers
  • potting soil, enough to fill a teacup
  • a tablespoon
  • small ivy plant, I find the slow growing variety "Glacier" works well

Instructions:

1. Clean and dry the teacup before starting. Clear the table and cover it with newspaper or a large garbage bag to avoid getting soil on the table.

2. Fill the bottom third of the teacup with potting soil.

3. Take the ivy out of its container and remove any pot-bound roots. Place the plant in the teacup.

4. Fill the rest of the teacup with soil, covering the roots of the ivy. Press the soil down with your spoon or hand.

5. Water lightly and place in indirect light. Fertilize every few weeks.

6. Remember that there are no drainage holes in the teacup, so water sparingly. If you over water, just tip the cup to drain the excess water out. My teacup planters have lived happily for several years following this advice!

Jump to Feedback | Post feedback
Related Links:
Previous: Breed Information: Schipperke ThriftyFun Next: Orange-Chocolate Pie (Freezer Dessert)
1x1
 Feedback
1x1
1x1
1x1
1x1
 Sponsors
1x1
1x1

Post by starlight2007 (61) | (07/05/2006)
Profile |Contact
I agree with luv2craft, my Mom doesn't care for real plants. I'll make one for myself and they woulld be great Christmas gifts for my 3 Sister in Laws. They love Houseplante. Do you know of any other plants I could use also, maybe a small blooming cactus that will not stickyou? I was thinking of putting small pebbles on top. So many ideas. I'm in high gear on this craft. Thanks for the info.
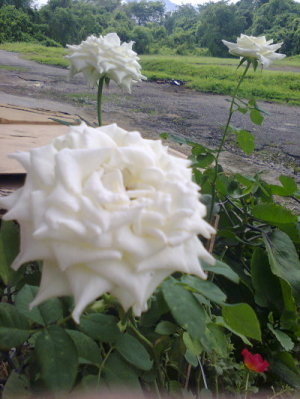
RE: Teacup Planters


Post By jmiller51 (Guest Post) (05/04/2006)
this is the perfect size for hospital trays. Someone gave my grandmother one and it went with her to the nursing home.


Post By Cadensnana from Delaware (Guest Post) (05/04/2006)
I love this idea! I have a few old cups that I don't display any longer but this would be a perfect way to use them. The idea about hot gluing them made me think of using museum putty to hold the cup to the saucer if you wanted them to stay put but removable if you ever wanted them separated again. I have found lots of uses for museum putty or gel. Thanks for this idea!


Post By Linda (Guest Post) (05/03/2006)
What an absolutely cute idea, Thank you for sharing it with us.


Post by luv2craft (67) | (05/03/2006)
Profile |Contact
This would make a nice Mother's Day gift for mom.
You could find the cups and saucers @ the Goodwill or yard sales. I think that I would hot glue the cup to the saucer for fear of my kids knocking the plant over. It would make it more stable.

Great job Christine!


1x1

Post Feedback:
Login using the form on the top of the page to post feedback if you have registered with ThriftyFun. If you have not yet registered, click here. It's FREE!. If you are not registered you can post feedback as a guest below. Please don't use your email address for your name because spam robots can dredge it from our site. Please do not post your feedback more than ONCE. We need to approve all guest feedback and it may take from minutes to hours for that to happen.
(1x1 graphic )
Your Name

Subject

Feedback

text tool text tool text tool text tool

Image Upload: Add an image to your post! Click the "Browse" button below and select an image from your hard drive. Please only select gifs or jpegs. If you have any problems, just email the image to images@thriftyfun.com


If you want to post your email address for responses from readers, obscure it in some way like put spaces between the name and @ sign and service address with (remove spaces) behind it or name (at) server (dot) com . This is for your protection from those creepy Robots.

(1x1 graphic )

© 1997-2008ThriftyFun.com - Design by Cumuli Design
Disclaimer: ThriftyFun.com cannot accept any responsibility for any injury or damage that you may cause to yourself, others, or property when following any advice given on this site. Read the full disclaimer. If you find any information on ThriftyFun.com or in our newsletters that is either erroneous and/or potentially harmful to others, please Contact Us, immediately.