Home |  Index |  Submit Request |  Share Photos |  Share Tips |  Active Topics |  New Feedback  |  Contact Us  |  Search
 User Login:  Username:    Password:      Forgot It?  | Join ThriftyFun!

 Popular Topics
 - Beauty
 - Budget and Finance
 - Christmas *
 - Cleaning
 - Consumer Advice
 - Craft Projects
 - Craft Tips
 - Food Tips
 - Garage Sales
 - Gardening
 - Gifts
 - Green Living
 - Home Improvement
 - Organizing
 - Parenting
 - Parties
 - Pest Control
 - Pets
 - Product Reviews
 - Recipes
 - Repair
 - Thanksgiving
 - Weddings for Less

More Topics

Google Search:

Web thriftyfun.com

About:
RSS Feed
About Us
Media
Advertising
Contact Us
Privacy Statement
Disclaimer

Craft Project: Cookie Cutter Garden Stakes

By Ellen Brown
1x1
Date: 05/29/2008 Topics: Craft Projects > Garden & Yard | Gardening > Decoration | Photos > Crafts  
1x1
1x1
Post Feedback! | Email Friend | Print | Get Responses | Bookmark | del.icio.us | Link | Rate: Thumbs Up Thumbs Down
Cookie Cutter Garden Stakes
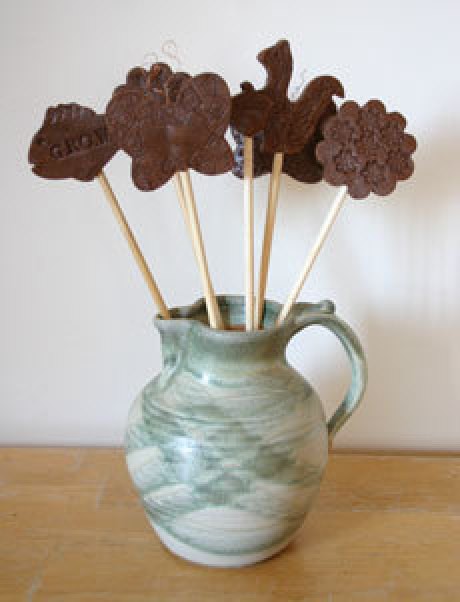
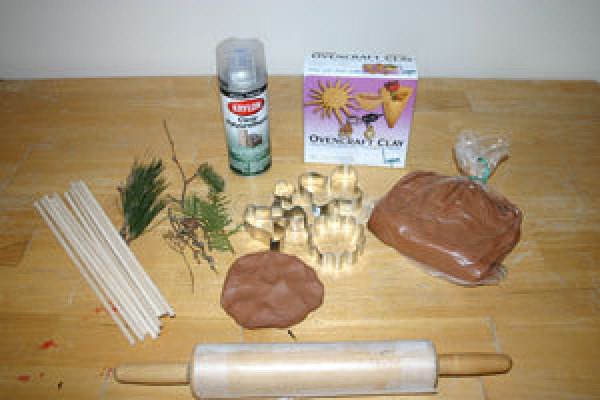
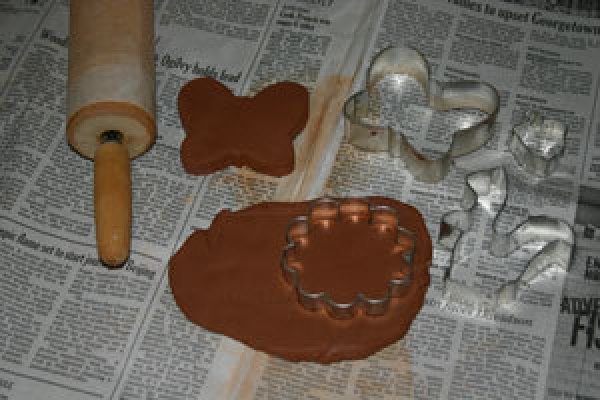
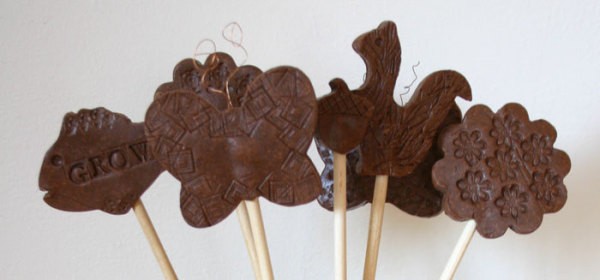
Garden art can be beautiful and functional at the same time. Here is an easy and inexpensive project that allows you to add a personalized touch to your garden and potted plants. With supervision, this project is an easy one for kids, and best of all, no 'crafty' skills are required.

Materials

  • Bakeable clay (available at craft stores)
  • Assorted cookie cutters
  • Wooden dowels or wire hangers (to act as stakes)
  • Wood glue
  • Clear polyurethane sealant (if using the stakes outdoors).
  • Newspaper
  • Rolling pin (cover it with wax paper to prevent staining)
  • Cookie sheet

Optional Items

  • Embellishments of your choice (leaves, pinecones, shells, rubber stamps, etc.)
  • Pencil or screwdriver for carving
  • Stain, acrylic paint, or permanent markers

PlantStakesMaterials300x200.jpg

Instructions

PlantStakes1_300x200.jpg

Assemble your materials. Using unfinished wood, cardboard, or several layers of newspaper as a work surface, shape a handful of clay into a patty and using your rolling pin, roll it out like cookie dough until it's approximately 1/2 inch thick. Roll out only enough clay to cut out one or two cookies at a time. Keep the rest in a tightly sealed bag until you need it.

Before cutting out your clay cookies, compare the thickness of your dough to the thickness of the dowel you will be using. The dough should be thick enough so that when you go to insert the dowel into the middle of the clay, it doesn't break through. For example, I used 1/4 inch wooden dowels and rolled out my dough 1/2 inch thick. Adjust the thickness if necessary, then cut out assorted shapes using your cookie cutters.

After you cut out your clay cookies, make a hole in the bottom for your dowel. Make sure the hole is deep enough so that after baking, your dowel can be reinserted far enough into the cookie to support its weight. I made my dowel holes 1-1 1/2 inches deep.

PlantStakes2_300x200.jpgOnce you have all of your cookies cut out, it's time to carve or imprint designs into them (painting is done AFTER baking). It's a good idea to leave the dowels in the cookies at this point to prevent the holes from getting flattened. To decorate my cookies, I used a piece of a pine bough to make the fur on my squirrel. With some fancy scrapbook fasteners, I imprinted patterns on the wings of my butterflies and added copper florist wire for antennae. I used rubber stamps to imprint the word 'grow' onto my fish. Remember, there are no rules, so just have fun with it!

Warning: Do not embed any embellishments into the clay, they will catch fire in the oven! Also, the copper antennae on my butterfly did fine, but be forewarned that some metal finishes turn color when heated.

PlantStakes3_300x200.jpgRemove the dowels from your cookies and place them on a cookie sheet. At this point, follow the drying instructions that came with your clay. To prevent cracking, my clay needed to be completely dry before baking. Drying times vary. Mine took 48 hours at room temperature.

After drying your cookies, bake them according to the directions that came with your clay. My clay baked at 350 degrees F for 1 hour. After baking, your cookies can be painted with acrylic, enamel, tempera, or watercolors, or they can be stained or antiqued with the same products recommended for wood.

After the cookies cool down from baking, drop a few drops of wood glue into the dowel holes and insert the dowels. Let the glue dry for a few minutes before moving on to the next step.

Finally, if you're planning to use your plant stakes outdoors, apply several layers of a clear polyurethane sealant to them to protect them from moisture damage. Follow directions according to the label. You can find clear polyurethane at craft stores of wherever paints are sold.

Helpful Hints

PlantStakes4_300x200.jpgClay: I used Ovencraft Clay by Laguna that I bought at Michaels Craft Store. A 4 lb box (now that's a LOT of plant stakes!) cost $9.99 + tax (no coupon). Michaels carries other bakeable clays, and although some were cheaper, I happened to like the color of this one. If the idea of baking clay doesn't inspire you, clay that hardens by air drying may work for this project, too (I haven't tried it). Many stores that carry craft supplies carry some type of bakeable clay.

Baking: There may be a small amount of smoke and an intense odor as the clay bakes, so run the hood on your stove and crack the kitchen windows. Projects should ALWAYS be baked by adults.

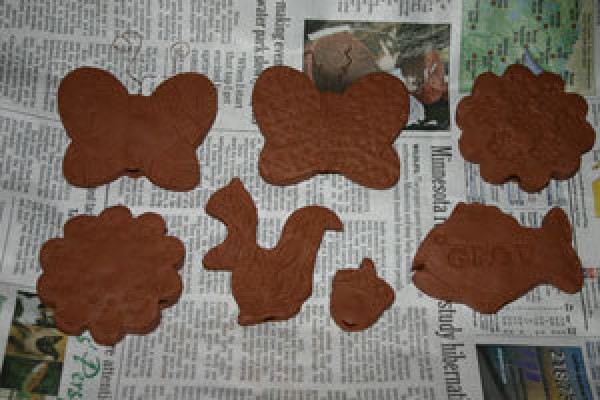
Drying: How long it takes varies according to the thickness of your clay. Place your cookies on several layers of newspaper or on an oven rack to speed up drying.

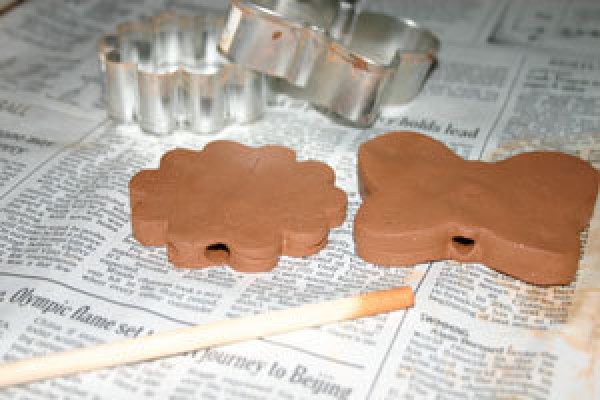
Inserting the dowels: If dowel holes shrink slightly during the drying or baking process, widen them slightly using a screwdriver or sharp knife.

PlantStakesClose700327.jpg

About The Author: Ellen Brown is an environmental writer and photographer and the owner of Sustainable Media, an environmental media company that specializes in helping businesses and organizations promote eco-friendly products and services. Contact her on the web at http://www.sustainable-media.com

Jump to Feedback | Post feedback
Related Links:
Previous: Use Shredded Paper Under Tomato Plants ThriftyFun Next: Cut Up Veggies For Quick And Healthy Snack
1x1
 Feedback
1x1
1x1
1x1
1x1
 Sponsors
1x1
1x1

Post By marilyn front royal VA (Guest Post) (06/19/2008)
Please do not use your rolling pin for food once you have used it for clay! The same goes for the cookie cutters. You can scrub and scrub, but you will never get things food-safe after they have touched clay of any kind.blind_quilter AT yahoo.com

Report Spam or Abuse


Post By cece (Guest Post) (06/01/2008)
What a clever idea! Thank you so much. I'm going to try it out this week.

Report Spam or Abuse


Post by Lisingreece (62) | (05/31/2008)
Profile |Contact
These are adorable and have given me other ideas for things to make, Thanks so much for sharing,

lisingreece

Report Spam or Abuse


Post by cookwie (1027) | (05/30/2008)
Profile |Contact
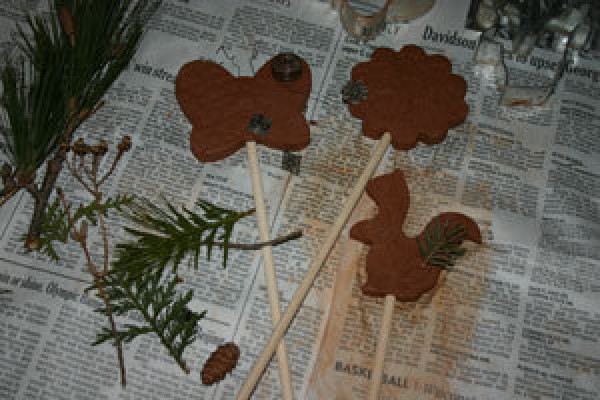
Just make sure they are visible at night!!! Don't want to get poked in the eye!

Report Spam or Abuse


1x1

Post Feedback:
Login using the form on the top of the page to post feedback if you have registered with ThriftyFun. If you have not yet registered, click here. It's FREE!. If you are not registered you can post feedback as a guest below. Please don't use your email address for your name because spam robots can dredge it from our site. Please do not post your feedback more than ONCE. We need to approve all guest feedback and it may take from minutes to hours for that to happen.
(1x1 graphic )
Your Name

Subject

Feedback

text tool text tool text tool text tool

Image Upload: Add an image to your post! Click the "Browse" button below and select an image from your hard drive. Please only select gifs or jpegs. If you have any problems, just email the image to images@thriftyfun.com


If you want to post your email address for responses from readers, obscure it in some way like put spaces between the name and @ sign and service address with (remove spaces) behind it or name (at) server (dot) com . This is for your protection from those creepy Robots.

(1x1 graphic )

© 1997-2008 ThriftyFun.com - Design by Cumuli Design
Disclaimer: ThriftyFun.com cannot accept any responsibility for any injury or damage that you may cause to yourself, others, or property when following any advice given on this site. Read the full disclaimer. If you find any information on ThriftyFun.com or in our newsletters that is either erroneous and/or potentially harmful to others, please Contact Us, immediately.