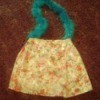
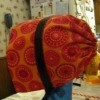
What do you get when you hand four bandanas to a crafty kid with her own sense of style? The result just might be this very cute two piece bandana halter top and skirt. The little set is not quite no-sew, but the few stitches that you take are so simple that it's hardly sewing at all.
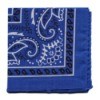
It looks especially cute in traditional bandana paisley print in bright tropical colors. Try mixing and matching colors for the bandana top - bright fuchsia with lime green or yellow? Red and blue? Black and red?
Materials
- 4 matching or contrasting bandanas
- 2 yards satin 1/8 or 1/4 inch ribbon
needle threaded with matching color
Instructions
For the top:
- Fold two of the bandanas in half diagonally.
- Holding them up to your body to adjust measurements right, position triangle's point about 4 inches below each shoulder.
- Tie the two bottom points together at the front even with the breastbone.
- Fold down the triangle point on one side to the inside of the top. Using the needle and thread, tack the point of the triangle down to form a 'channel' to run the ribbon through.
- Repeat with other side of bandana shirt.
- Cut ribbon to 1 yard lengths. Run 1 piece through the channel formed by sewing the bandana points down, bringing the ends together at the top. Knot ribbon together just above the fabric to keep ribbon in place.
- To wear: tie remaining to ends of triangles together at center of back. Tie ribbon together at back of neck.
Variations:
- You can also experiment without different ways of tying the bandana.
- For a little girl, use just one bandana. Fold into a triangle and tie the two long points at the back. Fold down the top of the triangle, tack in place with a couple of stitches and run a ribbon through the channel to tie at the back of the neck.
- Again, using just one bandana, lay the bandana flat. Fold two opposite points in diagonally to meet in the middle. Slip bandana lengthwise through a belt buckle ring to secure the center. Tie remaining two points together at the middle of the back. Spread 'cups' to cover chest area.
For the skirt:
- With right sides facing, put remaining bandanas together. Measure down about six inches from the top of each side and mark.
- Sew seam from marking to approximately 6 inches from bottom of bandana.
- To wear: slip on and tie at each side of hip.
Comments

December 4, 20110 found this helpful
Cute and original!