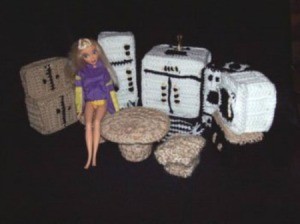
Look what's cooking! Barbie is in the kitchen.
This is the second in the series of Barbie or other small doll crocheted furniture. Please feel free to change colors to fit more with what your little interior decorator would like. I have tried to use materials that anyone would have or would be easy to obtain. There are a lot more pieces to the kitchen so I would say for an average crocheter working while watching TV it will probably take a week to complete.
Basic construction of these pieces is crocheting the different pieces and then slipstitching the pieces together, making a slip cover over the base pieces of Styrofoam, polystyrene, or cigarette box. Styrofoam can be cut with a serrated knife and then the edges sanded smooth with another piece of Styrofoam. Polystyrene can be cut with an electric saw which gives a nice smooth cut or with a hand saw. In a pinch pieces of wood could be used for the bases, but this would make each piece heavier, and also a hazard if thrown.
This table is worked in Rounds.
Base:
Rnd 1:Chain 4 and join to form ring.
Rnd 2: 12 dc in ring, Join. Chain 2.
Rnd 3: 1 dc in each space around. Join. Chain 2.
Rnd 4: 1 dc in each space around. Join. Chain 2.
Rnd 5: 2 dc in each space around. Join. Chain 2.
Rnd 6-8: 1 dc in each space around. Join.
Fasten off and work in ends.
Table Top: Make 2
Rnd 1: Chain 4 and join to form ring.
Rnd 2: 12 Dc in ring. Join. Chain 2.
Rnd 3: 1 Dc in space next to chain 2 and 2 Dc in each space around. Join. Chain 2.
Rnd 4: 2 Dc in space next to chain 2 and 3 Dc in each space around. Join. Chain 2
Rnd 5: 3 Dc in space next to chain 2 and 4 Dc in each space around. Join.Fasten off and work in ends.
Assembly:
Slide base over pudding cup. Stuff pudding cup with Walmart bag cut in half. Trim tab back on pudding cup. Cut 5 inch square out of brown cardboard. Lay one circle on the top and one on the bottom and slip stitch together. Whip stitch the top to the base.
Make 2
Top: Make 2
Row 1: Chain 9 In second chain from hook Dc and in each stitch across (7 Dc).
Row 2-5: Dc in each stitch across. Chain 2. Turn, except for last row.
Fasten off and work in ends.
Base:
Row 1: Chain 7 In third chain from hook Dc and in each stitch across (5 Dc). Chain 2. Turn.
Row 2-5: Dc in each stitch across. Chain 2. Turn, except for last row.
Row 1: Chain 7 In third chain from hook Dc and in each stitch across (5 Dc). Chain 2. Turn.
Row 2-16: Dc in each stitch across. Chain 2. Turn, except for last row.
Assembly:
Slipstitch both pieces together for top of stool. Slip stitch base to band base. Whip stitch base to top.
Top of Hutch Base and Bottom of Base: Make 2 total
Row 1: Chain 16 in third chain from hook Dc and in each stitch across (14 Dc). Chain 2. Turn.
Row 2-4: Dc in each stitch across, Chain 2. Turn, except for last row.
Sides of Hutch Base: Make 2
Row 1: Chain 13 in the third chain from hook Dc and in each stitch across (11 Dc). Chain 2. Turn.
Row 2-5: Dc in each stitch across. Chain 2. Turn.
Fasten off and work in ends.
Back of Hutch Base:
Row 1: Chain 13 in third chain from hook Dc and in each stitch across (11 Dc). Chain 2. Turn.
Row 2-7: Dc in each stitch across. Chain 2. Turn, except for last row.
Fasten off and work in ends.
Front of Hutch Base: Make 1
Row 1: Chain 13 in third chain from hook Dc and in each stitch across (11 Dc). Chain 2. Turn.
Row 2: Dc in each stitch across. Chain 2. Turn.
Row 3: Dc in each stitch across. Chain 2. Turn.
Row 4: Sc in each stitch across, fasten off. Switch to black or contrasting color.
Row 5: With Black or contrasting color slip stitch across row. Fasten off. Switch back to main color.
Row 6: Sc in each stitch across. Chain 2. Turn.
Row 7-8: Dc in each stitch across. Chain 2. Turn, except for last row.
Fasten off and work in ends.
Hutch Top:
Front: Make 1
Row 1: Chain 10 in third chain from hook Dc and in each stitch across (8 Dc). Chain 2. Turn.
Row 2: Dc in each stitch across. Chain 2. Turn.
Row 3: Dc in each stitch across. Chain 1. Turn.
Row 4: Sc in each stitch across. Fasten off and attach black or contrasting color.
Row 5: slip stitch in each stitch across. Fasten off. Switch back to main color.
Row 6: Sc in each stitch across. Chain 2. Turn.
Row 7-8: Dc in each stitch across. Chain 2. Turn, except for last row.
Fasten off and work in ends.
Hutch Top Back:
Row 1: Chain 10 in third chain from hook Dc and in each stitch across (8 Dc). Chain 2. Turn.
Row 2-7: Dc in each stitch across. Chain 2. Turn, except for last row.
Fasten off and work in ends.
Hutch top Center Band: Make 1
Row 1: Chain 6 in third chain from hook Sc and in each stitch across. Ch 1. Turn. (4 Sc)
Row 2-32: Sc in each stitch across. Chain 1. Turn, except for last row.
Fasten off and work in ends.
Assembly:
Stuff cigarette boxes with cut up Walmart bags until firm. Glue three together to form base. Whip stitch over 4th row bar with black or contrasting color to make handles on Hutch front base and Hutch front top. Slip stitch cover together then over base. Stuff another cigarette box with cut up Walmart bags until firm. Slip stitch pieces together and slip stitch cover over this box.
Sides and front: Make 4
Row 1: Chain 22 in third chain from hook Dc and in each stitch across (19 Dc). Chain 2. Turn.
Row 2-5: Dc in each stitch across. Chain 2. Turn, except for last row.
Fasten off and work in ends.
On one of your panels count 4 stitches from the end and slip stitch across the panel for divider.
Below that whip stitch a piece of chop stick on the front for handle.
Top and bottom: make 2
Row 1: Chain 12 in third chain from hook Dc and in each stitch across (10Dc). Chain 2. Turn.
Row 2-5: Dc in each stitch across. Chain 2. Turn, except for last row.
Burners: Make 4
Row 1: Chain 4. Join to form ring.
Row 2: 6 sc in ring and join.
Fasten off and work in ends.
Oven Window: Make 1
Row 1: Chain 7 in third chain from hook Dc and in each stitch across (5 Dc). Chain 2. Turn.
Row 2-4: Dc in each stitch across. Chain 2. Turn, except for last row.
Fasten off and work in ends.
With contrasting color slip stitch around the all four sides.
Fasten off and work in ends.
Assembly:
On front panel whip stitch oven window above the slip stitch divider. With a yarn needle threaded with your contrasting colors over bar on 3rd row whip stitch your knobs for the stove. Whip stitch your stove burners to the top panel. Slip stitch four side pieces and bottom together. Slide in your piece of polystyrene or Styrofoam. Place top on and slip stitch the top on.
Top and Bottom: Make 2 total
Row 1: Chain 12 in third chain from hook Dc and in each stitch across (10 Dc). Chain 2. Turn.
Row 2-4: Dc in each stitch across. Chain 2. Turn.
Fasten off and work in ends.
Side pieces: Make 2
Row 1: Chain 12 in third chain from hook Dc and in each stitch across (10 Dc). Chain 2. Turn.
Rows 2-13: Dc in each stitch across. Chain 2. Turn, except for last row.
Fasten off and work in ends.
Back
Row 1: Chain 12 in third chain from hook Dc and in each stitch across (10 Dc). Chain 2. Turn.
Row 2-13: Dc in each stitch across. Chain 2. Turn, except for last row.
Fasten off and work in ends.
Front:
Row 1: Chain 12 in third chain from hook Dc and in each stitch across (10 Dc). Chain 2. Turn.
Row 2-3: Dc in each stitch across. Chain 2. Turn.
Fasten off main color attach contrasting color.
Row 4: Slip stitch in each stitch across. Switch back to main color.
Rows 5-9: Dc in each stitch across. Chain 2. Turn, except for last row.
Fasten off and work in ends.
Ice Maker Window
Row 1: Chain 3 in second chain from hook double crochet and in last stitch (2 dc). Chain 2. Turn.
Row 2-4: Dc in each stitch across. Chain 2. Turn, except for last row.
Fasten off and work in ends.
With contrasting color slip stitch around.
Assembly:
Whip stitch ice maker window to center of front. Whip stitch two small pieces of chop stick on top and bottom of front. Slip stitch pieces together and the add base and slip stitch closed.
Back and Front: Make 2 total
Row 1: Chain 20 in the third chain from hook Dc and in each stitch across (18 Dc). Chain 2. Turn.
Row 2-9: Dc in each stitch across. Chain 2. Turn, except for last row.
Fasten off and work in ends.
Sides: Make 2
Row 1: Chain 18 in third chain form hook Dc and in each stitch across (16 Dc). Chain 2. Turn.
Row 2-8: Dc in each stitch across. Chain 2. Turn, except for last row.
Fasten off and work in ends.
Bottom: Make 1
Row 1: Chain 20 in the third chain from hook Dc and in each stitch across (18Dc). Chain 2. Turn.
Row 2-6: Dc in each stitch across. Chain 2. Turn, except for last row.
Fasten off and work in ends.
Top:
Row 1: Chain 20 in the third chain from hook Dc and in each stitch across (18Dc). Chain 2. Turn.
Row 2-3: Dc in each stitch across. Chain 2. Turn.
Row 4-6: (Color Change Rows) With main color Dc in the first 5 stitches, In next stitch work Dc until last two loops are on the hook. Pull loop of next color through last two loops (Color Change made). Cut main color off. Dc in next 5 stitches. In next stitch work Dc until last two loops are on the hook. Pull loop of next color through last two loops (Color Change made). Cut contrasting color off. Dc in 6 stitches with main color. Chain 2. Turn.
Row 6-9: With main color Dc in each Stitch across. Chain 2. Turn, except for last row.
Fasten off and work in ends.
Assembly:
On top in middle of second row whip stitch over post to create two knobs. On front panel chain stitch up center of panel for eight rows. Cut off and work in ends. Going across the third row chain stitch across. Cut off and work in ends. Whip stitch piece of chopstick for handle on front of upper portion and whip stitch two longer pieces of chopstick on either side of divider (chain stitches). Now slip stitch all pieces together. Taking ice pick or sharp object poke hole in polystyrene or Styrofoam for ceiling hook. Glue in place with strong glue.
Row 1: Chain 21. Fasten off.
Row 2: Attach white Sc in each stitch across. Fasten off.
Row 3: Attach black Sc in each stitch across. Fasten off.
Continue alternating colors until row 12, with black slip stitch across entire row. Fasten off.
Cut pieces of yarn black and white 4 inches long and loop through ends of rows to make fringe.
Front and Back: Make 2
Row 1: Chain 14 in third chain from hook Dc and in each stitch across (12 Dc). Chain 2. Turn.
Row 2-6: Dc in each stitch across. Chain 2. Turn, except for last row.
Fasten off and work in ends.
Center Band:
Row 1: Chain 10 in third chain from hook Dc and in each stitch across (8 Dc). Chain 2. Turn.
Row 2-22: Dc crochet in each stitch across. Chain 2. Turn, except for last row.
Fasten off and work in ends.
Window:
With contrasting color, chain 10 in the third chain from hook Sc and in each stitch across (8 Sc). Chain 1. Turn.
Rows 2-6: Sc in each stitch across. Chain 1. Turn, except for last row.
Fasten off and work in ends.
With main color slip stitch around all four sides.
Fasten off and work in ends.
Assembly:
On front panel whip stitch window to panel. Whip stitch small piece of chopstick to front right hand edge for handle. Slip stitch ends of center band together and then slip stitch top. Slide in base and bottom on. Slip stitch together.
Top and bottom:
Row 1: Chain 18 in third chain from hook Dc and in each stitch across (16 Dc). Chain 2. Turn.
Row 2-4: Dc in each stitch across. Chain 2. Turn, except for last row.
Fasten off and work in ends.
Center Band:
Row 1: Chain 10 in third chain from hook Dc and in each stitch across (8Dc). Chain 2. Turn.
Rows 2-22: Dc in each stitch across. Chain 2. Turn except for last row.
Assembly:
Slip stitch ends of band together. Slip stitch top on and slide in boxes and then slip stitch bottom on. In center front embroider 2 handles.