Home |  Index |  Submit Request |  Share Photos |  Share Tips |  Active Topics |  New Feedback  |  Contact Us  |  Search
 User Login:  Username:    Password:      Forgot It?  | Join ThriftyFun!

 Popular Topics
 - Beauty
 - Budget and Finance
 - Christmas *
 - Cleaning
 - Consumer Advice
 - Craft Projects
 - Craft Tips
 - Food Tips
 - Garage Sales
 - Gardening
 - Gifts
 - Green Living
 - Home Improvement
 - Organizing
 - Parenting
 - Parties
 - Pest Control
 - Pets
 - Product Reviews
 - Recipes
 - Repair
 - Thanksgiving
 - Weddings for Less

More Topics

Google Search:

Web thriftyfun.com

About:
RSS Feed
About Us
Media
Advertising
Contact Us
Privacy Statement
Disclaimer

Artificial Flower Framing

By Eva Marie Stasiak
1x1
Date: 03/20/2006 Topics: Craft Projects > Framing | Photos > Crafts  
1x1
1x1
Post Feedback! | Email Friend | Print | Get Responses | Bookmark | del.icio.us | Link | Rate: Thumbs Up Thumbs Down
This craft can be a lot of fun and very complementing to a rooms décor. You can make simple country kitchen designs or something more contemporary and modern.

Supplies:

  • Shadow box or Frame with removable glass
  • Spray paint
  • Artificial flowers
  • Tape
  • Hot glue gun

Artificial Flower Framing Supplies

Directions:

The first step is to decide whether or not you frame or shadow box is the color you like. If the background of your framing is not, you can spray paint it. Remove the frame and glass before painting, unless you want to paint your frame as well. If this is a step you need to take let it dry for at least 24 hours after you have painted the background.

Artificial Flower Framing Done

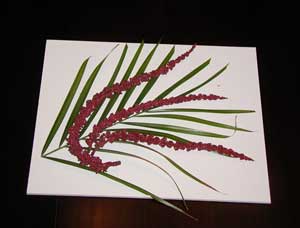
Next you will want to prepare your flowers and greenery by cutting the lengths and pieces you will want to use. Also if you are using a frame instead of a shadow box you will want to remove the glass, you will not use the glass for this project because usually the flowers and leaves make this a 3D picture. (This is also a good time to plug in your hot glue gun so it is ready for the next step.)

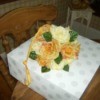
Now arrange your cut pieces on your background the way you like. Use a small amount of tape to secure your arrangement. Do not secure tapes firmly, just use it to lightly tack items into place. After you have tacked everything into place with the tape pick up the background and hold it upright to ensure everything looks good and nothing falls or no additional pieces of tape are needed. Remember you are using a very small amount of tape and only lightly tacking things into place.

Artificial Flower Framing Done

The final step is to use a small amount of hot glue in place of the tape. After you have glued everything into place let your art dry for 20 minutes and then hold upright once again to ensure everything is in place and secured properly.

Finally, reassemble frame or shadow box and display your art.

Artificial Flower Framing Done

Jump to Feedback | Post feedback
Related Links:
Previous: Barb's Baked Beans ThriftyFun Next: Sunworthy #41285140
1x1
 Feedback
1x1
1x1
1x1
1x1
 Sponsors
1x1
1x1

Post by rainwolf (8) | (03/21/2006)
Contact
Hey, this is a wonderful craft idea! I love working with silk flowers and will have fun doing some of these....thank you for the instructions!


Post By Derek (Guest Post) (03/20/2006)
Easy and fun. Great idea !


1x1

Post Feedback:
Login using the form on the top of the page to post feedback if you have registered with ThriftyFun. If you have not yet registered, click here. It's FREE!. If you are not registered you can post feedback as a guest below. Please don't use your email address for your name because spam robots can dredge it from our site. Please do not post your feedback more than ONCE. We need to approve all guest feedback and it may take from minutes to hours for that to happen.
(1x1 graphic )
Your Name

Subject

Feedback

text tool text tool text tool text tool

Image Upload: Add an image to your post! Click the "Browse" button below and select an image from your hard drive. Please only select gifs or jpegs. If you have any problems, just email the image to images@thriftyfun.com


If you want to post your email address for responses from readers, obscure it in some way like put spaces between the name and @ sign and service address with (remove spaces) behind it or name (at) server (dot) com . This is for your protection from those creepy Robots.

(1x1 graphic )

© 1997-2008 ThriftyFun.com - Design by Cumuli Design
Disclaimer: ThriftyFun.com cannot accept any responsibility for any injury or damage that you may cause to yourself, others, or property when following any advice given on this site. Read the full disclaimer. If you find any information on ThriftyFun.com or in our newsletters that is either erroneous and/or potentially harmful to others, please Contact Us, immediately.