ThriftyFun Logo
Home   Find   Ask   Share   Answer   Join   Index   Login  
 
 User Login:  Username:    Password:      Forgot It?  | Join ThriftyFun!

 - Beauty
 - Budget and Finance
 - Cleaning
 - Consumer Advice
 - Craft Projects
 - Craft Tips
 - Food Tips
 - Garage Sales
 - Gardening
 - Gifts
 - Green Living
 - Home Improvement
 - Organizing
 - Parenting
 - Parties
 - Pest Control
 - Pets
 - Product Reviews
 - Recipes
 - Repair
 - Weddings for Less

RSS Feed
About Us
Media
Advertising
Contact Us
Privacy Statement
Disclaimer

Making Ribbon Roses

1x1
Date: 10/31/2006 Topic: Craft Projects > Gifts > Ribbons & Bows  
1x1
Post Feedback | Get Responses | Bookmark | Link | Print | Print (With Feedback) | Rate: Thumbs Up Thumbs Down | Bookmark and Share
I am thinking about making my own ribbon roses to use as my bridal bouquet. I have seen pictures of them and they look gorgeous. Only I haven't made them before and have just started practicing on some ribbon I found at home using online instructions.

Any tips or pictures would be greatly appreciated. Also any ideas for cheap ribbon to practice on before I buy the lengths to use for the big day.

Monica from Kalgoorlie
(1x1 graphic )
Previous: Fixing Warped Vinyl Records ThriftyFun Next: Handles for My Rosewood Wardrobes
(1x1 graphic )
1x1
1x1
 Feedback
1x1
1x1
1x1

By nanaverm (59) Profile Contact
There's another version of ribbon roses I've made before: (hope I remember right) If the ribbon is the same on both sides, hold onto the "tail", fold across the ribbon to make a point, then fold again and again, making more points. When you have about the size you want, loosen the outside and it should look like a blossom. Wire and tape the ends together at the bottom. It will look different from the wire ribbon rose.

Posted on 03/11/2008 | Report Spam or Abuse

1x1
1x1
 View Archives:
1x1
1x1

This pages has been archived 2 times. You can view older posts and feedback below.

1x1
1x1
 Post Feedback:
1x1
1x1
1x1

Login using the form on the top of the page to post feedback (if you are a registered user). If you have not yet registered, click here to do so. It's FREE!.

1x1
(1x1 graphic )

1x1
 Archives:
1x1
1x1

Request: Making Ribbon Roses

Archived on 03/11/2008

I wanted to know how to make roses out of ribbons. I want to make them from all of the ribbons on the flower sprays after a funeral.

Thanks,
Susie from Mississippi

Answers:

RE: Making Ribbon Roses

What a wonderful way to save the memory of a loved one for family members, giving them a small token that can be kept anywhere, even placed on the Christmas tree or saved for a child. Great idea. (11/02/2006)

By susanmajp

RE: Making Ribbon Roses

When my grandma died a lady from her church made flower pictures from the ribbons for the flowers. You wouldn't have known it was ribbons until you right up to it. But they were flat. (11/02/2006)

By sandy63

Report Spam or Abuse

Other: Craft: Making Ribbon Roses

Archived on 10/31/2006

One of the easiest and most inexpensive craft project to add flair to your home or wardrobe is a simple ribbon rose. Ribbon roses can be made in any color and are perfect for adding elegance or fun as a brooch, pen top or barrette. A ribbon rose can even add panache to guest towels or throw pillows.

You will need:

  • 3 feet of wired ribbon (flower shown measures 3 inches across)
  • Floral stem wrapping tape
  • Hot Glue (low temperature)
  • Scissors

Optional material:

  • Decorative jewelry beads or seed pearls (shown in finished flower)
  • Any brooch or barrette hardware your desire
You will want to be sure: Any children involved are supervised around hot glue and scissors Your ribbon has wire down each edge and isn't too stiff.

Estimated cost for project as shown:

  • Spool of Wired Ribbon $3.50 (search the bargain bins, you can find cheaper ribbon!!)
  • Floral Wrap Tape $1.49
  • Seed pearls $2.75
  • Glue Sticks $1.49

* materials purchased at a large craft retailer.

RibbonRoseMaterials.jpg

Estimated Project Time: 30-40 minutes

To begin, be sure you have all your materials assembled and a clean workspace. This makes any project a lot easier.

RibbonRoseStemWrap.jpg

  1. Cut your ribbon and knot one end.
  2. Get your hot glue gun ready by plugging it in on a heat tolerant surface away from kids, pets and anything flammable.
  3. Find the wire end on one edge of your knotted ribbon and begin gently pulling the wire against the fabric. Your goal is to create a ruffle or shirred effect.
  4. Once the wire is drawn through, begin wrapping it around on itself to create the rose. This takes a bit of adjusting, but the key is to make sure the gathered edge of the ribbon is on the inside of your blossom.
  5. When you have the desired blossom, put the knotted end and the raw end together and wrap the wire tail (from the side you pulled) around both ends. This secures the blossom for the next step.
  6. On the back of the rose, apply thins beads of hot glue across the edges of each wrap. The key here is to keep the glue lines thin. (Note: If you want to add a stamen, now is the time. See below for the instructions)
  7. When the glue has cooled, but is still tacky, begin wrapping the ribbon ends with your floral tape. A great way to start is to press one end of the tape into the glue and then start wrapping your 'stem'.
  8. When the stem is wrapped and secure, turn your rose over and refine the appearance of the petals by adjusting them.
  9. At this point, you can do whatever you want to with your ribbon rose!

You could:

Affix a brooch pin or barrette form to the back of your rose with hot glue or sewing.

OR

Attach the rose to the top of a pen for a fun writing instrument.

OR

Sew a series of ribbon roses to a canvas bag for a great new spin on an old classic

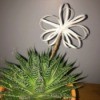
To add embellishments (like a stamen made of seed pearls and silver balls as shown), is easy to do. Simply thread the beads of your choice to fine gauge silver wire and twist the wire tail. For a richer look, create several bead strands and wind them together. Once you have what you want, slide the tail through the middle of the blossom and twist the remaining wire around the ribbon 'stem'. Then, apply your floral wrap tape as per step 7.

FinishedRibbonRoses.jpg

Remember:

  • You can create just the rose you want.
  • Longer lengths of ribbon mean larger roses.
  • Tighter twists create rose buds.

Optional embellishments:

  • A. Smaller blossoms can be affixed to the outside edge of each flip-flop for a fun tropical look.
  • B. You can add the same blossom to a fun straw bag to coordinate your look for summer!

Copyright 2005 ThriftyFun.com - About the author:Marnie McCown-Guard is a freelance writer/photographer. Her work has appeared in magazines, newspapers, the Internet and even audio CD.

Report Spam or Abuse

© 1997-2009 ThriftyFun.com - Design by Cumuli Design
Disclaimer: ThriftyFun.com cannot accept any responsibility for any injury or damage that you may cause to yourself, others, or property when following any advice given on this site. Read the full disclaimer. If you find any information on ThriftyFun.com or in our newsletters that is either erroneous and/or potentially harmful to others, please Contact Us, immediately.