I came up with this idea last week while drinking a Pepsi and staring at the bottle.
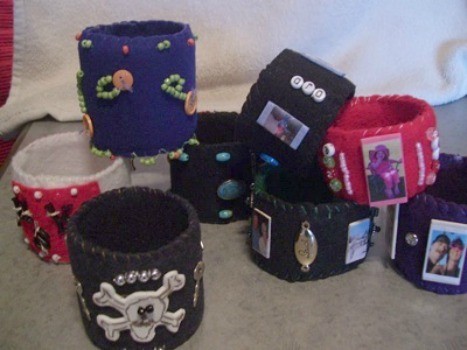
I tried making one and couldn't stop because they are so much fun and the designs are endless.
Not only are they sturdy yet soft to wear, they are a great way to recycle plastic bottles!
I will provide the general directions to make the bracelet, but the decorations and designs are only limited to your imagination so let it run wild!
They are great for boys also. Just use felt in colors they would like and call them wrist cuffs instead.
This is a great craft to do with kids. I just suggest that an adult cuts the strips from the bottle needed for each bracelet.
Approximate Time: An hour or more, depending on what is used for decorations.
Supplies:
- 16 oz. empty plastic Pepsi bottle for a child's bracelet
- 24 oz. empty plastic Pepsi bottle for older child or adult
- felt
- small rectangle woodsies (Popsicle sticks) if using photos
- mod podge
- clear nail polish
- needle and thread
- decorative items such as beads and buttons
- printer and computer if using photos
Instructions:
- Cut off top and bottom of Pepsi bottle. Save bottom and use for mod podge steps.
You will only use the middle that has the label on. Remove as much of the label as you can, but don't worry if any remains. It will not be seen.
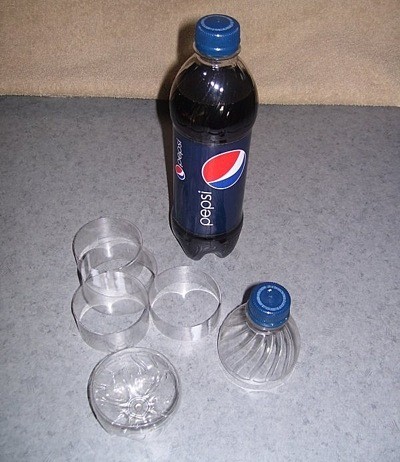
- Decide on how wide you want your bracelet to be. An adult should do the cutting of the bottle. You will need each strip intact as a complete ring. I inserted a cardboard tube from paper towels and sawed a small slit with a dinner knife, just big enough for the scissors tip.
Cut rings out and trim evenly, if needed.

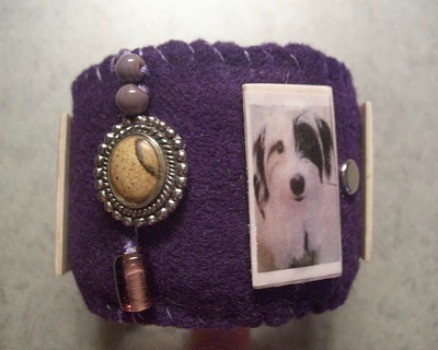
- Cut 2 strips from felt, slightly wider and longer than plastic ring. If making a photo bracelet, paint woodsies, if desired.
The backs will not show and photo will cover most of the top.
Pick out photos and resize to fit woodsies. Print and cut out. You will not adhere them to the woodsie until bracelet is finished.
- Poke 2 little holes in center of each woodsie.
I used the tip of a metal compass to do this. The wood is soft. These are holes you will use to sew them on to the felt.
- Decide where you want them on the bracelet and dab some glue on the backs.
- Take one strip of felt which will be the top of your bracelet and sew on the woodsies where you choose.
Don't make more than 3 passes with thread or it will cause a bump under the photo.
- Sew on all other decorations.
I used several different things such as buttons, beads, letter beads, brads, charms, shapes cut from foam and watch heads.
The possibilities are endless.
Knot all the things you sew on in the back of the felt strip.

- Brush some mod podge over inside of plastic strip.
- Roll the plain strip of felt slightly smaller and insert into ring, smoothing it out against the plastic until it's flat.
You are wanting the plastic ring to be in the center of top and inside felt strips.
- Do the same to the outside of ring and lay your decorated strip over it, making sure edges of both felt strips line up. Trim if needed before sewing closed.
- Whip stitch both sides and across ends of felt.
- If you used woodsies, give them a coat of mod podge and center photo on. Brush on another coat to front of photos.
- When dry, brush on a coat of clear polish. Do another if you want a deep gloss look.
By Mary from Palm Coast, FL