Photos > CraftsJuly 16, 2007

Book Angels

Book Angels

Book Angels

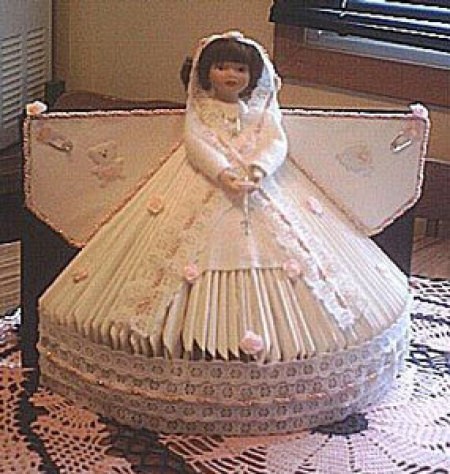
First of all I would like to just say I love making these for any occasion. They are cheap and easy to make and best of all its a great way to recycle all those hard cover books you don't read anymore or the ones you can get at a yard sale for dirt cheap.

Approximate Time 1 day and 2 hours

Supplies:

  • 1 hard cover book: free-$1.00
  • 1 small porcelain doll from a dollar store or thrift shop: $.50-$1.00
  • 1 can of white paint (I get mine free from our hazardous waste facility) or maybe you have some left over in the garage from a new paint job in the house
  • 1 small can of black paint, I get it from the dollar store: $1.00
  • 1 spool of lace: $1.00
  • A small piece of felt: $.50
  • 1 spool of any type of corrugated string: $1.00
  • small flowers, stars, beads, gems, etc. for decorations, which are usually laying in your craft drawers
  • Hot glue gun
  • foam paint brush: pack of 5 for $1.00 at dollar store
So total to make these books are between $4.00 to $10.00

Instructions:

First, take 20 pages from the front of the book and, two at a time, fold the bottom corner to the middle of the book with the folded part facing the front cover. Press to crease. Then do the same for the last 20 pages at the back of the book with the folded part facing the back cover, thus forming the wings. Then figure out how many pages are left and find the center. Turn the book upside down and fold two pages in the center the same way as before so you don't lose it. Go back to the front of the book, take the first two pages after your recent folds, fold bottom corner into the center. Press to crease. This will give you the same fold as before, just upside down. Keep folding towards the front of the book. When you hit the center fold start, folding from the back of the book the same way (folding towards the back cover). Keep going until you have folded all the pages. Here is your dress. Ta-Da the hard part is done!

Now when I first made these, I left the wings folded and just put a few drops of hot glue so they don't pop out too much. As I got making more, I decided to cut the creases so that I still had the shape but not the bulk (I prefer to cut), but to each their own, I guess. It's all trial and error. I will try to post one of each, if I can.

The next step is to paint the wings and dress using the foam brush. These work better to get in the creases in the dress. As that is drying, you may need to altar the doll. The ones I get, the arms and legs are separate but the head is attached to the torso so I use needle nose pliers to slowly and carefully detach the head (starting in the arm hole) making sure I keep at least some of the neck still attached. Don't forget to keep the arms.

Now that the paint is dry on the front, take your black paint. Cover the whole back and any other parts on the front that the wings and dress don't cover.

Next after all is dry. Glue head on book. Cut your felt shape. Take your felt and glue the neck part to the head. The arms can be tricky. The arms should only use half of the length of the felt cut for the arms. With the dolls being so small the whole arm only makes the hand to elbow. You can stuff the rest of the sleeve or leave it (it will be covered later). I usually play around with them for a while until I get the felt to wrap them the way I want and the arms to place on the dress the way I want them too. Once I get them the way I want them, I then glue the arms into the sleeves. Don't attach to dress yet just in case you want to add things under the arms, for example: lace, gems, etc.

Trim bottom of dress with lace and make a long strand to wrap as a shawl over head and shoulders then down as far as you want. This helps to hide the fact that the arms are too short. Next glue shawl to head, then glue arms where you want them. Sometimes I can even get them to pray. Then I hang a cross earring (from the dollar store) from her hands. Trim wings with corrugated string, add decorations to wings and dress. Check for any spots that may need a dab of hot glue.

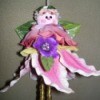
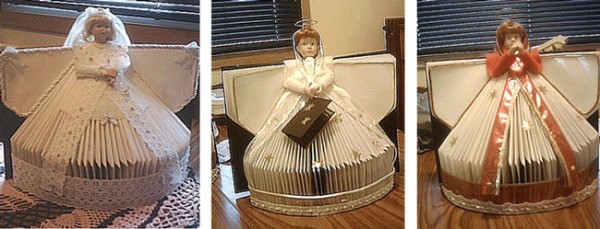
And you have your very own book angel for any occasion. I have made these for baby showers, teachers gifts, anniversaries, Christmas gifts; next is a wedding one.

Well I hope I didn't forget anything. Enjoy! My favorite one so far is the pink one.

By Libby from Canada

bookangels782x300.gif

By

Feedback

Read feedback for this post below.

By
01/07/2010

An oldie but a goody; you did a nice job on your embellishments. A magazine done like that and painted green, decorated with beads and such makes a Christmas tree card holder centerpiece.
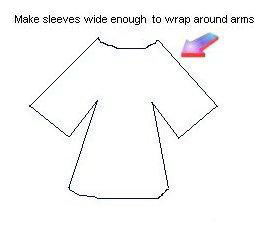
By Lora (Guest Post) 11/18/2007

I have never seen anything like this. How wonderful!

By
07/19/2007

What a smart idea, I have never seen these before! Beautiful work. Thank you.

By MaryAlice (Guest Post) 07/18/2007

Thanks for the memories,,,,I forgot about this one. I remember this was a school project that we made for our parents for christmas....I think my mom still has it in our attic. :>

By Lynda (Guest Post) 07/17/2007

Unique variation on the 60's craft ( making Choir
Boys and Carolers the same way but taller and a slightly different fold.) You certainly have to have a LOT of time to do this many dolls. We used old phone directories instead, which took all day just to fold all of the pages! Books should be easier? Needless to say, we got tired of that craft after a single season and few of us ever took it up again! lol God bless you for the hard work. : )

By
07/16/2007

Very, very, very nice!!!!!

By April (Guest Post) 07/16/2007

Thanks for the memories, when I was little my brother and I used to make Christmas trees like these out of Readers Digest books.

By
07/16/2007

these are wonderful and i cannot wait to try to make one. thanks so much

By
07/16/2007

I LOVE THEM !!! and thanks for all the pictures and the step by step instructions

Related

Post Feedback

Your thoughts are welcomed and appreciated. Enter your feedback here!

Feedback:

Image Upload:

Add an image to your post! Click the "Browse" button above and select an image from your hard drive. Please only select gifs or jpegs. If you have any problems, please contact us.


facebook like arrowLike ThriftyFun on Facebook

Browse Topics

Over 80,000 tips, recipes, questions & crafts.

Ask a Question

Submit a question to the TF community.

Subscribe to ThriftyFun Newsletters!

Email: