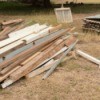
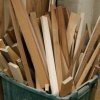
Home |  Index |  Submit Request |  Share Photos |  Share Tips |  Active Topics |  New Feedback  |  Contact Us  |  Search
 User Login:  Username:    Password:      Forgot It?  | Register

 Popular Topics
 - Beauty
 - Budget and Finance
 - Christmas *
 - Cleaning
 - Consumer Advice
 - Craft Projects
 - Craft Tips
 - Food Tips
 - Garage Sales
 - Gardening
 - Gifts
 - Green Living
 - Home Improvement
 - Organizing
 - Parenting
 - Parties
 - Pest Control
 - Pets
 - Product Reviews
 - Recipes
 - Repair
 - Thanksgiving
 - Weddings for Less

More Topics

Google Search:

Web thriftyfun.com

About:
RSS Feed
About Us
Media
Advertising
Contact Us
Privacy Statement
Disclaimer

7 Steps To Milling Four Square Lumber

By Dave Markel
1x1
Date: 04/17/2004 Topics: Gardening | Home Improvement > Woodworking  
1x1
1x1
Post Feedback! | Email Friend | Print | Get Responses | Bookmark | del.icio.us | Link | Rate: Thumbs Up Thumbs Down
Introduction:

This tutorial assumes that you know how to safely operate your power tools. Always refer to the manufacturer instructions if you are unsure how to use your tools.  

Any wood worker needs to take a board from the lumber yard or their local sawyer and make this board a uniform thickness, length and width. This board needs to have all four edges square to each other. This is referred to a milling a board four square and is a pre-requisite to any wood working project.

This is best accomplished by using a jointer, thickness planer, miter and circular saws and a table saw. In this example we will mill a board 30" x 4-1/2" x 5/8" with all for edges square to each other.

Step 1: Rough cut your stock

Rough cut your stock to 30-3/4" x 4-3/4" and maintain the same overall thickness. Start by selecting a piece of stock larger then your finished size (obviously) and use a framing square to square off one end of the board.

Be sure the end isn't checked (cracked) and if it is square the board off just beyond where the cracks end.

Make the cut using a circular saw being careful to make a fairly square cut. Now measure 30-3/4", the rough length, and square off the board using your framing square and make the second cut the same way you made the first.

Be careful to cut on the waste side of the line.  

Step 2: Rip to rough width

The table saw is the best tool for this cut. Set the rip fence so it is 4-3/4" from the blade and set the height of the blade so the gullet of the teeth is the same height as the stock. Following the directions included with your table saw start the blade and make the cut, being sure to use a push stick.

Step 3: Truing one face

Now that your piece of stock is the rough size needed it is time to true up one face. This is best accomplished with the jointer.  

As always with the jointer it is advisable now to take more than 1/16" per pass. Taking more wood per pass will overwork the machine and give results that are less than optimal.  

Analyze the board to determine the direction of the grain and whether there is cupping. It is best to place the cupped face down since it will site better on the jointer table. Run the board through for a couple of passes until you have a uniform face free of voids and dips.

Step 4: Truing the second face

The thickness planer is by far the best tool to accomplish this. On the jointer it is simple to get the second face true but it is quite difficult to get it parallel to the first.

The thickness planer guides the board and makes the second face exactly parallel to the first. Once the second face is true and parallel to the first continue to plane the board until it reaches the finished thickness, in this case 5/8". Remember to feed the stock with the grain to ensure a smooth clean cut.  

Step 5: Square one edge

Back to the jointer for this step. Set the jointer fence so it is exactly 90 degrees to the table and be sure the cutting depth is set to 1/16". Determine the direction of the grain and place on face against the jointer fence and make a pass through the cutter applying steady pressure against the fence.  

Once you are satisfied that the edge and face are square to each other mark the edge for reference.

Step 6: Square the other edge

Now that you have one edge prepared it is back to the table saw to rip the board to width. Set the fence 4-9/16" (1/16" larger then needed). With the marked edge against the table saw fence rip the board. Now return to the jointer and make one final pass, milling the new sawn edge. Be sure that the jointer is set to 1/16".  

Step 7: Squaring the ends

I prefer to use a table saw to square the end and cut the board to length although a table saw with a miter gauge will work as well. Check that your miter saw is cutting a true 90 degrees and when you are sure it is trim one end of the board, taking as little off as possible. Now measure the finished width of 30" and make the cut taking care to cut on the waste side of the line.  

Conclusion:

You should now have a board that is 30" x 4-1/2 " x 5/8" with all four sides square to one another.

There are a number of methods that will work for milling a board square; however I have always had good luck using this method.  

About The Author:
Dave Markel is the author of "The All Wood Working Journal".
He has helped hundreds of individuals improve their wood working skills. Visit his site at http://all-wood-working-plans.com
Jump to Feedback | Post feedback
Related Links:
Previous: There's Powder on My Flower: Dealing with Powdery Mildew ThriftyFun Next: 9 Steps to Soapmaking Success
1x1
 Feedback
1x1
1x1
1x1
1x1
 Sponsors
1x1
1x1

No Feedback Yet

Be the first to post feedback! Click here to post feedback.

1x1

Post Feedback:
Login using the form on the top of the page to post feedback if you have registered with ThriftyFun. If you have not yet registered, click here. It's FREE!. If you are not registered you can post feedback as a guest below. Please don't use your email address for your name because spam robots can dredge it from our site. Please do not post your feedback more than ONCE. We need to approve all guest feedback and it may take from minutes to hours for that to happen.
(1x1 graphic )
Your Name

Subject

Feedback

text tool text tool text tool text tool

Image Upload: Add an image to your post! Click the "Browse" button below and select an image from your hard drive. Please only select gifs or jpegs. If you have any problems, just email the image to images@thriftyfun.com


If you want to post your email address for responses from readers, obscure it in some way like put spaces between the name and @ sign and service address with (remove spaces) behind it or name (at) server (dot) com . This is for your protection from those creepy Robots.

(1x1 graphic )

© 1997-2008ThriftyFun.com - Design by Cumuli Design
Disclaimer: ThriftyFun.com cannot accept any responsibility for any injury or damage that you may cause to yourself, others, or property when following any advice given on this site. Read the full disclaimer. If you find any information on ThriftyFun.com or in our newsletters that is either erroneous and/or potentially harmful to others, please Contact Us, immediately.