Little Suzy Bronze Post Medal for All Time! 104 Posts
January 12, 2009
Fleece cover to stretch over the carrier. The flap comes down over the baby's head to keep the wind of of it's face.
Approximate Time: 3 hours
Advertisement
Supplies:
1 yard of fleece for the top
1 yard of fleece for the lining
scissors
thread
sewing machine
54 inches of 3/4 inch wide elastic
a large safety pin
needle and thread for hand sewing
Instructions:
I laid the fabrics out and cut a piece 28 inches wide by 35 inches long from each piece.
Lay them with right sides together and stitch around with a 1 inch seam allowance rounding the corners. Leave an opening about 3-4 inches to turn it.
Clip the curved seams so they lay flat. Cut off the points at the corners.
Now turn it right sides out. Cut a hole 8 inches from the top edge and 10 inches from each side edge. The hole should be about 7 inches diameter. Cut through both thicknesses of fleece. I sewed around the circle I drew on the fabric before I cut it out. That way the pieces keep together nicely.
Sew 1 inch around the entire piece.
Now take the safety pin and pin it to the end of the 3/4 inch wide elastic (54 inches long) and thread it through the pocket you've just created. When you bring it all the way around to the beginning end of the elastic, stitch the 2 ends together.
Advertisement
Now hand sew the opening that's left from when you turned your piece right side out.
Cut a strip of fabric from the lining fleece about 24 inches long and 4 inches wide. Sew it around the circle you cut out and join at the ends.
Now roll it onto the underneath and stitch in the ditch from the top. Cut extra fabric off on the underneath side.
Cut a piece 12 inches x 18 inches for the flap. Zig zag around it to finish the edging. Sew it above the hole on the front side through all thickness. Put the flap down over the hole and top stitch on the top about 1/2 inch from the edge.
Now stretch it out and pull the sides down around the baby carrier. Use the flap to cover baby's face.
The first picture is the front and the second is the back.
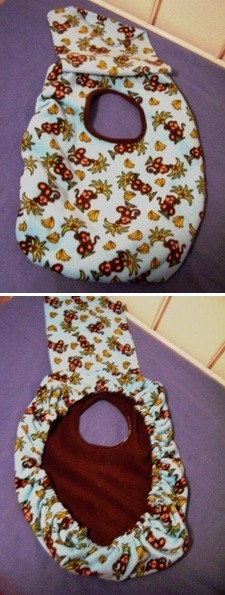 Fleece cover to stretch over the carrier. The flap comes down over the baby's head to keep the wind of of it's face.