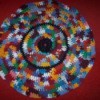
How do I make a rug from material?
By CA from Simi Valley, CA
Add your voice! Click below to answer. ThriftyFun is powered by your wisdom!
I watched a series of videos on Youtube which explained the process very well.
vintagechica.typepad.com/
www.ehow.com/
I have a Word document that shows photographic step by step instructions. If you're interested, click on my contact button here and I can email it to you.
The only requirement for this sit-on-the-couch project, is that you need to know how to crochet, just a single crochet, a chain stitch, and a slip stitch.
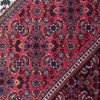
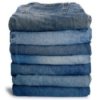
I make cotton rag rugs. I get material for these anywhere it is cheap: yard sales, salvation army, linen closet, ads in the paper(you wouldn't believe the things that people give away for free), etc. sheets make excellent material for rugs. They are sturdier than regular material. They're cheap at yard sales and the salval and you can always ask around if anybody has any they want to get rid of. Plus, they have nice length. I mix different patterns and colors together when I sew my strips. Again I make them into balls. You can sew tubes with these or tuck in the salvage edges as you crochet or not worry about the edges, thus giving it the raggedy, frayed edge-look, rag rug. Once you have collected an array of colors, you can make them in shades/patterns of blue or green. I have done varieties of colors and patterns and I have also done specialty rugs to match the shower curtain and window curtain that I made for my bathroom in blues and yellows.
you can do a trial project to see if it's for you by making a hot pad trivet. rip your material in 2 1/2 inch to 3 inch wide strips. snip the length end of your material every 2 1/2 -3 inches and start tearing. and you're basically ready to go. connect your strips, make your ball, and start crocheting. you can go back and forth, flipping your rug, or you can crochet solely on the top side, hooking into the outer edge of the stitch in the row below.
here is a site that shows you how to connect your strips without sewing them together. so you could rip your strips, connect them and ball them up all from the couch if you'd like.
www.cocoknits.com/
i have a large wooden hook(R to Q size) that i use to crochet around a chain of my choice. if i want it round, i make a chain of 5-6 stitches, hook it at the one end like the center of a granny square, and go from there. i do a single crochet stitch, putting in a slip stitch around the "corners" where you can visibly see the stiches from the row before do not line up with the row you are working on.
i can send pictures of some of my rugs if you'd like. feel free to contact me through the group or at my personal email address pkift12@windstream.net.
Add your voice! Click below to answer. ThriftyFun is powered by your wisdom!