ThriftyFun Logo
Home   Find   Ask   Share   Answer   Join   Index   Login  
 
 User Login:  Username:    Password:      Forgot It?  | Join ThriftyFun!

 - Beauty
 - Budget and Finance
 - Cleaning
 - Consumer Advice
 - Craft Projects
 - Craft Tips
 - Food Tips
 - Garage Sales
 - Gardening
 - Gifts
 - Green Living
 - Home Improvement
 - Organizing
 - Parenting
 - Parties
 - Pest Control
 - Pets
 - Product Reviews
 - Recipes
 - Repair
 - Weddings for Less

RSS Feed
About Us
Media
Advertising
Contact Us
Privacy Statement
Disclaimer

Craft Project: Roman Warrior Shield For Kids

1x1
Date: 05/16/2008 Topics: Craft Projects > Crafts for Kids | Photos > Crafts  
1x1
Post Feedback | Get Responses | Bookmark | Link | Print | Print (With Feedback) | Rate: Thumbs Up Thumbs Down | Bookmark and Share
Roman Warrior Shield For Kids
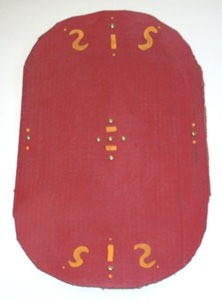
This fun cardboard shield is created to look like a soldier's shield from ancient Rome. It stays on the simple side, to really look authentic.

It has brass brads to give the "metal stud" look of old wooden shields. It also uses bright but simple colors to help keep the shield truly looking like it's from ancient Rome.

This craft is a great way to get kids into history. While the children are making the shields, use the time to tell them about ancient warriors and ancient Rome.

Explain that metal studs (the brass brads) were used to help strengthen the wooden (cardboard) shields.

Approximate Time: 25 minutes

Supplies:

  • Large Cardboard
  • Red craft paint
  • Yellow craft paint
  • paintbrush
  • brass brads
  • safety pin
  • yarn or twine
  • glue
  • scissors

Instructions:

  1. Depending on the child's age, either have them cut out a large oval from the cardboard, or have an adult cut it out for them. The cardboard oval should be about 2 and 1/2 feet tall and 1 and 1/2 feet wide.
  2. Have the child paint the entire "shield" in red paint. Let paint dry.
  3. Decorate the red "shield" with simple yellow lines. Let dry. Let the child choose their own design, just try to keep it simple.
  4. Use a safety pin to poke holes in the cardboard. Push brass brads into the holes to create a few "studs", like ancient shields used. Brads should be used in the middle and top ends of the shield.
  5. Cut a short piece of yarn or twine and glue it to the back of the shield to create a handle. Let dry.

By Aysha from Boise, Idaho

(1x1 graphic )
Previous: Cherry Delight ThriftyFun Next: Trinity (Italian Greyhound)
(1x1 graphic )
1x1
1x1
 Feedback
1x1
1x1
1x1

No Feedback Yet

Be the first to post feedback! Click here to post feedback.

1x1
1x1
 Post Feedback:
1x1
1x1
1x1

Login using the form on the top of the page to post feedback (if you are a registered user). If you have not yet registered, click here to do so. It's FREE!.

1x1
(1x1 graphic )

© 1997-2009 ThriftyFun.com - Design by Cumuli Design
Disclaimer: ThriftyFun.com cannot accept any responsibility for any injury or damage that you may cause to yourself, others, or property when following any advice given on this site. Read the full disclaimer. If you find any information on ThriftyFun.com or in our newsletters that is either erroneous and/or potentially harmful to others, please Contact Us, immediately.