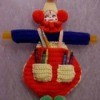
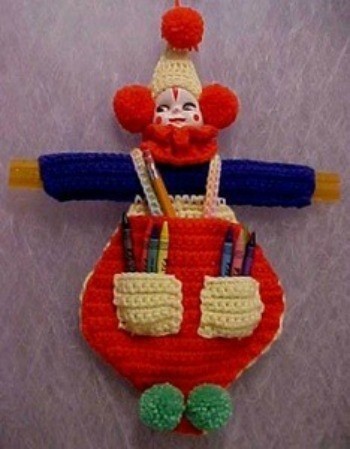
This cute little vintage clown hangs on the wall and holds a ruler, crayons, and pencils. Handy and decorative. The little ones will love him.
Approximate Time:
Notes:
This is a good way to use leftovers in mix and match colors in any order that is pleasing to the eye. You will also need a 1/4 inch paper punch, and a hot glue gun.
You may prefer to use the cool melt glue sticks for this project.
Concerning the plastic faces: this is a vintage pattern and, in the original version, you could buy the clown faces as well as the doll faces. The clown faces are no longer available, but you can still find the doll faces at Hobby Lobby and other craft stores. So you may either use the doll face or you may do as I have done and paint the doll face.
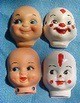
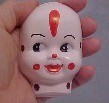
In the photo, you see the doll faces that are available, and the ones that I have painted. The painting is very simple. Spray the face first with white paint. Let dry and using red and black sharpies and redraw the new features on. The outlines of the face will make this easy to do. Punch a hole on each side of the face at the neck to attach the ruffled collar. and one hole on each side of the face at eye level to attach the hat and pom-poms.
Ruler Cover: (Arms) Use your choice of color (blue in photo)
Row 1: ch 35, 1 sc in 2nd chain from hook, 1 sc in each st of ch across, ch 1, turn,. (34 sts)
Rows 2-12: 1 sc in each sc across, ch1, turn. (34 sts.) (no ch on row 12) Tie off leaving 18 inch yarn end. Sew piece together lengthwise, leaving ends open to hold the ruler.
Pants Back: Yellow in photo
Row 1: Hold ruler Cover flat and sl st, ch 1 between 12th and 13th sts of seam to attach yarn, 1 sc in same st, 1 sc between each of next 11 sts, ch 1, turn (12sts)
Rows 2, 4, 6, 8: (every other row) 2sc in first st. 1sc in each of next 10 (12) (14) (16) sts, 2 sc in last st. ch 1, turn (14) (16) (18) (20) sts.
Rows 3, 5, 7, 9: (every other row) 1 sc in each st across, ch 1, turn (14) (16) (18) (20) sts.
Rows 10-12;: 2 sc in first st, 1 sc in each of next 18 (20) (22) sts, 2 sc in last st, ch 1 turn. (22) (24) (26) sts.
Rows 13-18: 1 sc in each st across, ch 1, turn. (26) sts,
Rows 19-27: In first 2 sts work 2 sc together as 1, 1 sc in each of next 22 (20) (18) (16) (14) (12) (10) (8) (6) sts, in next 2 sts work 2sc together as 1ch 1, turn. (24) (22) (20) (18) (16) (14) (12) (10) (8)sts,
Rows 28-31: 1 sc in each st across, ch 1, turn. (8 sts) (No ch on Row 31). Tie off.
Pants Front: Orange in photo.
Row 1: Ch 17, 2sc in 2nd ch from hook, 1 sc in eah of next 14 sts, 2 sc in last st, ch 1, turn. (18 sts)
Row 2-26: Repeat Rows 7-31 of Pants back. Row 2 for front will be same as Row 7 for back. Row 3 for front will be same asRow 8 for back, etc.) Tie off at end of Row 26. Pockets (make 2) Yellow in photo.
Row 1: ch 10, 1 sc in 2nd ch from hook and each st of ch across, ch, turn (9 sts)
Rows 2-8: 1 sc in each st across, ch 1, turn. (9 sts) (No ch on Row 8.) Tie off. Sew pockets on top of front piece, referring to photo for placement, leaving opening on top to insert crayons. Place front piece on top of back piece of pants and sl st or sew together, matching pieces at the "feet" and leaving opening on top to insert pencils.
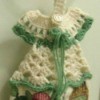
Neck Ruffle: Orange in photo.
Row 1: ch 13. 1 sc in 2nd ch from hook and each st of ch across. ch 2, turn (12 sts)
Row 2: 3 sc in each sc across. ch 3, turn (33 sts)
Row 3: 3 trc (wrap yarn twice around hook and work off 2 wraps at a time) in each sc across. Ch 3, sl st. to base at beginning of previous row. Tie off leaving a few inches.
Straighten center of base of ruffle and squeeze a little of the cool melt glue onto the center. Attach it at this point to the center of the neck on the face piece. Tie a piece of yarn through the ruffle base near the holes in the neck and gently thread through the holes and tie, being careful not to break the plastic hole. Center the collar over the ruler cover (arms) and secure collar to arms by hot gluing or sewing.
Straps: Variegated pink, white, blue in photo (Make 2) ch 19, 1 sc in 2nd ch from hook. 1 sc in each st of ch across. Sew or glue to pants referring to photo for placement.
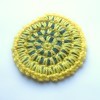
Cap: Yellow in Photo
1st Row: ch 13. sc in 2nd ch from hook and each st of ch across. ch 1, turn (12sts)
2nd Row: In first 2 sc work together as 1 st (decrease), 1 sc in each st across to last 2 sts. Work last 2 sc together as 1 st (decrease). (10 sts)
Remaining rows: Continue to decrease 1st and last st in each row until only one st remains.
Assembly:Tie off. Position hat across forehead of clown, and tie the sides into the holes at eye level. Pull cap up on forehead, and tack to the top of the face with cool melt glue. (If using hot melt glue, squeeze a little onto the hat, wait a few moments before applying to the face. Refer to photo for position of cap.
Tie pom-poms in place as shown in photo. leave the ties on the tip of the hat a little long and tie again at the end for a hanger to hang your clown. You may need to add a touch of glue to the sides of the face.
By Harlean from Hot Springs, Arkansas
The instructions are also in a PDF file for which you may need Acrobat Reader to view. Download Acrobat Reader
Click Here to download the Crochet School Clown Instructions in PDF format.
Add your voice! Click below to comment. ThriftyFun is powered by your wisdom!