I'm looking for instructions for making a t-shirt blanket. Does anyone have any?
By Angela Sullivan from Waurika, OK
Add your voice! Click below to answer. ThriftyFun is powered by your wisdom!
Here is one from right here on thriftyfun:
www.thriftyfun.com/
or: www.straw.com/
Add your voice! Click below to answer. ThriftyFun is powered by your wisdom!
I am wanting to make a Tee-shirt blanket for my boys with their old baseball and basketball shirts. Does anyone have any ideas? The easier the better.
Scaudle from North Carolina
Hope this helps:
T-Shirt Blanket: Seven Steps to Preserving Cotton-Embossed Memories
http://www.thriftyfun.com/tf293441.tip.html
(03/19/2006)
By ThriftyFun
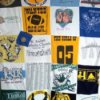
I made one of these for a lady whose husband was a classic car enthusiast, he had hundreds of t-shirts from these car shows. She wanted a king size quilt so I found 48 t-shirts that had approx. the same size images. I made 15" blocks of the images, cutting them out after first fusing some non stretch interfacing to the backsides. This made the measuring, cutting, and sewing much easier since it eliminated all the stretch and curl in the cotton t-shirts. I didn't put any sashing between the blocks since she wanted as many blocks as would fit in the measurements. I did add a 10" border all the way around for a more finished look.
I used low loft batting and poly backing. I used the backing to bind over to the front instead of extra piece of binding. I tied with embroidery thread (3 strands) at each corner and halfway between in the seams. This kept the three layers pretty secure. This quilt was much bigger than I'll ever attempt again but it was an experience and turned out exceptionally well considering the sheer bulk of it all. I would suggest starting with a throw size or wall hanging size so you don't bite off more than you can chew. Good luck. (03/20/2006)
By leslie
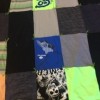
I made a t-shirt quilt last Christmas in one week. I made the blocks finished size to be 14 inches. I pre-washed all fabrics used as the t-shirts would not shrink. I did a quilt as you go. Which means that I'd put the backing, batting and t-shirt together, quilt the block, and then add them to each other in rows of 5.
By Nancy