How can I use some plain white ceramic tiles (8 by 8) as part of a wedding reception guest table centerpiece? or any other ideas?
You could clean them off with rubbing alcohol and put out sharpie markers of different (or just 1) color for guests to sign as keepsakes. Take photos from the wedding, and glue onto tiles, then clear coat to protect. The couple could use them later to cover a tabletop, serving tray, or glue on thick felt to the backs, and use as trivets. The tiles would need some type of clear coat later to keep signatures from wearing off. I'm sure there are many different ways to use signed tiles as a way to save the day's memories, just Google it for more ways than you could possibly imagine.
Will this be one of the main tables?
What theme will other tables have?
Do you have a definite color scheme besides white?
Tiles are usually very easy to use in home crafts.
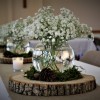
Perhaps you could cover 4 tiles, place them together in the center and set a suitable basket in the center of the tiles. Place real or artificial flowers in basket or use other items, such as flimsy scarves matching your color scheme.
You can use any type of material to cover your tiles.
Thinner material or medium heavy paper usually is easy to work with. A thinner material works well because you want to be able to fold it over the ends of the tiles.
I recently did something similar and found everything that I needed at my local Dollar Tree. This store has 16"X11" 'Wallpaper" that is 'Peel & Stick' so it will stick on your tile and you can use Mod Podge for a finish. They have white designs and many other colors and designs. Very easy to use. It would only take 2 sheets but buy more just in case of a mistake.
Here is a link that demonstrates how to do coasters but your tiles will be the same, just 8x8 instead of 4x4.
www.kenarry.com/
This could be helpful also:
modpodgerocksblog.com/
Here's hoping everything turns out great.
You can affix images with the bride and groom to ceramic and place them in the center of a wedding reception guest table.
You can affix images by using transfer paper and a standard home printer, or with regular printer paper and a bottle of Mod Podge.
Using a transfer paper:
Print your chosen image on transfer paper. Transfer paper can be found at craft stores, office supply retailers, and online. You do not have to print images in mirror image mode (reverse mode).
Allow the printed image to dry for at least 60 minutes.
Read the transfer paper package instructions carefully, as some brands require applying 2-3 even coats of clear acrylic spray over the image while others do not. If required, shake the acrylic spray can as directed and spray on a quick, even coat. Wait the recommended drying time (possibly 10-15 minutes), then repeat the process 1-2 more times. The acrylic will help to strengthen and protect the image once it's transferred.
Cut closely around the perimeter of your printed image with scissors. Leave no more than a 0.125 in (3.2 mm) boundary around the entire perimeter of the image.
Soak the cutout image in a bowl of warm, not hot, water from the tap for 1 minute or more - read the transfer paper package instructions and follow the product instructions.
Peel the backing paper off of the cutout image using your thumbnail. If the backing doesn't start to peel away easily, soak the cutout for another 30-60 seconds.
Place the film image-side up on the ceramic surface and gently rub your thumb from the center to the edge of the image in all directions in order to smooth away wrinkles and bubbles.
Allow the image to dry completely on the ceramic surface during 30-60 minutes, but follow the drying time provided on the transfer paper package.
Using ModPodge:
Clean the ceramic item with rubbing alcohol and let it dry completely.
Print your chosen image in mirror image mode with your home printer.
Let the printout dry for 3-4 hours (laser printer) or overnight (inkjet printer).
Cut out the printed image, leaving a border of about 0.125'0.25 in (3.2'6.4 mm) around the perimeter.
Brush a thin layer of Mod Podge regular matte waterbase sealer over the image.
Smooth the cutout onto the ceramic surface, image side down.
Allow the cutout to dry for at least 3-4 hours.
Dampen your fingertip lightly and gently rub and peel away the paper. Avoid over-wetting your finger or the surface.
Once you've peeled away all the paper and revealed the transferred image, let it dry completely for a day. Then, spray on 1-2 coats of clear acrylic sealer after waiting 24 hours.
The numbered tiles could be placed on small easels @ tables.
Design a painted 'Mr. & Mrs' wood framed wall art.
You can place several tiles together and write or paste a picture with the names of the bride and groom, like here www.pinterest.com/