Make this bucket of love for your loved one this Valentine's Day.
Approximate Time: 40 minutes, excluding the time waiting for the paint to dry.
Advertisement
Supplies:
a suitable vector illustration
I downloaded a free vector illustration of a silhouette of two lovers from http://www.canstockphoto.com/.
a photo editing program
I used PhotoScape version 3.6, which can be downloaded free of charge from http://www.photoscape.org/.
galvanized mini tin bucket with a height of 2 3/8 inches
For a possible supplier, see http://bucket-outlet.com/lilbucket.htm.
acrylic paint in the following two colors: black and plum
Modge Podge
quick-drying matt clear varnish spray paint
hairdryer
a 10/32 inch paint brush
a fan-shaped paint brush
a pair of standard scissors
one small clear cellophane bag
sweetheart candies
See http://www.necco.com/ourbrands/default.asp?brandid=8.
decorative ribbon
a few sheets of old newspapers to protect the working area
Advertisement
Instructions:
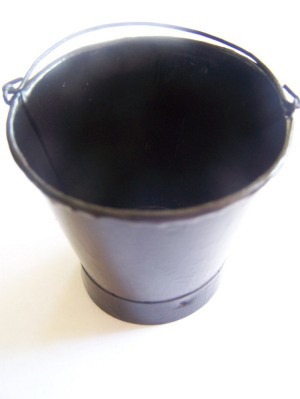
Turn the mini tin bucket upside down on a sheet of newspaper. Using a 10/32 inch paint brush, paint the whole outside and the bottom of the bucket with the black paint.
Let it dry thoroughly and apply a second coat of black paint.
Let it dry thoroughly again, and then turn the bucket over. Paint the inside of the bucket with the black paint. Allow to dry thoroughly before applying a second coat to the inside too.
With the PhotoScape program, from the different frames that can be added to the vector illustration, choose the Transparent 02 frame, setting the width at 100%.
Save the adjusted illustration onto your computer, and then close the file. Reopen the file with the PhotoScape program, and print the illustration via PhotoScape, using the 5cm x 5cm size option. Now, cut the illustration out.
Advertisement
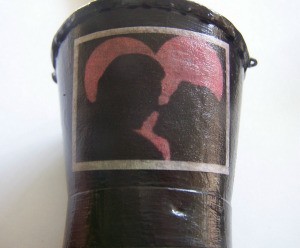
With the 10/32 inch brush, apply a layer of Modge Podge over the whole outside of the bucket. Put the illustration in position on the bucket, but do not press it down. With the brush, spread Modge Podge to the front of the illustration, lightly applying pressure so that it will stick to the bucket.
Working from the middle of the illustration, and from inside towards the outside, lightly rub out all the air bubbles from the back of the illustration.
Use the hairdryer to dry the whole bucket thoroughly, but do not use the highest heat setting on the hairdryer. Once dry, the illustration will be "glued" to the bucket.
Apply a layer of Modge Podge over the whole outside of the bucket, and dry it thoroughly with a hairdryer.
Repeat step 9; you need to apply 3 coats of Modge Podge, but remember that with every layer, the direction in which the Modge Podge is applied, must be changed from horizontal to vertical to horizontal, etc. Also, remember that after every layer of Modge Podge, the bucket must first be dried thoroughly with the hairdryer.
Advertisement
Using the fan-shaped paint brush, give the outside and inside of the bucket a wash with the plum-colored acrylic paint. Remember not to use too much paint when using a fan-shaped brush, as this will lose the fan-shaped effect. Remove excess paint by dabbing it onto a sheet of newspaper before starting to paint.
Turn the bucket upside down on a sheet of newspaper and spray the whole outside of the bucket with the matte clear varnish spray paint. Remember not to hold the can too close when spraying, and work in a well-ventilated area. Leave the bucket to dry thoroughly.
Turn the bucket around and spray the inside of the bucket. Leave it to dry thoroughly.
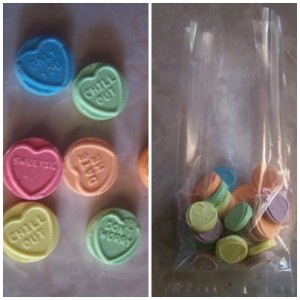
Add the Sweetheart candies to the cellophane bag. Tie a ribbon around the bag and make a bow.
Advertisement
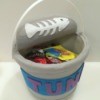
Pop the bag into the bucket.
Photos included:
Photo 1: Paint the outside and inside of the bucket with the black paint.
Photo 2: The illustration used for this project.
Photo 3: The illustration is "glued" to the bucket, using Modge Podge.
Photo 4: Using the fan-shaped paint brush, give the outside and inside of the bucket a wash with the plum-colored acrylic paint.
Photo 5: Add the Sweetheart candies to the cellophane bag.
Photo 6: The completed bucket of love.