I need instructions for a man made from tin cans like in the wizard of oz.
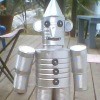
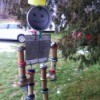
Make The Tin Man
SUPPLIES:
DIRECTIONS:
1. Open tops of each can and remove contents.
Drain cola cans. Spray all cans and funnel with silver
paint. Spray funnel inside and out. Let dry completely.
2. With an awl or ice pick, punch holes in vegetable
cans, each side, 1/2" from top and bottom.
Punch holes in the cola cans, each side, 3 1/2"
from the bottom. Turn vegetable cans upside down over the cola cans until the first set of
holes on the vegetable can meet the holes on the cola can. Run a 3 3/4" piece of wire
through both cans; bend ends of wire. You have just made the arms and legs.
3. Turn sardine cans with open side down (feet). Place each leg combo on the backside of a
sardine can. Run wood screw from open side of sardine can through bottom of cola can to
attach feet to leg.
4. Turn the 32 oz. coffee can (body) upside down and punch a hole in the center bottom.
Punch holes on each side, top and bottom, 1/2" from edge. Punch holes in the fruit can
(neck) 2 1/2" from the bottom on each side, and one hole in the center of the bottom. Set
neck right side up on the body. Bolt together using a screw and nut.
5. Punch holes in the 13 oz. coffee can (head) in the
center bottom and on each side 1 1/2" from the open
end. Cut a 20" piece of wire, bend one end. Run up
through can, leaving bent end inside can. Drop funnel
(hat) upside down over wire and let slide down to
rest on top of the head. Curl the top of the wire; this
6. Place legs inside open end of body and attach
a leg to each side of the body by running a 7"
piece of wire through holes. Bend wires at the
end. Arms are attached to the outside of the body
with a 13" piece of wire.
7. Glue the eyes approximately 1 1/2" from the
top of the head. Paint nose, mouth, and ears.
Three 1" crcles (buttons) are painted on body. All
are black. A red heart is painted on the left side of
the chest.
(10/22/2005)
By pcsupply
Add your voice! Click below to comment. ThriftyFun is powered by your wisdom!