Sowing seeds indoors is a great way to get a jump on the growing season - especially for vegetables and flowers that take a long time to reach maturity. Because you control the growing environment, young plants are protected from harsh weather and hungry animals while they are in their most vulnerable stages of development. By the time you transplant your seedlings to the garden, you've also extended your growing season by as much as two months. Here's how to go from indoor seeds to transplanted seedlings in 12 easy steps.
Advertisement
Review your seed packets. The key to sowing seeds indoors is timing. It's better to start them too late than too early. Read over your seed packets and note any information on starting seeds indoors. Most seeds can be started indoors from six to eight weeks before the date of your last frost. (Find your last frost date here). Really fast growers may only need a month, while the slowest growers may need as long as three or four months before their ready to be transplanted.
Choose your containers. The containers can be store-bought or homemade - it doesn't matter as long they can hold a few inches of soil and provide ample drainage. Many gardeners use disposable aluminum pans, fast food containers, plastic cups, or yogurt containers. Plastic store-bought seed trays are fairly inexpensive and can be reused for several years. Before adding soil, wash the containers and disinfect them in a 10% bleach solution (1 part bleach to 9 parts water). Rinse thoroughly and let them air dry.
Advertisement
Fill the containers with sterilized mix. Look for a commercially available "seed starting mix". These typically consist of a mixture of peat moss, vermiculite, and/or perlite, plus nutrients to aid germination and encourage growth. Pour a small amount of mix into a 5-gallon bucket and thoroughly moisten it before adding it to your containers. This eliminates the need for watering the seeds from the top (and sending them everywhere) after planting them. Fill your containers to within 1/2 inch from the top with the mixture. Use your hand or a stiff piece of cardboard to level the soil.
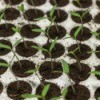
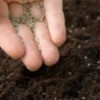
Sow the seeds. If planting more than one type of seed per flat, plant the seeds in rows. Sow thinly. A common mistake is to sow too many seeds per container. This results in crowded plants competing with each other for nutrients and makes thinning and transplanting more difficult.
Advertisement
Small seeds. Sow tiny seeds using a salt shaker (or place seeds individually using a tweezers) and cover them with a light dusting of dry soil mix. Very fine seeds can be pressed lightly into the soil.
Large seeds. For even spacing, place chicken wire over your container and put a seed in each hole. Use a pencil or chopstick to poke each seed into the soil. Cover the with soil according to directions on the seed packet (usually twice as deep as the seed's diameter).
Moisten the seeds. To keep seeds and soil firmly in place, spray them with a gentle mist from a hand-held plant sprayer.
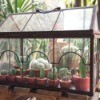
Cover the containers. Cover the container with a clear plastic bag or piece of glass to conserve moisture. (Many store-bought seed trays come with plastic covers.)
Label everything. This is especially important if you are growing more than one type of plant per flat!
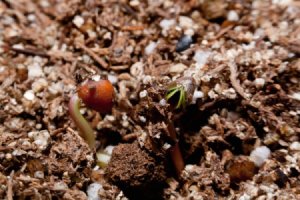
Place seeds in a warm spot. Every type of seed has an optimal soil temperature for germination (usually between 75-85 degrees F). At that temperature, the maximum number of seeds will germinate and in less time than at any other temperature. A few like it warmer or cooler, so check your seed packet for information. Place your seeds on top of a refrigerator or near another heat source until they germinate. If you have the budget for them, electric germination mats are a handy way to speed up the germination process and keep the soil warm while the seedlings grow.
Advertisement
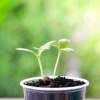
Check frequently for signs of growth. As soon as plants being to emerge, uncover your containers and move the seedlings into bright, indirect light. If you're using fluorescent lights, position the seedlings 1 or 2 inches below the lights for 16 hours each day. Water as needed to keep the planting mix moist.
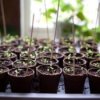
Pot them up. When seedlings are 2 to 3 inches tall and have several sets of true leaves, they should be moved to deeper containers or individual pots so they have more room to grow. Fill the new containers with the same pre-moistened, sterilized growing mix. Use a fork or small spatula to carefully lift and move the seedlings to their new containers. Multiple plants in the same container should be spaced 2 or 3 inches apart.
Begin weekly feedings. By now your seedlings will have used up all the food stores supplied by the seed, so you will need to begin feeding. Use a good liquid fertilizer diluted to half strength once each week. Continue to give them as much light as possible - rotating the containers daily to encourage even growth.
Advertisement
Harden and transplant. In 3 or 4 weeks, or when the overnight temperatures have reached 50 degrees F, start to acclimate your seedlings to outdoor conditions. One or two months after sowing, you can harden off most plants and plant them in the garden. A cold frame is ideal for this, otherwise set the plants outdoors (in a shaded, protected area) for a few hours, and gradually increase their exposure to the brighter light and outdoor temperature over a period of 10-14 days before moving them to their permanent position.
 Sowing seeds indoors is a great way to get a jump on the growing season - especially for vegetables and flowers that take a long time to reach maturity. Because you control the growing environment, young plants are protected from harsh weather and hungry animals while they are in their most vulnerable stages of development. By the time you transplant your seedlings to the garden, you've also extended your growing season by as much as two months. Here's how to go from indoor seeds to transplanted seedlings in 12 easy steps.