social

Making a Shadow Box

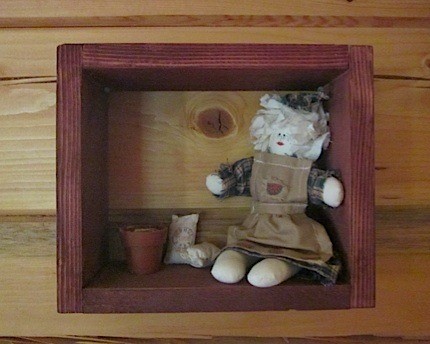
I knew that I needed something on one of my walls so I went to the garage and found 1/2 inch by 4 inch lumber. I cut the size box that I wanted and glued it together. I let the glue dry and painted with watered down acrylics. Next I found old scraps of fabric and assembled a doll free hand. A couple of $1 store extras and you have a shadowbox. You can put anything you like in your box, I sew a little bit so I made the doll.

Advertisement

Approximate Time: 2 hours

Supplies:

  • wood and wood glue
  • acrylic paint
  • fabric scraps
  • permanent fine markers for face
  • $1 store trinkets
  • rag

Instructions:

  1. Cut wood to size of box wanted. (You only need 4 pieces.)
  2. Glue the box together.
  3. Let dry.
  4. Paint with a rag and watered down acrylic color you'd like.
  5. Put together your shadowbox scene. I used a doll, plastic flower pot, and flour sack.

By lnygaard from Billings, MT

Fabric doll in shadow box.
 

Add your voice! Click below to comment. ThriftyFun is powered by your wisdom!

 
Anonymous
September 13, 20120 found this helpful

Very cute.


Add your voice! Click below to comment. ThriftyFun is powered by your wisdom!

 
In This Page
Categories
Crafts Home Decor WallsSeptember 11, 2012
Pages
More
🍀
St. Patrick's Ideas!
🎂
Birthday Ideas!
💘
Valentine's Ideas!
Facebook
Pinterest
YouTube
Instagram
Categories
Better LivingBudget & FinanceBusiness and LegalComputersConsumer AdviceCoronavirusCraftsEducationEntertainmentFood and RecipesHealth & BeautyHolidays and PartiesHome and GardenMake Your OwnOrganizingParentingPetsPhotosTravel and RecreationWeddings
Published by ThriftyFun.
Desktop Page | View Mobile
Disclaimer | Privacy Policy | Contact Us
Generated 2024-02-02 16:21:20 in 3 secs. ⛅️️
© 1997-2024 by Cumuli, Inc. All Rights Reserved.
https://www.thriftyfun.com/Making-a-Shadow-Box.html