Here's some instructions for making your own treasure box to give as a Valentine's Day gift or for other occasions.
Needed Items:
- small cardboard gift type box, cigar box, or jewelry box
- yarn
- felt or other fabric scraps
- scissors
- glue
- aluminum foil
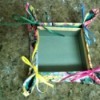
Turn a small box into a treasure box for someone special.
Directions:
- Cut the yarn into different lengths. Glue the yarn on the sides and top of the box in a pattern or design: hearts, diamonds, zigzags, curvy lines, or spirals.
- Tie several knots in a piece of yarn and glue the yarn along the edges of the lid or box to give the look of nails or bolts. Be careful not to glue the yarn on the top edges of the box where the lid will fit.
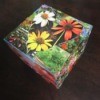
- Crumple pieces of aluminum foil and then smooth the pieces back out. Spread glue on the box and the lid. Place one piece of foil on the box and one on the lid. Press the foil against the surface of the box and lid with your finger. Push the foil on and around the yarn designs. It will make the foil look like embossed silver. Cut off the excess foil.
- Cut a piece of colorful felt to lay inside the box. If you are using other fabric, take a piece of cardboard and cover the front side with the fabric, gluing the edges to the back. Put the nice side up. Glass gems can also be attached with glue.