social

Sturdy Felt Hat

An inexpensive homemade felt hat that holds any shape you like!

Approximate Time: Less than 2 hours, plus drying time

Supplies:

  • craft store felt - at least twice the surface area you want to create
    Advertisement

  • Elmer's Glue-All Multi-Purpose Glue
  • medium size paint brush
  • Styrofoam or cardboard - enough to make a mold for the hat
  • sewing machine (depending on how complicated you want the hat to be)
  • sewing needle
  • thread
  • ribbon (not necessary, but recommended)
  • sewing pins - at least 20
  • webbing or an old tie

Instructions:

These instructions are adaptable to any kind of hat, but they detail a multi-color fedora since that will cover the most complicated aspects of hat-making. If you just want a bonnet, your life will be much easier!

  1. Make or find a mold of the shape of the hat you want, but don't worry about a rim until step 8.

    For example, if you want a spherical hat, you could find an (expired! - it will get stabbed) soccer ball the size of your head. If you want something more complicated, you may need to make a mold out of Styrofoam or cardboard.

    Advertisement

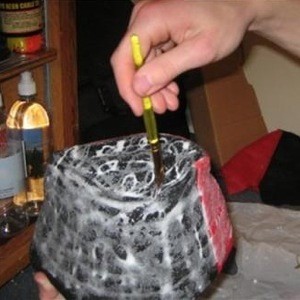
    To make a mold out of Styrofoam, either find a piece as big as the hat you want to make, or glue together many layers until they are as big as the hat you want to make. Once the glue dries, then in a sink, outside, or on a tarp (unless you want to vacuum for the next hour), take a knife and carve it to the shape you want. Be sure to make the base of the mold the same size as your head (use a tape measure or have a friend do a side-by-side comparison).

    Tip: Don't be generous when you carve. You can always take more off, but you can't put it back on.

    To make a mold out of cardboard, tape the cardboard in the shape you want (for a top hat, tape it into a cylinder). Again, be sure to make the base of the mold the same size as your head.

  2. Shape the felt to cover your mold. If one sheet of felt won't cover your mold, you need to either stretch the felt, sew two pieces together, or both. If your mold is cylindrical (a top hat, a fedora), you need to sew your felt into a cylinder of that shape. The final product should stretch tightly onto your mold, and look exactly as you want it to look when it is done.
    Advertisement

  3. Do it again so you have two of the same felt template.

  4. Stretch one layer of felt onto your mold and smother it in glue.

  5. Stretch the second layer of felt over the first and pin it down with sewing pins. If you have any indents in your design be sure to pin those down. DO NOT use thumb tacks as I did -- the circles from the tack will show on the finished product.

  6. Wait for the glue to dry. Overnight is probably best.

  7. If you plan on reusing the mold, carefully and slowly remove the felt from the mold. You may need to slip a knife between the mold and the felt to get it off. If this is a one-time project, you can be a little less polite.

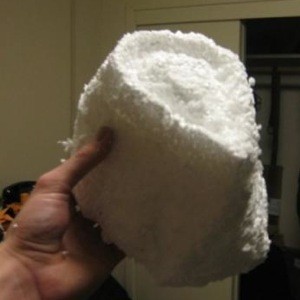
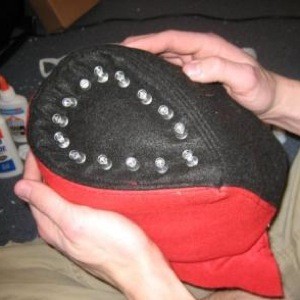
    Notice that, since the glue is dry, the felt holds its shape.

  8. If you want a stiff rim, do the same process as above to create it. To size the inside of the rim, trace the outside of the hat onto some felt, and then trace 1/3 inch inside of that circle for seam allowance. Don't glue the allowance together.
    Advertisement

  9. If you want a ribbon: Pin the top of the rim's seam allowance onto the outside of the hat.

    If you don't want a ribbon: Pin all of the allowance to the inside of the hat and forgo steps 14 and 15.

  10. If you are using an old tie, rip out the thread and take out the webbing. Now, take your webbing (from the tie or the store) and sew it in a circle so it fits around your head.

    Webbing keeps the hat from stretching.

  11. Pin the webbing between the inside of the hat and the bottom of the rim's seam allowance.

  12. Test fit the hat, being careful of the pins. It should fit exactly as you want it to. If not, keep pinning until you get it right.

  13. Sew the rim and webbing on by sewing around the bottom of the hat. If you are using a ribbon, this can be a hideous stitch; if not, it should be beautiful.
    Advertisement

  14. Pin the ribbon on all the way around the hat, over the outside layer of seam allowance. If you want, wrap another length of ribbon vertically around where the original connects to itself, and pin it flat to the hat. This will hide all the seams.

  15. Sew the ribbon on. I recommend doing it by hand.

  16. Walk tall and proud with your new felt hat!

By Quixotic Ducky from Tacoma, WA

Sturdy Felt Hat

Sturdy Felt Hat

Sturdy Felt Hat

Sturdy Felt Hat

Add your voice! Click below to comment. ThriftyFun is powered by your wisdom!

 
In This Page
Categories
Crafts ClothingDecember 29, 2009
Pages
More
🍀
St. Patrick's Ideas!
🎂
Birthday Ideas!
💘
Valentine's Ideas!
Facebook
Pinterest
YouTube
Instagram
Categories
Better LivingBudget & FinanceBusiness and LegalComputersConsumer AdviceCoronavirusCraftsEducationEntertainmentFood and RecipesHealth & BeautyHolidays and PartiesHome and GardenMake Your OwnOrganizingParentingPetsPhotosTravel and RecreationWeddings
Published by ThriftyFun.
Desktop Page | View Mobile
Disclaimer | Privacy Policy | Contact Us
Generated 2024-01-22 18:31:38 in 2 secs. ⛅️️
© 1997-2024 by Cumuli, Inc. All Rights Reserved.
https://www.thriftyfun.com/tf14104161.tip.html