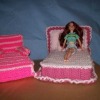
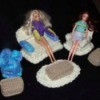
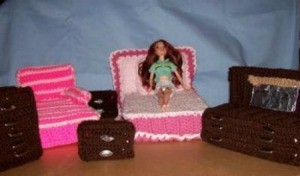
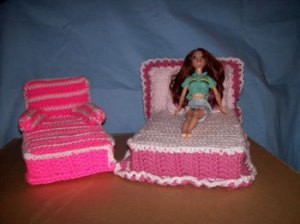
 This is the third and final part of the crocheted furniture for Barbie or other small dolls. Since pink is Barbie's signature color, pulled out all of the pink yarns I could find. But if your little interior decorator doesn't like pink or would rather have a blue bedroom that is up to you.
Again you are making slip covers for the bases which are made out of polystyrene or Styrofoam or cigarette boxes. If made with the polystyrene or cigarette boxes this is pretty light weight furniture so why not make a duffel bag to store it in and make it portable. Another idea would be to find a small suitcase, decoupage the outside and store the furniture in it. The suit case will have pockets that they can store any accessories that you make. An average crocheter working in the evenings should be able to finish the bedroom set in a week.
Some tips: Due to the fact that all people have different tension, you can measure your starting chain against your block of polystyrene or cigarette boxes. Then just adjust the pattern from there.
The chaise can be made a solid color by making two bottom pieces and the back can be made solid by not doing the color changes.
I am sure that a lot of you know someone who smokes, if they smoke soft packs ask them to switch to the box for a carton and you will have plenty of cigarette box's to use. I choose cigarette box's because they are plentiful for anyone to get there hands on and they litter our highways and byways. This is a good wholesome way to get rid of them. Also if your child is allergic to nicotine they can be sprayed with a clear sealer before hand to seal in the nicotine from the tobacco residue.
Top and Bottom: Make 2 total
Row 1: Chain 27 in third chain from hook Dc and in each stitch across. Chain 2, turn.
Center Band:
Row 1: Chain 9 in third chain from hook Dc and in each stitch across
Row 2-52: Dc in each stitch across, Chain 2, turn except for last row.
Fasten off and work in ends.
Assembly:Slip Stitch top to center band, then slip stitch bottom on leaving enough room to slide in polystyrene or Styrofoam then continue closing. Add ruffle to bottom.
Ruffle:
Three Dc in every other stitch around bottom of bed. With contrasting color attach and make picot edging (Chain 4 slipstitch between shells on ruffle) all the way around.
Headboard: Make 2
Row 1: Chain 27 in third chain from hook Dc and in each stitch across. Chain 2, turn.
Row 2-9: Dc in each stitch across Chain 2, turn except for last row.
Assembly: Slip stitch two pieces together with polystyrene or Styrofoam in between layers.
Ruffle:
Three Dc in every other stitch around top and sides leaving bottom with no ruffle. With contrasting color attach and make picot edging (Chain 4 slipstitch between shells on ruffle) all the way around.
Pillow: Make 2
Row 1: Chain 17 in third chain from hook Dc and in each stitch across. Chain 2, turn.
Row 2-5: Dc in each stitch across, Chain 2, turn except for last row.
Assembly: Slip stitch together with polystyrene or stuffing between layers.
Ruffle: 3 dc evenly spaced around edges.Bed Assembly: Whip stitch headboard to bed base. Whip stitch pillow to center of bed.
Top of Base: Make: 1
Row 1: Chain 22 in third chain from hook Sc and in each stitch across. Chain 2, turn.
Row 2: Sc in each stitch across until last stitch work until last two loops on hook and make a loop of contrasting color and work through last two loops (Color change made) Chain 2 turn.
Bottom of Base
Row 1: Chain 22 in third chain for hook Dc and in each stitch across Chain 2 turn.
Row 2-17: Dc in each stitch across, Chain 2 turn except for last row.
Fasten off and work in ends.
Center Band:
Row 1: Chain 9 in third chain from hook Dc and in each stitch across
Row 2-50: Dc in each stitch across, Chain 2, turn except for last row.Fasten off and work in ends.
Assembly of Base of Chaise Lounge: Same as for bed with out the ruffle.
Back of Chaise Lounge: Make 2
Row 1: Chain 22 in third chain from hook Sc and in each stitch across. Chain 2, turn.
Row 2: Sc in each stitch across until last stitch work until last two loops on hook and make a loop of contrasting color and work through last two loops (Color change made) Chain 2 turn.
Row 3: With contrasting color Sc in each stitch across. Repeat color change. Chain 2, turn.
Continue in Pattern, 2 rows main color one row contrasting color until you have completed 13 rows ending with 1 row main color.
Assembly: Same as for headboard on bed without the ruffle.
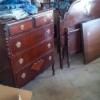
Make: 2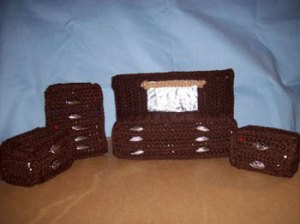
Top and bottom:
Row 1 Chain 14 in third chain from hook Dc and each stitch across, Chain 2 turn.
Row 2-4 Dc in each stitch across, Chain 2 turn except for last row.
Fasten off and work in ends.
Sides: Make 2
Row 1: Chain 10 and in third chain from hook Dc and in each stitch across, Chain 2 turn.
Row 2-3: Dc in each stitch across, Chain 2 turn except for last row.
Fasten off and work in ends.
Back: Make 1
Row 1: Chain 14 in third chain from hook Dc and each stitch across, Chain 2 turn.
Row 2-3: Dc in each stitch across, Chain 2 turn except for last row.
Fasten off and work in ends.
Front: Make 2
Row 1: Chain 12 in third chain from hook Dc and each stitch across, Chain 2 turn.
Row 2: slip stitch along row, down across the end, back up the other side and across the last end. Fasten off and work in ends. Slip stitch in back loops only both drawer fronts together in center. Wire a bead on each for drawer handle.
Assembly: Slip stitch sides and front and back together. Slip stitch top on to sides and front and back. Put in your boxes or polystyrene. Slip stitch bottom on enclosing box's or polystyrene. Work in ends.
Front and Back:
Row 1: Chain 14 in third chain from hook Dc and each stitch across, Chain 2 turn.
Row 2-4: Dc in each stitch across, Chain 2 turn except for last row.
Fasten off and work in ends.
Center Band:
Row 1: Chain 10 in third chain from hook Dc and in each stitch across, Chain 2 turn.
Rows 2-28: Dc in each stitch across, Chain 2, Turn except for last row.
Fasten off and work in ends.
Assembly: On the front of your piece of your chest, wire 5 beads evenly down the front. Slip stitch front and back to center band, work in ends.
Front and Back of Base
Row 1: Chain 33 in third chain from hook Dc and in each stitch across. Chain 2 Turn.
Row 2-4: Dc in each stitch Chain 2 turn except for last row.
Fasten off and work in ends.
Center Band:
Row 1: Chain 12 in third chain from hook Dc and in each stitch across, Chain 2 turn.
Rows 2-37: Dc in each stitch across, Chain 2, turn except for last row.
Fasten off and work in ends.
Assembly: On front panel evenly space 3 beads on one side of front and three beads on the other side. (Dividing it in half). Slip stitch center band together to form ring and then slipstitch front and back to ring with base in between.
Backing to Mirror:
Row 1: Chain 22 in third chain from hook Dc and in each stitch across.
Row 2-16: Dc in each stitch across, Chain 2 turn except for last row.
Fasten off and work in ends.
Assembly: Slip stitch together over polystyrene. Whip stitch to base. Add mirror.
Bar for Mirror:
Row 1: Chain 27 in 2 chain from hook sc and in each stitch across.
Fasten off and work in your ends. Tie knot at each end.
Mirror is a piece of foil folded to make thicknesses to desired size and glue into place with crocheted bar glued above it.
I think every one should have a Barbie bedroom. I hope that crocheters out there have enjoyed this series. But please remember that these are just the basic pieces. By now you have caught on to the fact that there are many different shapes you can come up with. Cigarette boxes could be stacked to make an entertainment center or a long table. You can cut Styrofoam easily enough to make any shape you would wish to cover. I tried to keep the shapes simple and did not use fancy stitches so I could keep it quick and easy, but you could use other stitches as well to make it different.
I also did not make any accessories which I figure you all would like to play around with. But here are some suggestions: Buy a small terracotta pot at a craft store (I know Michael's sells them) and add some silk flowers or leaves and you have potted plants. Lamp shades can be made from those little medicine cups and painted or a bead trim added and a medicine bottle could be used as the base. Crochet a small afghan and throw it on the bed or chaise or couch. You could also make more pillows. Crochet around a square base and it could become a computer or a TV set.
Barbie could have a play room or rec room by taking the couch pattern and adding the table and chairs from the kitchen and maybe the china hutch. More cabinets for the kitchen could be made by covering more bases. A couple of chaises and the table and chairs could be used for a sun room. Barbie could have an office with the five drawer chest as a file cabinet and stacking boxes for a desk. Three boxes on each side with beads wired on for drawer handles and a small polystyrene top would easily make the desk. If anyone comes up with more ideas, write an article and send it into Thriftyfun. I would love to see what you have done.
I love the patterns.
My 2 great granddaughters will love them, too
Thank you, Debra
Shirley
I am making the items for my granddaughter whose 6th birthday is March 30th. She will LOVE them! Thank you so much for sharing!!! Barbara
How cute and clever this set is! You did an outstanding job. I just completed a purse set for Barbie using old cassette tape as yarn. If anyone needs the pattern it's free at http://www.myrecycledbags.com
Thanks again for sharing such a neat project with us!
Cindy
www.myrecycledbags.com/
A website dedicated to recycling & crafting
I love the pattern it's so cute Do you know where I can find more free patterns