ThriftyFun Logo
Home   Find   Ask   Share   Answer   Join   Index   Login  
 
 User Login:  Username:    Password:      Forgot It?  | Join ThriftyFun!

 - Beauty
 - Budget and Finance
 - Cleaning
 - Consumer Advice
 - Craft Projects
 - Craft Tips
 - Food Tips
 - Garage Sales
 - Gardening
 - Gifts
 - Green Living
 - Home Improvement
 - Organizing
 - Parenting
 - Parties
 - Pest Control
 - Pets
 - Product Reviews
 - Recipes
 - Repair
 - Weddings for Less

RSS Feed
About Us
Media
Advertising
Contact Us
Privacy Statement
Disclaimer

Craft Project: Popsicle Stick Trinket Box

1x1
Date: 06/19/2009 Topics: Craft Projects > Gifts | Father's Day > Crafts | Photos > Crafts  
1x1
Post Feedback | Get Responses | Bookmark | Link | Print | Print (With Feedback) | Rate: Thumbs Up Thumbs Down | Bookmark and Share
Craft Project: Popsicle Stick Trinket Box
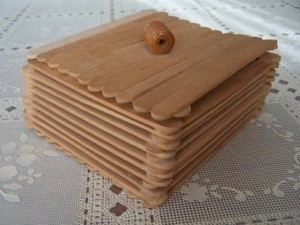
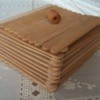
Easy box to make using Popsicle sticks layered and glued together to put trinkets in such as coins, jewelry, coupons, memorabilia, photos, receipts, pins, buttons, etc. Great Father's Day gift. My daughter made this for her dad at Girl Scouts.

Approximate Time: 1 day (accounting for the glue drying time)

Supplies:

  • Wood glue
  • 60 clean sticks
  • Large button for handle

Instructions:

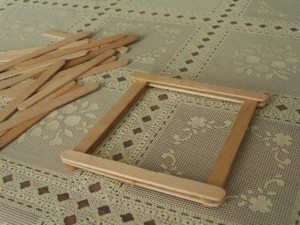
Lay the 2 sticks out across from each other on your left and one on your right.

Lay 2 more across the first 2 in the opposite direction. Glue the tips of the sticks where they touch at the corners.

Add each row gluing the corners.

This box has 9 rows (36 sticks for the 4 sides).

The bottom can be glued on after the rows are completely dried. Put a layer of glue on the complete bottom after it has been glued to the sticks on the side.

The top is made by laying 2 sticks opposite each other. Lay each stick close to each other and going across the first 2 laid down. Gluing to the 2 laid down first. After dried put a layer of glue across the whole top to hold sticks in place.

Attach a large button for the handle.

Let each piece dry completely. Paint and decorate as you please.

By Little Suzy from Millbury, Oh

(1x1 graphic )
Previous: Repairing Cat Scratches on Wicker Furniture ThriftyFun Next: Rubbing Alcohol for Carpet Stains
(1x1 graphic )
1x1
1x1
 Feedback
1x1
1x1
1x1

No Feedback Yet

Be the first to post feedback! Click here to post feedback.

1x1
1x1
 Post Feedback:
1x1
1x1
1x1

Login using the form on the top of the page to post feedback (if you are a registered user). If you have not yet registered, click here to do so. It's FREE!.

1x1
(1x1 graphic )

© 1997-2009 ThriftyFun.com - Design by Cumuli Design
Disclaimer: ThriftyFun.com cannot accept any responsibility for any injury or damage that you may cause to yourself, others, or property when following any advice given on this site. Read the full disclaimer. If you find any information on ThriftyFun.com or in our newsletters that is either erroneous and/or potentially harmful to others, please Contact Us, immediately.